What did you do to your FX / QX70 today?

I actually drove mine! Got it back from a total re-paint along with a new windshield and an invisible bra, 4 days ago, but the weather has been crappy!

I need an exhaust!!

@tChuck,, my local stereo shop is raving about Rockford Fosgate,, they re-tooled their way of doing things and you can make your whip sound sick for around $1300. That includes ace-ing that center channel.
 
...
@tChuck,, my local stereo shop is raving about Rockford Fosgate,, they re-tooled their way of doing things and you can make your whip sound sick for around $1300. That includes ace-ing that center channel.

RF makes some great stuff. Are you going to do it?
 
Drove to downtown Detroit with the wife.

Currently at the Michael Jackson The Immortal World Tour Cirque Du Soleil 21st row on the floor at Joe Louis Arena!!
 
Go Tim, go. I replaced the passenger side steering knuckle, hub bearing, hub and lower ball joint on our "fam mobile" and took it to an alignment yesterday (8am - 4pm with breaks in between). All good now, finally.
 
Nick,

I know you're just test fitting so it probably doesn't matter, but the wheel is on the wrong side. Make sure all your tires are mounted correctly since those tires are directional. I always notice these things haha. One time on a Mustang forums I pointed it out to a guy.
 
Just finished the 3M wrap. Tried to do the steering wheel without taking it apart. It is FAR from perfect! much more difficult to get the cuts right with the controls there.
2011-10-16_12-59-38_703.jpg
the start
2011-10-16_14-11-37_436.jpg
Finish...didn't do a straight on shot because then you would be able to see how bad it was!
 
Nick,

I know you're just test fitting so it probably doesn't matter, but the wheel is on the wrong side. Make sure all your tires are mounted correctly since those tires are directional. I always notice these things haha. One time on a Mustang forums I pointed it out to a guy.
You're right. Going out to garage to check them out....

---------- Post added at 02:00 PM ---------- Previous post was at 01:17 PM ----------

Yup they're good. Thanks for the heads up stu
 
Cool, no problem. I know when I got mine mounted, the guy actually marked each wheel ahead of time for front, rear, left, and right.
 
my cuts weren't that great...not much room for error with the buttons there. There is some stock color showing in some spots. But avoiding the hassle of taking it all apart I am satisfied for now. If it starts peeling bad I will do it again.
 
Is this the final resolution for the spacer/stud debacle?

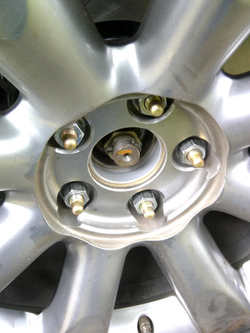
The SS Debacle has officially sailed! To be honest, I'm glad to see the bitch go. :tongue (2): Installed are H&R 20mm DRS spacers and ARP wheel studs at all four corners. It looks good, I feel good about it, and my center caps still fit. Unless H&R decides to make a 25mm DRS spacer I am not even going to consider changing this setup again.

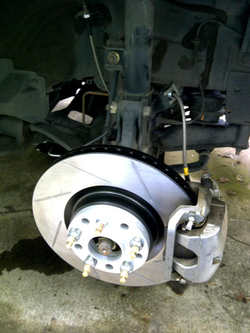
So, in a little under 7hrs I finished all the FX work aside from the rear pads and rotors. I would have easily finished today but my correct rear rotors are still en route from R1, and I didn't want to install the new pads without them. On that list was an air filter cleaning, wheel stud install (front), pad + rotor install (front), braided ss brake lines (f+r), spacers (f), lug nuts (f), a trip to a local tire shop for lug nuts, and brake fluid flush. Everything went very smoothly aside from disconnecting the hard brake line at the rear driver's side, which required a couple shots of PBlaster and about a half hour of downtime. I haven't burned in the pads and rotors yet but at least they're installed. The forecast calls for sun tomorrow so I'm hoping to get out and give the ABS system a workout. :top:

Here are some pics...

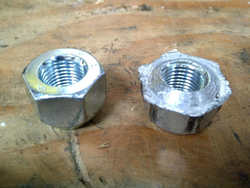
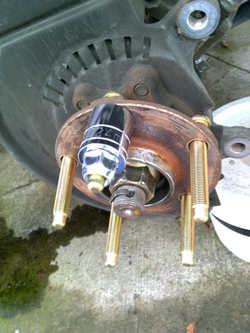
When installing the new wheel studs, one way to "press" them in is to thread the conical lug nut backwards and tighten it down to pull the studs into place. For the sake of my limited socket depth I had to also use another large socket as a spacer, like this:
IMG-20111016-00702.jpg

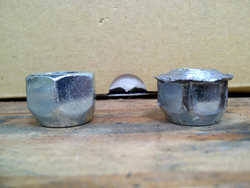
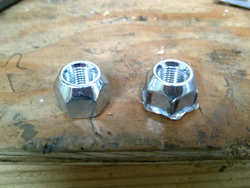
The new studs are so tough that my impact wrench actually started to pull the lug inside out, and even then the studs weren't fully seated. I had to torque down the wheels several times in order to seat the new studs. The "seating nut" is on the right and a new one on the left for comparison. If you choose this method, plan on destroying at least one nut.
IMG-20111016-00703.jpg
IMG-20111016-00704.jpg
IMG-20111016-00705.jpg

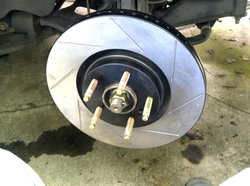
Studs mostly seated, new R1 Premium slotted rotor installed.
IMG-20111016-00707.jpg

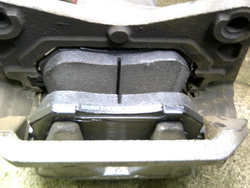
New Stoptech pads installed.
IMG-20111016-00706.jpg

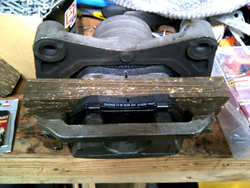
I didn't want to drive all the way to the parts store for a caliper piston spreader so I used some flooring shims I had lying around to create enough of a gap to get the new pads onto the new rotor. It worked fine.
IMG-20111016-00709.jpg

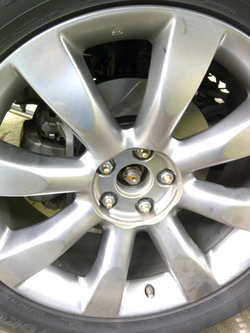
Pads, rotors, spacers, Stoptech lines, and lugs installed. Final torque down to seat the studs.
IMG-20111016-00708.jpg

This is how much the WRX studs extend beyond the 20mm spacers when fully seated. Plenty of room for the oem center caps and enough for thicker spacers in the future if it comes to that. Not that I'm planning on thicker spacers...
IMG-20111016-00711.jpg
IMG-20111016-00712.jpg

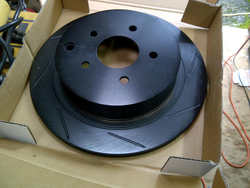
Here's one of the zinc coated and slotted eline rotors that R1 sent me by mistake. I'm not sure if they'll even fit, but they are WAY lighter than the premiums. I would guess about 30-40% lighter...
IMG-20111015-00697.jpg
 
Nice pictorial man! Must feel good to be done with this.....How does the ride look now? What do you think of the rotors over OE?
 
Nice pictorial man! Must feel good to be done with this.....How does the ride look now? What do you think of the rotors over OE?

Thanks buddy. It looks good. I'll take some more pics and actually drive it tomorrow. I had baby duty this evening so I stopped work before the test drive.
 
Back
Top