What did you do to your FX / QX70 today?

Stripped her down of all trim, molding, handles and such for repaint job tomorrow. Dropping her off first thing in the morning. Won't see her until Wednesday! Fingers crossed.
 
Stripped her down of all trim, molding, handles and such for repaint job tomorrow. Dropping her off first thing in the morning. Won't see her until Wednesday! Fingers crossed.

How big of a pain in the ass was that?

Re & Re was the hardest job of my wrap (probably cause I gave the hard parts for someone else to do).
 
It didn't take much time, the wheel well trims all came off without any hassle, so did the driver side rocker panel, the passenger side was giving me a hard time, and rear window rubber bottom seal. The only thing they will have to remove are the tail lights and head lights.
Car looks so weird when it's stripped off like that lol.
 
Andy, I didn't even think of taking the pics. Will do when I pick her up on Wednesday.
Hopefully the weather will improve so I can paint the lower trim in gunmetal.
 
Yeah most of the car is really easy, like the door handles and wheel trim.

The two pieces that I absolutely got frustrated with was the chrome trim at the bottom of the door and the belt trim just under the windows.

In the end the chrome trim just required some new clips for reinstallation (NBD).

But those belt strips are easy to bend and become deformed. I am currently awaiting infiniti parts USA to send all 4 as new (i decided to replace all 4 instead of just 2 that were bent, so they all match in colour).

EDIT:
IMAG0501_zps265406ee.jpg
 
Last edited:
Re-aasembled housing around original cluster and also paneling around paddle shifters. Moved steering column moving joystick into new location straight down the middle.


iPad HD
 
Last edited:
Why did you replace the trim below the window? They don't seem to need to be removed for wrap. Were they faded?

They were removed for the wrap albeit that was probably not entirely necessary. They were also somewhat faded, but most of the reason was that I fucked up two of them taking them off. I bent them just enough that they didn't sit quite right, and then when trying to fix one of them I made it WAYYY worse.

Decided 4 new moldings was the way to go.
 
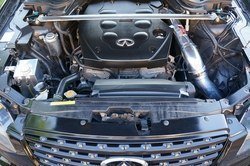
Okay so I spent over 4 hours trying to put in the weapon R PS reservoir. For the record I knew going into this that it wasn't just going to be bolt up, but it easily spiralled past even my initial thought. I do not suggest anyone ever tries to bother with this. I quite simply is not worth the trouble.

Anyway the main issues were:

A) The actual fitting ends are incorrect, I eventually had to cut off one of the fitting bevels and even then the hose would not slip onto the hose. The next step here is to purchase a new hose and chamfer the ends of both the fitting and the hose.

B) obviously due to the design of the tank for use in a g35 the brackets do not bolt up correctly. In fact they don't even come close to anything that could work. Therefore an entirely new bracket will need to be bent/welded/fabricated in order to support the tank.

Because of the above two reasons and the fact that if I really want to do this I want to do it correctly I abandoned the install yesterday. I ended up plastidipping the OEM tank black (left a strip so I can see the fluid level), and reinstalled that with new fluid.

I will revisit the weapon R PS install once I have a bit more time, in the meantime I am going to grab a spare OEM bracket and the PS reservoir and visit a local welding shop to see if they can mock up a bracket that bolts up to the 3 OEM mounting locations and also bolts up to the new PS tank correctly.

If the option above is a no go fabricating an entirely new tank is my next option. That way I can have the tank brackets made to the correct specs and it will bolt up without any other brackets. Then I would have to either get the tank plated, or powder coated or w/e.

Again not fucking worth it. The maximum I would ever recommend to anyone is to dip the stock tank black and call it a day, but now that I have started I don't want to stop.

---------- Post added at 11:17 AM ---------- Previous post was at 11:16 AM ----------

For anyone wondering what I am on about, see this thread:

http://my350z.com/forum/engine-driv...rsteering-tank-and-coolant-overflow-tank.html

I ran into all this guys problems plus a bunch more.
 
Any pics of how the brackets don't line up? I was going to pick one up and install, thought it would be a simple bolt on like the coolant overflow. That took me 10 minutes.
 
Any pics of how the brackets don't line up? I was going to pick one up and install, thought it would be a simple bolt on like the coolant overflow. That took me 10 minutes.

I will snap a few pictures tonight for you. I did the coolant overflow as well took me longer to find my drill than to actually install the thing. This however is a completely different animal.

I would honestly forgo the spending 70 bucks on the weapon R tank and just go custom from the beginning. Any fabrication shop should be able to weld a small stainless reservoir with some form of custom brackets. Just a matter of cost.
 
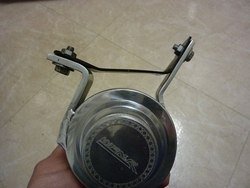
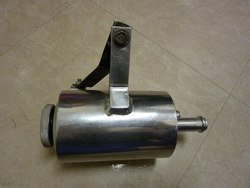
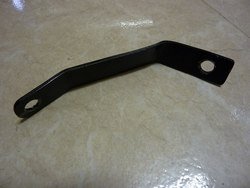
Here is how I mount the Weapon-R coolant and power steering tanks in my FX35. I bent the stock bracket the coolant, install a rivet nut (I can't remember if I drill a hole or an existing one), and mount the coolant tank to it. The PS tank, I bent a strip of metal to connect the tow brackets on the tank as a support and I mount the assembly on just on bottom hole to the factory bracket. It secure enough just with one bolt to the factory bracket. I can't remember if I had to take the factory bracket of the car to mount the tank to it or what, but its do able. One thing I don't like about it this tank is one of the outlet nipple is way too big to use the factory hose, so I use a radiator hose but the other of that hose is now a little too big for the metal PS line. I think the factory hose may be short as well.
DSC00035_S_zps329ded9b.jpg

P1060634_zps4cc21fea.jpg

P1060628_zps69ffd2e8.jpg

P1060630_zpsa2149276.jpg
 
Back
Top