So I check out that DIY that u posted the pretiqious society pack is a bit over price for my liking just to get DVD workingwill cost me over 350 shipped that's abit too much for me so what I will do is take everything apart this weekend and take a picture of the wires hopefully u or some one can point out which one I need to cut it be much appriciated...

You are using an out of date browser. It may not display this or other websites correctly.
You should upgrade or use an alternative browser.
You should upgrade or use an alternative browser.
Enable AUX/Video input while driving
- Thread starter rijc99
- Start date
- Status
- Not open for further replies.
Nice job, i ended up doing this also. Only thing i didn't like is how it had to be in sport mode for the navi to work. i ended up taking the switch apart and i moved the little copper contacts so it can work while in auto and cut out in sport mode. Also hooked up the illumination wires. If you would like it to illuminate at night, tap the red wire from the snow switch and connect it to pin 4, also have to tap the Grey wire from the snow switch and connect it to pin 2
heres a quick reference to the damper switch, sorry no time for a picture:
5 6
--3
--2
4 1
Oh and 1 and 3 are used for the VSS wires for the people that want to do this mod
Wish I knew this when I did my switch, would have liked it the way you had it done. But it's all good, i could live with it.
Hmmmm.... Maybe one day in the future I'll get another switch and redo it, since I can't reuse my switch, I added hot glue to make sure he wires stay in place.
Thanks, but I just got it... Looks like the connector (pin32) is similar, but the wires have changed.. Will re-do this on the weekend..
******************
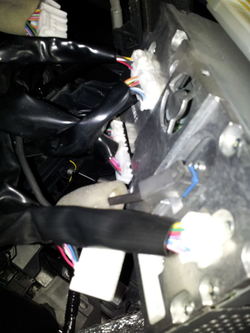
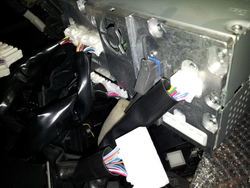
Did it this weekend without a hitch... The wiring is different for the 2009 and 2010; doesn't make sense to me, but it is. For a 2010 non-nav the wires are located on the connector that is on the oppositte side of the 3 black antenna wires. If you're sitting in the car and facing the front of the AV unit, the plug is on the bottom left of the unit. Cut the red and ground the violet (wire coming from the plug)...
Cheers.
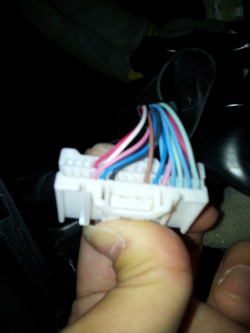
hey PMG-705 i took the unit apart found the connector opposite to the 3 antenna wires bottom left can you confirm is the right one in the picture i took and also on that connector there's 2 red wires i don't know which one to cut i found the violet wires please take a look and help me out thank you


 Front connector
 back of connector
Attachments
-
 20120721_183052.jpg79 KB · Views: 72
 -
 20120721_182500.jpg116.9 KB · Views: 58
 -
 20120721_183052.jpg79 KB · Views: 74
 -
 20120721_183052.jpg79 KB · Views: 58
 -
 20120721_182500.jpg116.9 KB · Views: 69
 -
 20120721_182500.jpg116.9 KB · Views: 56
 -
 20120721_182500.jpg116.9 KB · Views: 62
 -
 20120721_184840.jpg57.9 KB · Views: 53
 -
 20120721_182500.jpg116.9 KB · Views: 48
 -
 20120721_182500.jpg116.9 KB · Views: 51
 -
 20120721_184801.jpg43.5 KB · Views: 47
 -
 20120721_184801.jpg43.5 KB · Views: 77
 -
 20120721_184840.jpg57.9 KB · Views: 75
 -
 20120721_184801.jpg43.5 KB · Views: 57
 -
 20120721_184840.jpg57.9 KB · Views: 52
 -
 20120721_183052.jpg79 KB · Views: 75
 -
 20120721_184801.jpg43.5 KB · Views: 49
 -
 20120721_184840.jpg57.9 KB · Views: 52
 -
 20120721_182500.jpg116.9 KB · Views: 54
 -
 20120721_182500.jpg116.9 KB · Views: 85
 -
 20120721_183052.jpg79 KB · Views: 52
 -
 20120721_184801.jpg43.5 KB · Views: 47
 -
 20120721_184840.jpg57.9 KB · Views: 63
 -
 20120721_182500.jpg116.9 KB · Views: 55
 -
 20120721_182500.jpg116.9 KB · Views: 61
 -
 20120721_182500.jpg116.9 KB · Views: 54
- Car
- FX
hey PMG-705 i took the unit apart found the connector opposite to the 3 antenna wires bottom left can you confirm is the right one in the picture i took and also on that connector there's 2 red wires i don't know which one to cut i found the violet wires please take a look and help me out thank you
Front connector
back of connector
You want the ones that are next to each other.. cut the red speed wire and wrap both ends with electrical tape. Ground the violet wire that is coming OUT of the plug.. have fun.
Attachments


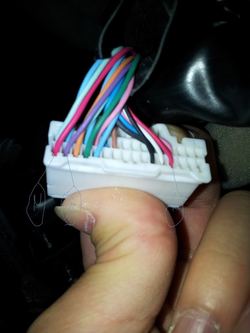


You want the ones that are next to each other.. cut the red speed wire and wrap both ends with electrical tape. Ground the violet wire that is coming OUT of the plug.. have fun.
thank for getting back PMG705 but one more question so tape both of the red ends ground the violet wire end that is coming out of the connector to a screw like rijc99 have in the first page .. what about the other violet end that is coming out of the SUV do i just tape it up too ?
Either way we want pics!
sorry i was away for a vacation everything work find after this mod best mod i ever done thank to PMG-705 for the awesome help ...couldn't find no AC car outlet had to buy power converter for the hdd player and HDrive but i tug everything inside the panel so is not too messy but work great
So I check out that DIY that u posted the pretiqious society pack is a bit over price for my liking just to get DVD workingwill cost me over 350 shipped that's abit too much for me so what I will do is take everything apart this weekend and take a picture of the wires hopefully u or some one can point out which one I need to cut it be much appriciated...
For those looking for a reasonably priced plug and play solution because they are either not comfortable cutting wires or simply don't want to, take a look at our kits http://www.carkitcompany.com .
In addition to using a plug and play harness we use a remote to activate the bypasses to avoid having to mount a switch. Also if you prefer you can pair our remote to your homelink buttons on the rearview mirror and use those instead of the remote.
Last edited:
First gen! Don't forget about us too
WOW wish you guys would tell me sooner that's a good price blah i already cut it ...First gen! Don't forget about us too
Saleen00_227
Member
The Method for the FX35 2010+ is confirmed working on the new 2013 FX37
Edit: This is true for the Navi equipped systems
Edit: This is true for the Navi equipped systems
Last edited:
The Method for the FX35 2010+ is confirmed working on the new 2013 FX37
Edit: This is true for the Navi equipped systems
Yep the AV wiring for 2013 FX37 is identical to the 2012 FX35, time to update my website
")
- Status
- Not open for further replies.
Share: