onthemove MOD's

The differential bushing lost its shit all over the damn place. Nothing feels or sounds different, so I might not replace it. Looks like a pita.
DSC01952.JPG
 
The Kinetix manifold flexes while revving. I new this for awhile but decided to make a vid between figuring out what to do about this diff bushing and making corrections to my driveway. I'm so easily amused. Got some seat cushions that are easy on the bum while cruising. The intake flexing is towards the end.
 
Last edited:
Thanks. The pitch in these vids is higher cause my camera is a piece. At the end of the vid I say "huh" in reference to something totally unrelated and I sound like mickey mouse dunno.gif.

I can see why the Kinetix can only take 14(?) psi of boost. Looks like I'm threatening to pop it revving my little na engine.

Edit - I watched this video a few more times and noticed a few things;
At start up, the exhaust knocked the camera around. Cool. :cool:
My engine's still pretty noisy. Not cool. :mad:
This camera really sucks. The pitch is way off. All my exhaust vids are missing some decibels. Not cool. :poop::mad::cry:
The engine has gotten quieter after replacing the crank and a/c pulleys, which one of the 2 was really bad, and then a year later I replaced the belt tensioner pulleys. Now it's the a/c clutch.
I had issues with the a/c recently. The clamp attaching the filter to my diy 4" intake took a bite out of the high a/c line. That's the second time my work didn't go my way, the first being the transgo reprogramming kit. Oh well. Shops f up too. After I repaired the line I had the a/c charged and was told the compressor was making the noise and that I'd need to replace it. Yeah, ok guy, just charge the system and shut your pie hole.
Tonight, I soaked the pulley in wd40 and after a little time soaking I started it back up and the noise completely went away, so I highly doubt it's something internal that would be a reason for replacement. It works great, just f'n noisy.
I'm going to do this to all my pulleys, even the new UR under drive ones, drive around for a week and then soak'em in lithium grease unless I find something even better. I'm also going to replace the differential bushing that resides in the subframe without actually replacing it. These might be good ways to deal with these two issues and I'll report back after with the success or failure of both.
 
Last edited:
There's only a few seconds of what the engine sounded like prior to WD40ing the :poop: out of the pulleys but enough to hear the difference. Sounded like some grindage was going on.
Before WD40 towards the end of the vid;
After WD40 with a/c off;
Here it is with the a/c on. No difference. Before, it was loud off and louder on.:D
I used WD40 on the hardware on all 4 door and the hatch awhile back. Kinda wish I didn't cause the doors swing too easily and don't stay open so easily on inclines like they used to.
I sprayed the :poop: out of the a/c clutch. It's inner workings are intricate. A lot of color flushed out of the bottom, mostly orange and some black. The compressors fine. The clutch was just a little rusty.
 
Last edited:
Today, I am bored. I used dragtimes and timeanddate sites to figure out what one of my best street runs was (Jan 24th 2017) after adjusting for the favorable winter conditions. I didn't keep track of the weather conditions but this site retains the info:). Dropped 2/10th's and 4 mph off whats shown below knowing the scanguage is a bit over zealous. Nearly no change after calculating for 136' DA. I'll be heading to the track right near the ocean this fall and I expect to see a sub 14 second time slip. No n2o though:cry:. I can't make up my mind about a power adder.

Weather in January 2017 in Charlotte, North Carolina, USA
DA Calculator - Density Altitude Calculator - DragTimes.com

Track Elevation: feet above sea level 751
Air Temperature: degrees F 44
Barometric Pressure: inches Hg 29.81
Relative Humidty: % 64
Density Altitude: 136 feet
Relative Density: 99.6 %

1/4 mile ET: 14
1/4 mile trap speed: 99
Stock and Mildly Modified Naturally Aspirated Engines 14.017 @ 98.802 MPH
485028-78d358115356ca07d67e353ff6f98134.jpg 485027-0e7b40fc064ee4faba6e5fb5678e77a2.jpg 485029-d55dddeaf51c31cadbfb558ea4f37e03.jpg 485030-1285f2a4ef43c7bb0486050e6aba67bc.jpg
 
Options to deal with a popped diff bushing are urethane or solid aluminum. They're inexpensive enough but an absolute pita to install. For a RWD it may be worth it to do the diff + subframe bushings but imo, NOT for AWD. I haven't noticed anything from this bushing having lost it's integrity but perhaps, over time, it might be a good idea for the drive shaft and axles.
Here's one more solution to the silly differential bushing that, should one need to replace it one must buy a whole new subframe.
Picked this stuff up last week. Reoflex 60 made by Smooth-on. It's 60, stock is supposedly 40 and the aftermarket variety (Z!) is 80.
80-dsc01973_2352261f34b3d8054da790c6af5a3cb2fe3deeeb.jpg
The bushing popped...really, exploded from the back which faces the differential. It didn't just ooze down the subframe, it blew it's wad all over the diff and my exhaust pipes. The sides seem solid, though as I hoped and expected, they are not completely solid. There is a passageway connecting the top & bottom on both sides which imo makes it easier for the urathane to travel and fill all the voids.
The fact that the silicone didn't trickle out but instead popped the way it did had me hoping that the rear of the bushing might've sealed back up because getting to the rear and shoring it up in a similar way I did the front would be tough. All is well and none of the new urethane is leaking from the rear.:)
I jacked up the FX and then did the same with the diff to center the diff bolt within it's now defunct bushing. I used brake cleaner to get the exhaust pipe and diff cover clean. The shit came right off (pic's 3 & 4). I cut out the top and bottom sections of the bushing (pic 2), cleaned out as much as possible then sprayed brake cleaner multiple times. Cotton swabs were my cleaning tool of choice. I cleaned until the swab came out clean and dry.
DSC01997.JPG DSC02000.JPG DSC02008.JPG
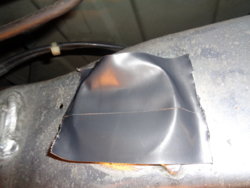
I used some t-rex duct tape, taped the outside of the steel shaft then put a piece over it and trimmed it with a razor blade. No urethane should enter the diff bolt area, just in case.
DSC02007.JPG DSC02010.JPG
Rather than use and ruin my little pump, I cut up a plastic cup to just pour in the product. It's easier this way. Used the tape on the subframe like a funnel. The urethane is viscous, similar to diff oil. Once the urethane started to run out, I braced the tape which was bulging just a bit from the weight of the urethane and let it drip. I'll peel off the tape once the urethane is firm and then trim off the area where I poured it in. Approx. 16 hours for a full cure so I'll leave the ass up in the air for 24 hrs. The process took about 2 hours and I used 10% or less of the product. Pretty easy thing to do and we'll see how it turns out. :cautious:
DSC02014.JPG DSC02015.JPGDSC02017.JPG
 

Attachments

  • DSC02013.JPG
    DSC02013.JPG
    162.1 KB · Views: 173
Last edited:
Whoa, ramoszx12r, guy, bro, I'm working for likes, not thanks. Follow GTO and give me some sugar baby :rofl:.
I got the idea from cwslightning on a g forum Z1 subframe collar bushings - G35Driver - Infiniti G35 & G37 Forum Discussion
So far so good. The top looks like it didn't catch, but it did. It's all the way to and over the top concerning the bushing but fell short in the area between the bushing's metal housing and the opening it fits into on the subframe. I considered just taping the bottom hole and then taping the top one with the hose for my pump in place and inject it like a mold but I feel this was the best approach. It provides extra urethane as the oem bushing is set into the subframe about a 1/2" and the new-ish urethane bushing fills it all in. The tape for the diff bolt did it's job, I'm just not sure if I want to cut out the extra urethane material and remove the tape, but if I do I best do it before this is fully cured. Right now, it's not difficult to cut with a razor blade.
No leaking from the back of the bushing at all. The amount I used was what is shown in the pic with the plastic cup X 2. I filled it twice then about a tablespoon dripped out over a 30 minute period of time so I'm confident it filled most if not all of the original space once occupied by the black silicone crap that oddly smells like fish?:confused:
DSC02028.JPG DSC02024.JPG
Edit - I cut the urethane away from the diff bolt just in case. It's not pretty but it should do the trick.
DSC02029.JPG
 
Last edited:
I was out last night and today. The diy urethane bushing held up just fine. I laid into it. Didn't notice before the failure, didn't notice after the failure and don't notice it now that it's made whole again. Never a noise or a feel. Cheap, quick ad easy fix for piece of mind I suppose.
I took some pics tonight, just in case ya'll have never seen an FX35:rolleyes: before. I still do not feel compelled to get big wheels or slam it in the weeds. It sits like a sporty crossover and I'm happy with that. I clayed & sealed it yesterday. I do this once every season now that I've corrected the paint.
I took 30 seconds to learn how to photo shop the license plate out:tup:. Yay me:rofl:.
That damn Ferrari wouldn't get out of my way.
exterior 6.JPG exterior 7.JPG exterior 8.JPG exterior 9.JPG exterior 10.JPG exterior 12.JPG exterior 13.JPG exterior 11.jpg DSC02061.JPG
 
A few close up shots of the wheels/brakes. G2 epoxy paint on the calipers, semi-polished face on the spacers, stainless lines, carbon pads and zinc rotors. Between the mild drop, weight reduction, mild brake upgrades and the tires, the FX stops a lot faster than it use to.
DSC02069.JPG DSC02063.JPG DSC02070.JPG DSC02068.JPG DSC02071.JPG
 
Hard start last week and lack of low rpm power so I checked the scangauge and there was a p0345 driver side cam position sensor "pending" code. Looks like the hose I installed in place of the brake hard line was pressing down on the wires for the sensor. Moved the hose, put everything back together and not an issue since.
While I was at it, figured I'd do what I intended to do when I did all the intake mods. Paint the 75mm throttle body and change out the hvac heat shield (which was actually very effective) for something else. I painted the throttle body, the adapter plate, a/c line that comes out of the brake box and the radiator cap. I used some leftover DEI form-a-shield to replace the hvac insulation. Looks better in the bay which is the only reason I gave it a shot. Not a fan of the 2 zip-ties holding it on but it'll stay until I find a better way to fasten it. The seam is on the bottom. I'll see if there's a change either way in iat's which are 7-8* above ambient and which is actually at ambient because iat's are 7* above ambient as soon as I start the fx with a cold engine.
DSC02080.JPG DSC02078.JPG DSC02088.JPG
DSC02079.JPG DSC02085.JPG DSC02086.JPG
 
looks great. If you can get a hold of just the fronts (FX50/G37s), the braking will improve by even much greater amounts. Like night and day. I promise.
& it's relatively cheap for that front BBK. No balance issues either if you match with the smallish stock rears. Win/Win
 
That's good advice and I'll keep it in mind. I have yet to feel the need to use the brakes to their max. I did when the FX was stock, I pushed them to their limits as many do from time to time but not anymore. If I drove through canyons or on a road coarse, that'd be a different story.
My thread and so called "build" is full of some of the crazy shit I do from deleting the sway bars to some of the cheesy shit I do like the taped up parachute bumper delete. Putting anything heavy duty on this thing other than that 5 lb pig of a grill ain't gonna fly. There's lots of stuff I see ya'll have done and I like most of it but so much of it adds weight and that goes against the grain of what I hope to accomplish.
 
I totally get it re. the weight and what you're trying to do. Upgraded fronts are bigger & better compared to stock and they do weigh a few more pounds. I was burning up rotors like they were disposable when stock. With all the suspension bits & fat semi sticky rubber, I can get going pretty quick. Stopping is more important than anything else I can think of. Must have
 
Here's a good article on why big brakes aren't necessary on the street and on street tires. The approach I've taken isn't sexy, isn't costly and will not impress the wheel/big brake snobs but it is very effective. Relocating the battery to the hatch wouldn't hurt either. Less nose dive.
The Myth Of The Big Brake Kit - Stop Lying To Yourself! - eEuroparts.com Blog

Dodge reduced the size of the brakes on the Demon vs the Hellcat for rotating weight reduction and because of the tires, it stops faster. I've done a fair amount of research into brakes over a year ago and the above link and quote below sum up my sentiment.

"You read that correctly. The Viper ACR, which set 13 lap records and in so-doing destroyed the million-dollar Porsche 918 Spyder and McLaren P1 lap times, can't stop as well as the new Demon.
First, fun with numbers. The Viper ACR weighs 3,374 pounds, and the Demon weighs 4,280 pounds. For those at home busting out the calculators right now, the Demon weighs 906 pounds more than the Viper ACR.
2018 Dodge Challenger SRT Demon, 2017 New York auto show
The Viper ACR sports Brembo 15.4-inch carbon ceramic brake rotors with 6-piston calipers up front and 14.2-inch rotors with 4-piston calipers in the rear. The Demon? Steel, 2-piece vented and slotted 14.2-inch rotors with Brembo 4-piston calipers up front and 13.8-inch vented and slotted rotors with 4-piston Brembo calipers in the rear.

Yes, the steel rotors on the heavier Demon are more than an inch smaller up front and nearly half an inch smaller in the rear compared to the Viper ACR's carbon ceramic rotors. So how does it stop shorter? Dan Reid of SRT Communications says it's mostly the tires.

The Demon runs a square setup of 315-mm wide specialized Nitto NT05Rs all around. The compound of the barely street-legal Nitto drag radials helps them bite the pavement. It's also worth highlighting that while the main performance numbers for the Demon were certified on a prepped dragstrip, this braking number was achieved on regular pavement, not at the strip.
The Viper ACR, on the other hand, runs specialized Kumho Ecsta V720s with 295s in the front and 355s in the rear. While the Demon has wider front tires than the Viper ACR, the meats on the rear of the ACR throw shade on the Demon's setup. Nonetheless, it's the Nitto's compound that get the job done.
How well do they do that job? The Viper ACR takes 101 feet to go from 60 to 0 mph. The Demon does the same thing in just 97 feet."
 
The intake pipe's new heat shield does actually seem to keep iat's down a little more, average - 5*. One thing to note is that at startup, the scangauge reads 4* above ambient whereas previously it was 7*. I did clean the MAF while making the shield, but it's not the first time I've cleaned it and the iat's religiously read 7* above. I have no idea why but I'll take it.
 
Back
Top