OEM Aero Front Spoiler Instructions

GEE50FX

The Traveller
iS VIP
Car
2010 White FX50S-sold
Name
Wayne
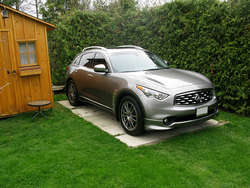
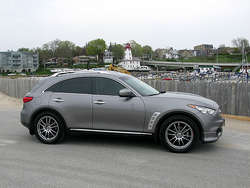
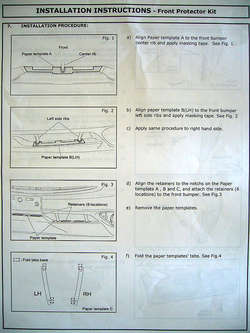
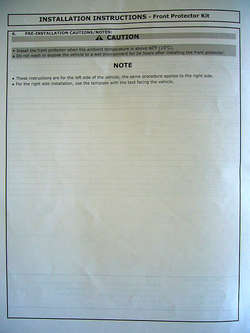
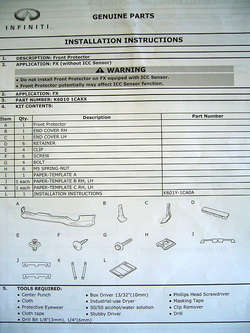
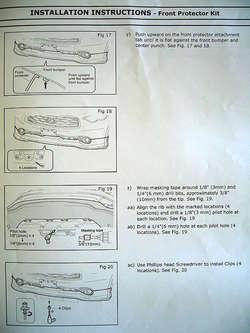
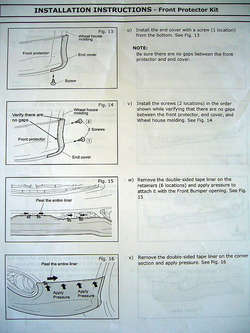
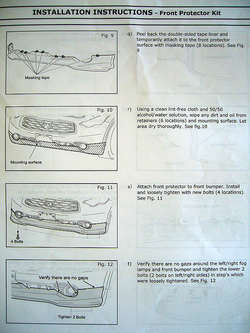
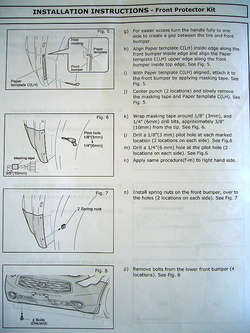
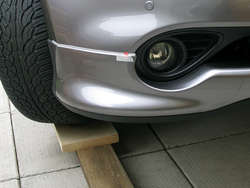
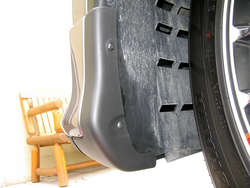
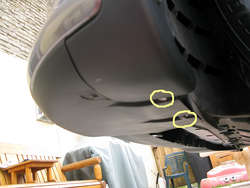
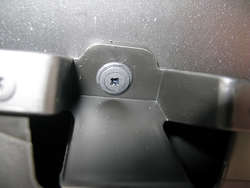
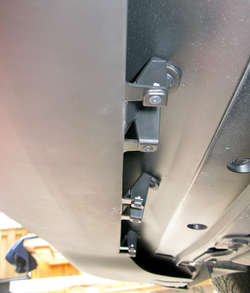
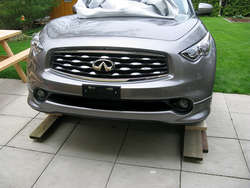
Here are the instructions that come with the Factory Aero Front Spoiler.
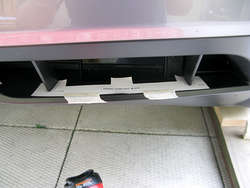
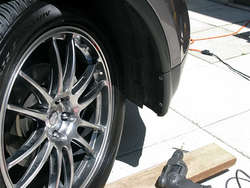
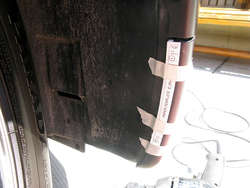
I will post a few actual install photos later

FX35FrontSpoiler1.jpg

FX35FrontSpoiler2.jpg

FX35FrontSpoiler3.jpg

FX35FrontSpoiler4.jpg

FX35FrontSpoiler5.jpg

FX35FrontSpoiler6.jpg

FX35FrontSpoiler7.jpg
 

Attachments

  • FX35FrontSpoiler4.jpg
    FX35FrontSpoiler4.jpg
    132.8 KB · Views: 176
  • FX35FrontSpoiler3.jpg
    FX35FrontSpoiler3.jpg
    117.2 KB · Views: 196
  • FX35FrontSpoiler3.jpg
    FX35FrontSpoiler3.jpg
    117.2 KB · Views: 205
  • FX35FrontSpoiler2.jpg
    FX35FrontSpoiler2.jpg
    79.7 KB · Views: 213
  • FX35FrontSpoiler2.jpg
    FX35FrontSpoiler2.jpg
    79.7 KB · Views: 217
  • FX35FrontSpoiler1.jpg
    FX35FrontSpoiler1.jpg
    124.5 KB · Views: 195
  • FX35FrontSpoiler1.jpg
    FX35FrontSpoiler1.jpg
    124.5 KB · Views: 184
  • FX35FrontSpoiler7.jpg
    FX35FrontSpoiler7.jpg
    124 KB · Views: 187
  • FX35FrontSpoiler7.jpg
    FX35FrontSpoiler7.jpg
    124 KB · Views: 188
  • FX35FrontSpoiler6.jpg
    FX35FrontSpoiler6.jpg
    121.7 KB · Views: 194
  • FX35FrontSpoiler6.jpg
    FX35FrontSpoiler6.jpg
    121.7 KB · Views: 186
  • FX35FrontSpoiler5.jpg
    FX35FrontSpoiler5.jpg
    127.2 KB · Views: 196
  • FX35FrontSpoiler5.jpg
    FX35FrontSpoiler5.jpg
    127.2 KB · Views: 197
  • FX35FrontSpoiler4.jpg
    FX35FrontSpoiler4.jpg
    132.8 KB · Views: 184
Thanks for instructions. I think I would let dealer do it,even I am pretty handy.
If they f* up anything,then they order one more set. But if you drill wrong or get gap,you screwed,noone will cover it for you.
 
I did the final Installation today. It is really quite easy, just take your time.

Here are a few install pics

Template taped on to locate two 1/4" holes to be drilled for End Cover
IMG_1732_1.jpg

Holes have been drilled and 2 Spring Nuts installed ( must do on both sides)
IMG_1735_1.jpg

Template taped on to locate slide on retainers ( there are 3 templates and each one locates 2 retainers)
IMG_1764_1.jpg

Next you must tape the tabs back on the two sided tape that is on the Spoiler (8 locations)
Remove 2 lower bumper bolts on each side and discard The kit has new longer
ones.


Slide spoiler on and install 2 new lower bumper bolts loosely on each end.
IMG_1767_1.jpg

Make sure there are no gaps around fog lights and front bumper and tighten the two screws on each end

Install End Cover on each side as per instructions
IMG_1766_1.jpg

Remove double sided tape liner on 6 retainers and end sections and apply pressure.
IMG_1768_1.jpg

Push up on bottom of Spoiler to contact bumper and drill 1/4" holes as per instructions on 4 spoiler attachment tabs.
IMG_1788_1.jpg

Clip installed in Attachment Tab (4 places)
IMG_1786_1.jpg

Finished Front View
IMG_1769_1.jpg

Finished Side View showing End Cover
IMG_1770_1.jpg

And Now to Show it Off
This is my Oudoor Garage
IMG_1771_1.jpg

IMG_1775_1.jpg

It's a Steep Climb out of there
IMG_1778_1.jpg

IMG_1782_1.jpg

At Our Harbor
IMG_1792_1.jpg
 

Attachments

  • IMG_1764_1.jpg
    IMG_1764_1.jpg
    56.2 KB · Views: 223
  • IMG_1764_1.jpg
    IMG_1764_1.jpg
    56.2 KB · Views: 257
  • IMG_1735_1.jpg
    IMG_1735_1.jpg
    96 KB · Views: 240
  • IMG_1735_1.jpg
    IMG_1735_1.jpg
    96 KB · Views: 227
  • IMG_1732_1.jpg
    IMG_1732_1.jpg
    76.5 KB · Views: 259
  • IMG_1732_1.jpg
    IMG_1732_1.jpg
    76.5 KB · Views: 233
  • IMG_1768_1.jpg
    IMG_1768_1.jpg
    69.3 KB · Views: 235
  • IMG_1768_1.jpg
    IMG_1768_1.jpg
    69.3 KB · Views: 231
  • IMG_1766_1.jpg
    IMG_1766_1.jpg
    74.8 KB · Views: 240
  • IMG_1766_1.jpg
    IMG_1766_1.jpg
    74.8 KB · Views: 232
  • IMG_1767_1.jpg
    IMG_1767_1.jpg
    61.7 KB · Views: 235
  • IMG_1767_1.jpg
    IMG_1767_1.jpg
    61.7 KB · Views: 234
  • IMG_1786_1.jpg
    IMG_1786_1.jpg
    68.2 KB · Views: 213
  • IMG_1786_1.jpg
    IMG_1786_1.jpg
    68.2 KB · Views: 234
  • IMG_1788_1.jpg
    IMG_1788_1.jpg
    62.9 KB · Views: 211
  • IMG_1788_1.jpg
    IMG_1788_1.jpg
    62.9 KB · Views: 223
  • IMG_1775_1.jpg
    IMG_1775_1.jpg
    146.7 KB · Views: 231
  • IMG_1771_1.jpg
    IMG_1771_1.jpg
    140.9 KB · Views: 241
  • IMG_1771_1.jpg
    IMG_1771_1.jpg
    140.9 KB · Views: 238
  • IMG_1770_1.jpg
    IMG_1770_1.jpg
    104.1 KB · Views: 236
  • IMG_1770_1.jpg
    IMG_1770_1.jpg
    104.1 KB · Views: 236
  • IMG_1769_1.jpg
    IMG_1769_1.jpg
    95.5 KB · Views: 253
  • IMG_1769_1.jpg
    IMG_1769_1.jpg
    95.5 KB · Views: 243
  • IMG_1782_1.jpg
    IMG_1782_1.jpg
    174.7 KB · Views: 216
  • IMG_1792_1.jpg
    IMG_1792_1.jpg
    83.7 KB · Views: 259
  • IMG_1782_1.jpg
    IMG_1782_1.jpg
    174.7 KB · Views: 205
  • IMG_1778_1.jpg
    IMG_1778_1.jpg
    183.5 KB · Views: 258
  • IMG_1778_1.jpg
    IMG_1778_1.jpg
    183.5 KB · Views: 228
  • IMG_1775_1.jpg
    IMG_1775_1.jpg
    146.7 KB · Views: 249
  • IMG_1792_1.jpg
    IMG_1792_1.jpg
    83.7 KB · Views: 242
hey brother, a little off topic I know, but I see you said that parking on the grass is your outdoor garage... just a heads up, parking a car on dirt or grass often is extremely bad... when the dirt gets wet like after a rain it will give off a lot of sulfur gases, this will cause accelerated rust to the under body. parking on dirt on a regular basis will cause so much rust under your car that in 2 years it'll look over 10 years old.. really should avoid that :)
 
hey brother, a little off topic I know, but I see you said that parking on the grass is your outdoor garage... just a heads up, parking a car on dirt or grass often is extremely bad... when the dirt gets wet like after a rain it will give off a lot of sulfur gases, this will cause accelerated rust to the under body. parking on dirt on a regular basis will cause so much rust under your car that in 2 years it'll look over 10 years old.. really should avoid that :)
Thanks for the heads up John, I do park it on concrete, I do all my work outside (no garage so I refer to it as my outdoor garage.
Here is where I park it.
IMG_1794_1.jpg
 

Attachments

  • IMG_1794_1.jpg
    IMG_1794_1.jpg
    153.2 KB · Views: 174
  • IMG_1794_1.jpg
    IMG_1794_1.jpg
    153.2 KB · Views: 209
I really like that parking spot. Puts the FX on display. By the way did you rewire your foglights to be daytime running lights?
 
I really like that parking spot. Puts the FX on display. By the way did you rewire your foglights to be daytime running lights?
Thanks :smile (2):
As to my foglights, in Canada all 2nd Gens come with it wired that way because Daytime Running lights are mandatory.

Oh, one other thing, My ICC works with the spoiler, the IBA also works, the only thing I did not try was my lane departure.
Infiniti warns that that the spoiler should not be installed on FX's with the ICC Sensor, but I had to try it. I thought it might affect it with the glossy paint below the sensor on a really bright day, but so far it's fine. If that causes a problem I think I would apply some matte paint below the sensor. Fingers are crossed.
 
That spot is great!
Nice writeup & pics. Looks great on there & looks like a quality part
 
Looks very good Wayne.. Congrats on the install.. Man, the lip on a lowered 2G just looks really nice.. You're making me want to get this now, damn it.
 
Great GEE35FX, looks amazing!!! Excellent pics and install steps.

Let's see some day I order it and install it by myself. Here in PR, purchase it to the dealer is extremely expensive.
 
Last edited:
Back
Top