modified struts & suspension

don't know why this single post was seperated, but I guess we can make this thread the thread for modifing struts & leave the drop thread as more of just a database of results as it was originally intended I guess... I'll move the other posts that are on the same topic to this thread too.

pelon, looks like you did a great job there, a few have discussed doing this in the past, but I think your the first to actually do it complete & installed, looks great...


EDIT: ok, moved all stut mod postings to this thread...
 
Last edited:
Just post the IMG code and hit return, then post the next.

004-2.jpg

005-2.jpg
 

Attachments

  • 004-2.jpg
    004-2.jpg
    76 KB · Views: 31
  • 005-2.jpg
    005-2.jpg
    78.6 KB · Views: 27
nice pics !

I see your way of doing it, def easier to weld.


fyi to paste IMG

"
"
 
for the rears shocks, couldnt someone find a shorter shock (maybe 1-2 inches shorter) and benefit from it being lower and not bottom out?

I was trying to cross reference some Kybs, but they dont show shock length on the parts catalog... but I search for a p/n that was -2 (from the FX p/n) and found one for a MDX (rear, dont know the size)
 
I borrowed a monroe master catalog that listed all there part #'s & dimensions, as well as what type of end is on each side. then measured my ride height minus the drop I planned, from the bottom mount to the top mount, added for 2 inches of downward travel & looked for same config with these dimensions as a compressed measurement, also trying to take into account overall travel, we don't need 8"+ of travel, the choices are not wide, & I settled on a part # that looked like it fit my needs best. determined the intended aplication of that shock & then cross referenced all manufactures of shocks for that fitment, came up with a rear shock fitment for a suzuki grand vitara, found a set of delco air shocks for that aplication & ordered them... will it actually work? it should, assuming I can find a way of getting the wheels even aligned at that low of a height to begin with :tongue:

if your just using a drop spring & maybe shaving the mount, then yeah, the rear shock can bottom & can bottom hard. the problem is our rear shock is the whole limit of travel, it IS the bump stop, & it's designed for the stock ride height. what I did initially with the h&r & the cut upper mount is modify the upper rear shock mount. this gave me enough extra travel to not bottom out hard anymore, & I rarely if ever hit the end of travel with this mod... if your not going lower than that then this should be enough for you...


to mod the upper stock shock mount to give maybe ~5/8" more shock travel, you need to remove one of the 2 bump stop bushings stacked in the end mount, then cut off the equievelent length of this bushing from the metal sleevetoo , & lastly, use this cut off length of sleeve above the assembly to space out the overall stack the same & allow the nut to wind up with the same thread engagement & compression... this allows the shock to compress that much more, yeah the actual bump stop will be firmer cause now it's one bushing instead of 2, but that's a big improvement since you won't even hit it, where hitting the double bushings is very harsh...

if my discription doesn't make sense to you now, it will when you take the upper rear mount apart & see how it's set up...
 
Last edited:
For the rears why can't you cut the bottom out of the lower control and extend it similar to modifying front strut and again not changing geometry of suspension or ride quality?
 
I've seen in a JDM mag there was a bracket that changes the position the rear spring bucket attaches to the knuckle, it essentially mounted the bucket at a lower angle all the time.

For the rear shock, a shorter shock is needed, the full upper travel is not really needed when you slam it down.

This is my ride height now since we modifed the HKS hipermax parts to fit with my air suspension.
front_02.jpg
 

Attachments

  • front_02.jpg
    front_02.jpg
    189.8 KB · Views: 29
edit, I see your post rookie, extending the end of the arm I guess does exactly the same thing as I winded up doing, except instead of a bolt on extension I'm making it part of the arm itself...


also your right the full upper travel isn't really required, I think I have about 1.5" travel before mine bottoms & it seems to be just enough...


also edit edit: damn that is sitting sweet... that's about how I want mine to sit, but steel instead of air.. I love the way yours sits at ride height...
___________________________________________________________
my original idea was to drop the spring bucket, cut the round bottom out & then put a band around it, making a deep cup for the spring, allowing the car to drop. it would have been complicated, we considered using a large piece of black pipe the diameter bigger than the spring to make the drop, but the complication with that was that the arm needs to drop down to at least 45deg to install the spring & it would have hit the bucket & binded, woulda had to struggle to get he spring in & I was concerned about contact through travel, not much room to go extra large for more clearance, it would have been tight ... then I realized that there is really no advantage to that & it would be better to just extend the mounting point at the outer end of the arm up, maintaining the exact distance eye to eye of the length of the original arm, effectively the suspension will not see any difference in geometry other than the affects of the drop itself, & it will do the same thing much cleaner, as long as the eye to eye distance is maintained this is the better way to do it I think...

the ride will not change at all as long as nothing bottoms, it'll be exactly the same, maybe a bit better even with the air shock boost...

I think the big problem will be that at that lower height the top of the wheel will kick in big time, the upper control arm angle will increase & pull the upper ball joint in as it drops.... the uper control arm is not set up for this ride height at all. for it to be made to be really flawless the upper control arm inner mounts should be raised a proprotionate amount to the drop, but even half that would be a big improvement... I need to get the lower arm done & installed to really know what the solution will be... it could be a problem too...

the alternative & the way most would do it is to just pull the bottom arms in... there are 2, one is the main one with the spring & the other is a front arm that connects the shock to the body... the easy easy way is to use a camber kit, it uses offset bolts to allow the lower arm to come in a bit too, effectively straightening the wheel, but the draw back to this aproach is that now the car will be much more sensative to camber change as the vehicle compresses through it's travel... this is a drawback to most independant rear suspension cars when there dropped a lot. the better but way more crazy way to correct the misalignment with a big drop is remounting the upper arm... I may just go for the bottom correcting route, be much easier, & the load leveling suspension should help avoid the drawbacks of the extra camber loss as the vehicle is loaded...
 
Last edited:
I would drop it at the knuckle vs dropping it at the spring, you get the same travel up and down on the spring, max up is what changes.

If possible, a Murano rear shock may be short enough to not bottom out.
 
that's what I winded up with & did, drop at the knuckle...

I haven't looked at the murano shock... I just got the delco air shocks today... they look to be perfect for this I think... not 100% sure if I need to space the lower bushing or if it may need a thinner bolt ifd the eye is a little smaller, but it is a sleeve design like the oe... for the most part it looks good I think...

---------- Post added at 09:41 PM ---------- Previous post was at 09:27 PM ----------

viet, when you drop from ride height, do the wheels camber in a lot? how about through travel, is the camber much issue for you? I'm assuming you pulled the lower arms in for camber?
 
Rear cambers a lot, it was crazy how much it cambered without the camber bolts in place before.

I've been meaning to get new arms to see what can be done to pull it in more, I suppose you can change the position at the knuckle, but there should be some play in the half shafts. Maybe cam washers at the upper control arm, down side of that is too much tension on the ball joint.
 
you can shorten the 2 lower arms easily enough, correct it at ride height no problem, but it'll still kick in a lot at the top when it compresses & go down from there no matter what you do to the lowers... bringing the top out alone will still not prevent this really, the upper arm will still be at the severe angle... the best solution is to raise the mounting points of the inner upper arm, this will correct the angle of the arm & let it go up & down much more straight.

what if the rear subframe was dropped out of the car & extention brackets were mounted at the top of the subframe at the upper inner mounts, correct the camber & correct the stroke through travel too, correct the geometry overall... only problem I see is the upper arm extensions may contact the floor when the subframe is reinstalled... gotta get a better look at this area....
 
I want to make my FX look like yours Rookie :biggrin:

great ride height !

more info on that bracket if possible...
..... probably wont get close to you height but the lower I can go w/o sacrificing ride would be my goal.
 
you can shorten the 2 lower arms easily enough, correct it at ride height no problem, but it'll still kick in a lot at the top when it compresses & go down from there no matter what you do to the lowers... bringing the top out alone will still not prevent this really, the upper arm will still be at the severe angle... the best solution is to raise the mounting points of the inner upper arm, this will correct the angle of the arm & let it go up & down much more straight.

what if the rear subframe was dropped out of the car & extention brackets were mounted at the top of the subframe at the upper inner mounts, correct the camber & correct the stroke through travel too, correct the geometry overall... only problem I see is the upper arm extensions may contact the floor when the subframe is reinstalled... gotta get a better look at this area....

Just took this pic.. The ball joint angle isn't all that bad. Sorry FX is all dirty, drove it in the rain a few weeks ago.
uca.jpg

We had to reinforce my upper spring mounts cause they were collapsing from the angle, it was mostly just bad distribution on the mount from the air bag plates though.
 

Attachments

  • uca.jpg
    uca.jpg
    58.5 KB · Views: 28
I'm glad to see that the bj angle isn't severe enough to bind, that's a good thing.

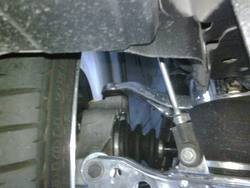
the problem with the angle of the control arm is not the ball joint though. the upper arm swings the ball joint up & down in a curve... it pivots on the inner mounting bushings & swings around it in an arc, of course not completely around in a circle but really just like that, just through a small portion of that circle...

picture this pivot point like the center point of a clock. lets say at ride height it is engineered for the arm to sit like a clock arm at 9 o'clock.... when the compression starts & the car goes down through travel, the clock arm goes from ~9 to ~10 lets say, so yes, the tip of the clock arm (ball joint)will also move in as it goes up, 10 oclock is "in" more than 9 o'clock, but not so severere, it's normal for it to swing that way & for it to come in a bit on compression. but now lets say that the vehicle is lowered so the tip of the clock arm now sits at a bit past 10 o'clock at ride height.... now, when the suspension compresses the arm pivots to a bit past 11 o'clock... 11 o'clock is really pulling the tip in, the difference in inward movement between 9 & 10 is much less than the difference between 10 & 11 if you see what I mean, taking it further to see the effects you can see at a more extreme that the difference between 11 & 12 would be the most severe, at that point the tip will be moving in more than it would even be moving up ... this is the problem, the more severe the angle of a short arm like our upper, the more it will pull in through travel...

the ideal solution is, if the car is dropped to where the arm is now at a bit past 10 o'clock, now leave the tip ( ball joint) exactly where it is, but move the center pivot point of the clock back up, bringing the tip (ball joint) out & back to where it was & making the arm back to ~ that 9 o'clock range.... now as it compresses it won't pull the upper bal joint in nearly as much


the only problem I could see with this approach for you is now the wheels wouldn't camber in as much as it did when dropped, & if your tire was close to touching the lip before it might then stick out to much & contact your body more if it came down more straight in your case... of course this would affect anyone with a drop this much, & while reducing the camber loss will improve the geometry it can also cause more clearance problems if you were counting on this loss of camber for clearance in the first place...

---------- Post added at 01:03 AM ---------- Previous post was Yesterday at 11:51 PM ----------

sorry man, but I'm a sucker for anologies to explain things by illustration... I just took a quick spin for a smoke & I realized that the tach in our dash is perfect to illustrate what I'm trying to show here, better than the clock analogy... just watch the tach... picture stock ride height upper control arm angle to be like at 1k rpm... now rev between 1k & 2k rpm, that's the swing of the arm as designed... the tip doesn't move in or out (left to right) much at all in this range, alls fine...

now hold the rpm's at 2k & picture this to be the new lowered ride height, & then rev between 2k & 3k as travel, it then is easy to see what is happening with the caster on a lowered fx... you'll see how much more the tip of the needle moves in( from left to right) as it goes up from 2k to 3k...

also want to mention that the lower arms are affected the same way, but since the arms are much longer the arch they follow is less severe & the change much less dramatic, not anywhere near as much of an issue like our shorter upper arms... so picture there movement to be like the difference between 1k & 1.3 k through the stroke of travel as opposed to the stroke of 1k-2k like our uppers... the longer the arm the less angle change for any given amount of travel...

---------- Post added at 02:28 AM ---------- Previous post was at 01:03 AM ----------

ahh, now that were into suspension geometry 101 just figured I'd add one more thing before I shut up... some may wonder why the designers even use a shorter upper control arm to begin with if it can cause the camber to increase on compression. this is done on purpose & it is designed to increase camber slightly on compression & reduce it on extension, this is because in harder cornering the outer wheel will compress with body roll while the inner will extend slightly, & this slight increase in camber on the outer wheel helps the outer tire to stay flater contact patch through the turn as the body rolls, also keeping the inner tire flatter as it extends... this is why independant rear suspension handles so much better than a solid straight rear axle car...
 
Last edited:
Back
Top