
Yo dudes, I installed my Fluidampr crank pulley today and snapped a few pics along the way. I've heard how difficult this can be and considering how much trouble people seem to have with it I thought I'd share my methods for what I would consider a strong 3 on the 10 point difficulty scale.
Tools required
-10mm socket
-12mm box wrench
-19mm socket (1/2" drive min)
-18" long (min) 1/2" drive breaker bar
1) Start by lifting the FX onto jack stands or ramps (I used ramps) and removing the splash pan w/ your 10mm socket. Though it's probably possible to do this without lifting the FX, it is much easier from the bottom.
2) Next you'll want to loosen the crank bolt. this is the 19mm bolt that secures the crank pulley and the one that causes people so many problems, mainly because of the extremely high install torque and the fact that the pulley is difficult to keep it from turning while removing or installing the bolt. It took me 2mins to remove this bolt, here's how:
2a) Apply your 18" breaker bar and 19mm socket to the crank bolt so that the arm of the breaker bar points directly toward the passenger side.

2b) Using a piece of string, twine, or anything similar tie the end of the breaker bar up to the bottom side of your passenger side frame rail. This will prevent the breaker bar from slamming into the frame rail with the force of 5 Babe Ruth home run swings during step 2c.

2c) CAREFULLY crank the engine with the ignition key as quickly as you can. It is imperative that you DO NOT ALLOW THE ENGINE TO START. Just turn the key enough to cycle the starter and as soon as you hear the engine start to turn over, turn it off and go check the bolt. I did it twice and it was more than sufficient. From that point you can remove the crank bolt with a normal socket wrench or if you're lucky you can use your fingers.
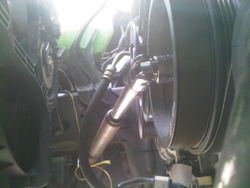
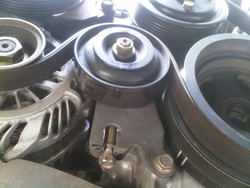
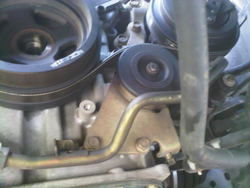
3) Once the crank bolt is removed, you'll want to remove the two accessory belts that engage the crank pulley. There are two tensioners, one for each belt, that function identically. They are here:

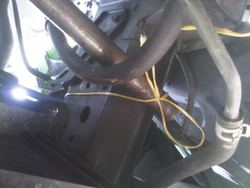
and here:

The tensioners operate on an "adjust and secure" principle in which the belt tension is adjusted with a threaded rod below the pulley and then the adjusted pulley location is secured with a nut on the pulley itself. Ergo you need to loosen the pulley nut before reducing the belt tension via the threaded rod below the pulley. Reduce the belt tension until you can remove the two belts from the crank pulley. If you haven't already assumed, this is a great time to replace your accessory belts if needed.
4) Remove crank pulley by pulling (with your hands) and wiggling it back and forth. It doesn't slide right off but with some effort and persistence it will come, just be patient. If you have a crank pulley remover, great but I would strongly advise against prying it with anything asymmetrical (like a pry bar or something). I was able to remove mine with my hands but it took quite a bit of wiggling.
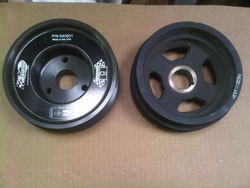
Here is the OEM pulley next to my new Fluidampr pulley:

5) Install is exactly the reverse of removal. As you can see both the old and new crank pulleys have shear keys so alignment is automatic and fool-proof. I'd recommend anti-seize compound on the crank shaft and a thread locking agent (I use the blue Loc-tite) on any bolt you don't want to wiggle free :wub:.
I don't have the torque specs for the crank pulley or accessory pulleys handy. if someone wants to post them here that would be great otherwise I'll look them up and update this thread later. *updated*
As always, safety is the most important factor in any work done, especially when it's done under the car. I use ramps whenever possible but if you're going to use a jack and stands check and double check their integrity and proper application prior to crawling under the car.
Good luck!
Torque specs:
Crank pulley bolt
Stage 1 : 39-49 N-m (4.0-5.0 kg-m, 29-36 ft-lb)
Stage 2 : 60-65 degrees clockwise
Alternator nut
73.5 N-m (7.5 kg-m, 54 ft-lb)
Idler pulley lock nut
34.8 N-m (3.5 kg-m, 26 ft-lb)
Tools required
-10mm socket
-12mm box wrench
-19mm socket (1/2" drive min)
-18" long (min) 1/2" drive breaker bar
1) Start by lifting the FX onto jack stands or ramps (I used ramps) and removing the splash pan w/ your 10mm socket. Though it's probably possible to do this without lifting the FX, it is much easier from the bottom.
2) Next you'll want to loosen the crank bolt. this is the 19mm bolt that secures the crank pulley and the one that causes people so many problems, mainly because of the extremely high install torque and the fact that the pulley is difficult to keep it from turning while removing or installing the bolt. It took me 2mins to remove this bolt, here's how:
2a) Apply your 18" breaker bar and 19mm socket to the crank bolt so that the arm of the breaker bar points directly toward the passenger side.
2b) Using a piece of string, twine, or anything similar tie the end of the breaker bar up to the bottom side of your passenger side frame rail. This will prevent the breaker bar from slamming into the frame rail with the force of 5 Babe Ruth home run swings during step 2c.
2c) CAREFULLY crank the engine with the ignition key as quickly as you can. It is imperative that you DO NOT ALLOW THE ENGINE TO START. Just turn the key enough to cycle the starter and as soon as you hear the engine start to turn over, turn it off and go check the bolt. I did it twice and it was more than sufficient. From that point you can remove the crank bolt with a normal socket wrench or if you're lucky you can use your fingers.
3) Once the crank bolt is removed, you'll want to remove the two accessory belts that engage the crank pulley. There are two tensioners, one for each belt, that function identically. They are here:
and here:
The tensioners operate on an "adjust and secure" principle in which the belt tension is adjusted with a threaded rod below the pulley and then the adjusted pulley location is secured with a nut on the pulley itself. Ergo you need to loosen the pulley nut before reducing the belt tension via the threaded rod below the pulley. Reduce the belt tension until you can remove the two belts from the crank pulley. If you haven't already assumed, this is a great time to replace your accessory belts if needed.
4) Remove crank pulley by pulling (with your hands) and wiggling it back and forth. It doesn't slide right off but with some effort and persistence it will come, just be patient. If you have a crank pulley remover, great but I would strongly advise against prying it with anything asymmetrical (like a pry bar or something). I was able to remove mine with my hands but it took quite a bit of wiggling.
Here is the OEM pulley next to my new Fluidampr pulley:
5) Install is exactly the reverse of removal. As you can see both the old and new crank pulleys have shear keys so alignment is automatic and fool-proof. I'd recommend anti-seize compound on the crank shaft and a thread locking agent (I use the blue Loc-tite) on any bolt you don't want to wiggle free :wub:.
I don't have the torque specs for the crank pulley or accessory pulleys handy. if someone wants to post them here that would be great otherwise I'll look them up and update this thread later. *updated*
As always, safety is the most important factor in any work done, especially when it's done under the car. I use ramps whenever possible but if you're going to use a jack and stands check and double check their integrity and proper application prior to crawling under the car.
Good luck!
Torque specs:
Crank pulley bolt
Stage 1 : 39-49 N-m (4.0-5.0 kg-m, 29-36 ft-lb)
Stage 2 : 60-65 degrees clockwise
Alternator nut
73.5 N-m (7.5 kg-m, 54 ft-lb)
Idler pulley lock nut
34.8 N-m (3.5 kg-m, 26 ft-lb)
Attachments
-
 IMG00540-20110530-1318.jpg52.7 KB · Views: 80
 -
 IMG00540-20110530-1318.jpg52.7 KB · Views: 93
 -
 IMG00541-20110530-1318.jpg50.4 KB · Views: 120
 -
 IMG00541-20110530-1318.jpg50.4 KB · Views: 76
 -
 IMG00542-20110530-1320.jpg63.6 KB · Views: 88
 -
 IMG00542-20110530-1320.jpg63.6 KB · Views: 73
 -
 IMG00543-20110530-1320.jpg49.2 KB · Views: 101
 -
 IMG00543-20110530-1320.jpg49.2 KB · Views: 104
 -
 IMG00545-20110530-1330.jpg61.9 KB · Views: 75
 -
 IMG00545-20110530-1330.jpg61.9 KB · Views: 94
Last edited: