
You are using an out of date browser. It may not display this or other websites correctly.
You should upgrade or use an alternative browser.
You should upgrade or use an alternative browser.
2010 Paddle Shifters
- Thread starter Saleen00_227
- Start date
SCY7H3
Member
- Location
- Toronto, Ontario
- Car
- 2012 FX35S AWD
Hello ! My friends
I am starting to make the bracket. And I am waiting the factory produces some parts to me!
Because the amount is not many, wating is necessary for me.
Sweeet!! I can't wait! Hope your New Year's celebration was fun :meeting::beer::drink::highfive::band::BBQ:
Woo hoo awesome
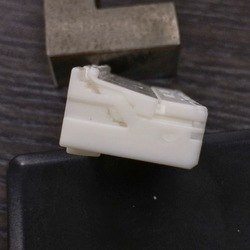
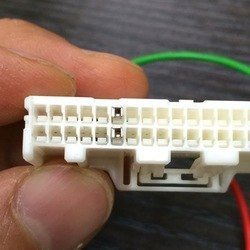
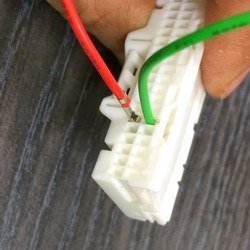
I want to show something "How is it to put the female terminal into the connector". This is not a real installation.
Important: There is not inculding white connectors in my bracket kit! (This connector is just a sample. )
Price will be higher , if the kit is inculded connectors.
Release the cover of connector ! Just a little!

Take out the front net cover, then you can see correct side of the terminal.


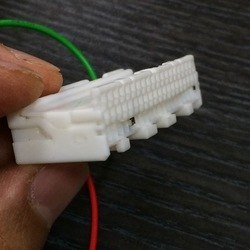
Put the terminals into the connector from the back of connector

Important: There is not inculding white connectors in my bracket kit! (This connector is just a sample. )
Price will be higher , if the kit is inculded connectors.
Release the cover of connector ! Just a little!
Take out the front net cover, then you can see correct side of the terminal.
Put the terminals into the connector from the back of connector
Attachments


Last edited:
SCY7H3
Member
- Location
- Toronto, Ontario
- Car
- 2012 FX35S AWD
I want to show something "How is it to put the female terminal into the connector". This is not a real installation.
Important: There is not inculding white connectors in my bracket kit! (This connector is just a sample. )
Price will be higher , if the kit is inculded connectors.
Release the cover of connector ! Just a little!
Take out the front net cover, then you can see correct side of the terminal.
Put the terminals into the connector from the back of connector


Hi Rex! thank you for the update and a quick how-to for terminal installation.
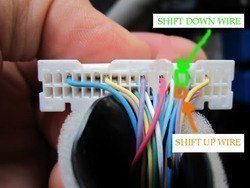
Just so that we understand, you will provide the white connectors with terminals and wire for connection with the paddles but the other side to control box will just have female terminals? Also is it possible to get the same wire colors as OEM like in your photos above? I believe down-shift (left shifter) wire is green and up-shift (right shifter) wire is orange. And I guess wire for ground can be black for both or orange-white and green-white? You probably know this already
")

Attachments

Saleen00_227
Member
- Location
- So-cal
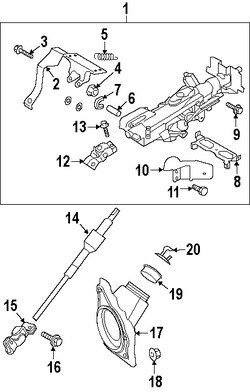
Hey guys, havent been on for a while but saw this today. In doing a quick search it looks like part of the bracket can be bought from the dealer. I don't know how hard the install will be on that part alone. If this works, you will still need to find a way to mount the top/front of the shifter but at least this one mount will line the shifters in place. Might be as easy as drilling and putting a bolt through it.

Part 8:

Look Under a 2010 FX50 for parts
Part 8:
Look Under a 2010 FX50 for parts
Attachments

Last edited:
SCY7H3
Member
- Location
- Toronto, Ontario
- Car
- 2012 FX35S AWD
Hey guys, havent been on for a while but saw this today. In doing a quick search it looks like part of the bracket can be bought from the dealer. I don't know how hard the install will be on that part alone. If this works, you will still need to find a way to mount the top/front of the shifter but at least this one mount will line the shifters in place. Might be as easy as drilling and putting a bolt through it.
Part 8:


I actually looked into this myself before and the problem is the front top mounts do not exist and there's no metal there to drill either. My steering column is apart and I can show you photos if you like.
I was thinking of buying that OEM bracket myself and welding on the top front mounts, problem is, the bracket isn't thick enough to prevent flex in the bracket itself. That's why OEM the front mount is on a thick plate welded on the shaft of the steering column, that would be the main support of the paddles, the bottom bracket is just a support part.
You could possibly reinforce that bottom bracket by welding extra pieces and add the front mounts.
When I spoke to my parts guy here in Canada, he said that part number does not work..not sure if it was phased out but I did see it available on Infiniti parts websites in the US.
Have you tried calling the dealer and asking if its available?
Oh and depends which year you had, some have the front mounts, just not this bracket so you're golden there.
Attachments

Saleen00_227
Member
- Location
- So-cal
send me some pictures of your steering column. Im curious as to how it looks. Email to this name at Yahoo if you can.
---------- Post added at 02:39 PM ---------- Previous post was at 02:24 PM ----------
I don't know if this is new or not. This is what one EX guy (LGmobile) did on the NICO forums. But instead of making your own bottom bracket just purchase one from the 2010 FX50


---------- Post added at 02:39 PM ---------- Previous post was at 02:24 PM ----------
I don't know if this is new or not. This is what one EX guy (LGmobile) did on the NICO forums. But instead of making your own bottom bracket just purchase one from the 2010 FX50
Attachments

SCY7H3
Member
- Location
- Toronto, Ontario
- Car
- 2012 FX35S AWD
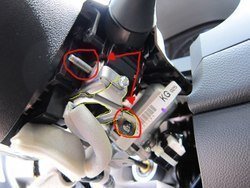
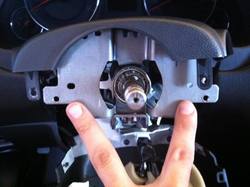
Here's a few shots of my 2012 Steering column, as you can see the front mounts are trimmed off. Thanks to Infiniti's efficiency program.
[Dead Link Removed]
---------- Post added at 06:16 PM ---------- Previous post was at 06:14 PM ----------
The EX steering column is designed differently, they have a way to create the front mounts but there's no bottom bracket available and there's no steering column cover available that support paddles. You have to make your and its not as clean.
Last edited by a moderator:
Saleen00_227
Member
- Location
- So-cal
Looks like the bottom bracket is non existent. And you do have that metal plate as the EX. You might be able to buy the bottom bracket, that will give you the side mount. Then just take your steering wheel off, as the EX guy did, and drill two holes (one on each side) into that metal plate you see there.
Last edited:
SCY7H3
Member
- Location
- Toronto, Ontario
- Car
- 2012 FX35S AWD
I wish it was that easy but there's two problems...first the mounting hole from the paddle does not come close to that bracket and secondly, I wouldn't want to mess around with taking the steering wheel off, disconnecting the airbags, etc.
Here's two more pics showing how they align. The paddle is aligned using the bottom steering cover that is bolted to the column and the cover screws into the paddle. This is how it would look put together.
[Dead Link Removed]
Here's two more pics showing how they align. The paddle is aligned using the bottom steering cover that is bolted to the column and the cover screws into the paddle. This is how it would look put together.
[Dead Link Removed]
Last edited by a moderator:
Saleen00_227
Member
- Location
- So-cal
i see the problem now. :good:
Hi, SCY7H3
I am so sorry! I only have a female and a male connector. And, connectors are patent products.
I am not ready to provide the white connectors(male and female) .
They will cost more money. If the bracket kit with connectors will make the price higher over $150~180.
That' why I post the terminal installation.
Originally, I use green wire for shift down and red wire for shift up(not orange wire)
If you think orange wires is better, I must buy new orange wires.
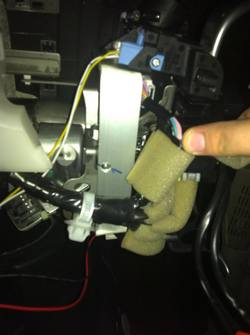
For black wire, it coulde be connect to any metale body.
Like this, screw black wire under the A/V monitor.
[Dead Link Removed]
I am so sorry! I only have a female and a male connector. And, connectors are patent products.
I am not ready to provide the white connectors(male and female) .
They will cost more money. If the bracket kit with connectors will make the price higher over $150~180.
That' why I post the terminal installation.
Originally, I use green wire for shift down and red wire for shift up(not orange wire)
If you think orange wires is better, I must buy new orange wires.
For black wire, it coulde be connect to any metale body.
Like this, screw black wire under the A/V monitor.
[Dead Link Removed]
Last edited by a moderator:
SCY7H3
Member
- Location
- Toronto, Ontario
- Car
- 2012 FX35S AWD
Usually, I made 5 bracket kits evey time!
But! Now, I only have one sample bracket, others were installed or sold.
I need more time to make more brackets! It is made by machine and handade after work time.
I never sell anythings on ebay, so I must prepare a lot of things to do it.
Forgive me, I can't make it faster.
About price, it is going to be $100~$120.
Here are photos about paddle connectors and part of the bracket.
http://plus.google.com/107211586850797072584/photos
---------- Post added 01-28-2014 at 12:07 AM ---------- Previous post was 01-27-2014 at 11:59 PM ----------
Q: How will the wire hook into the back of the control box?
A: I don't have any record, so I need time to do it.
Q:Will it be just two wires with the right pins plugged into the existing connector?
A: Not really. Two wires(green and orange) are pluged into the connector behide control box.
The other two black wires are connected to the ground.
Okay...so now you're changing the kit to not include the paddle connectors? If I'm not mistaken, you did indicate this was included in your post above for the price range of $100-120... I don't need the connector to the A/V box, just the paddle white connectors.
Okay...so now you're changing the kit to not include the paddle connectors? If I'm not mistaken, you did indicate this was included in your post above for the price range of $100-120... I don't need the connector to the A/V box, just the paddle white connectors.
Of course, the kit includes paddle shifter connectors .
But, it does not include connectors of the A/V box .
Price : $100~120.
Last edited:
SCY7H3
Member
- Location
- Toronto, Ontario
- Car
- 2012 FX35S AWD
Ah okay I thought you didn't include any white connectors.
Sent from my SGH-I747
---------- Post added at 02:07 PM ---------- Previous post was at 01:24 PM ----------
As long as the paddle connectors are included I'm happy, the a/v would not be needed as we have it in the car already
Sent from my SGH-I747
I thought you didn't include any white connectors. Sent from my SGH-I747
---------- Post added at 02:07 PM ---------- Previous post was at 01:24 PM ----------
As long as the paddle connectors are included I'm happy, the a/v would not be needed as we have it in the car already
Sent from my SGH-I747
jimmij
Member
- Location
- South florida
- Car
- 2013 fx37 awd
I can't wait for this kit. Does anyone know if we need a software update on a 2013
SCY7H3
Member
- Location
- Toronto, Ontario
- Car
- 2012 FX35S AWD
Hard to say but there is a member on here who tried to do the around view cam mod and he couldn't because the 2013 version has more components going through the CAN Bus..
Sent from my SGH-I747
Sent from my SGH-I747
I can't wait for this kit either, been wanting paddles since the day I bought my car lol
A
AusFX50s
Guest
Hi SCY7H3,
Are you going to be fitting the F-51 ****** body kit that you have pictured? According to the ****** sales guys....
"The body kit consists of 6 parts
- front bumper
- rear bumper
- grille
- net and DRL
- lining on the doors and arches
- sills
The first kit was installed and functional and it went into production it will be ready in 3-5 weeks that is why we are doing pre orders now and then the prices will rise. "
Share: