
I install a Transgo Shift Kit using the DIY from the G35 forum.
Here is the DIY: http://g35driver.com/forums/engine-...iy/313499-diy-transgo-valve-body-upgrade.html
It is nerve wrecking at first as I have not done anything like this before. It took me 6 hours total. I definitely think this mod worth the money. I didn't bother to check on installation cost at local transmission shops, but from my readings, the labor is anywhere from $600 to $800. Some member on the G35 forum did it for other charge $300. So the minute I found the DIY, I knew I will do the installation myself.
Overall, the install not hard at all, just messy as you work under the car with transmission fluid dripping down on you and time consuming. Just have to take your time and organize as there are a total of 52 bolts on the Valve Body that you will have to take apart. The followings are pic of my install:
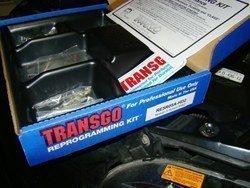
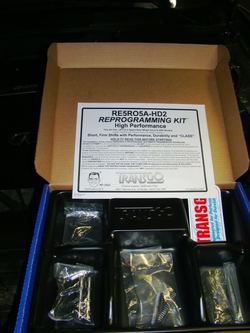
This is the kit


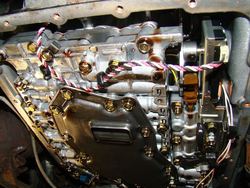
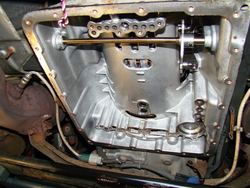
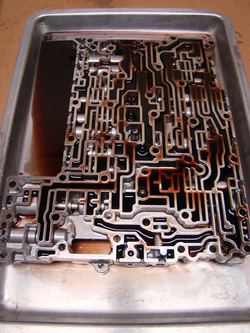
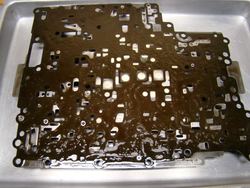
Here is the Valve Body after you remove the pan

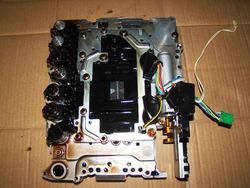
The Valve Body out of the transmission

Here is the naked trans after the Valve Body removed

Taking bolts off the filter that is mounted to the lower Valve Boby

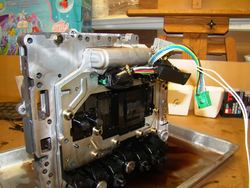
This is the upper Valve Body with the electronics and solenoids. There no need to remove the solenoids

Just another pic of the upper Valve Body with the electrical connectors removed

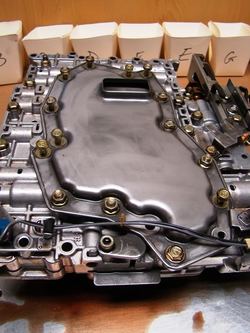
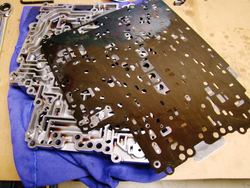
This is the lower Valve Body after you have removed 52 bolts and carefully separate the upper Valve Body off to the side with the Separator Plate so the balls will not be fall out of the upper Valve Body

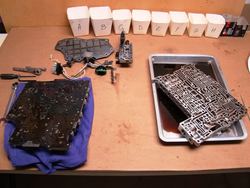
This what the Valve Body looks like after about 3 hours taking it apart

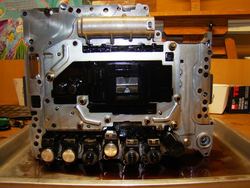
Closer look of the Separator Plate with the upper Valve Body flipped up

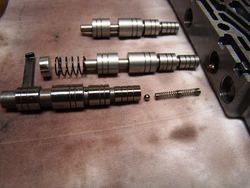
Ok, here are the parts that will be installed. No, the Transgo sticker stays out, lol.

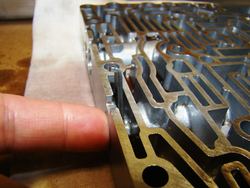
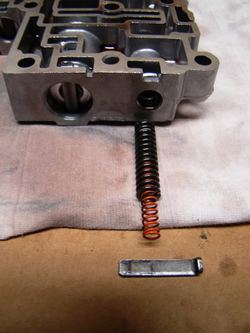
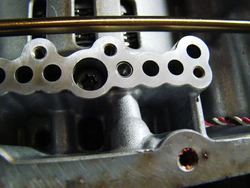
Remove the retainer to expose the valve

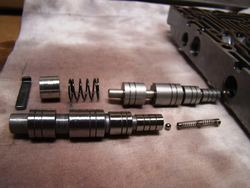
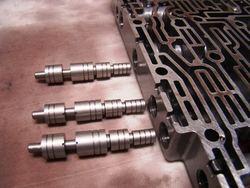
Replace the Direct Clutch Control valve

Replace the Input Clutch Control valve

Replace the High and Low Reverse Control valve

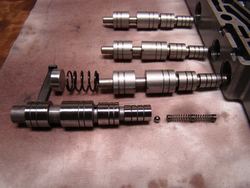
Tada, the three valves are done, here are the oe valves

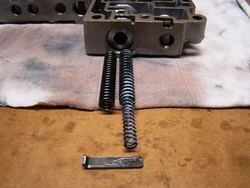
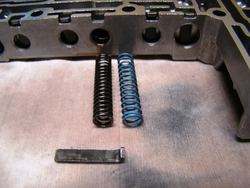
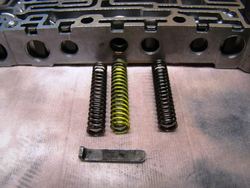
Insert additional spring into the Torque Converter Regulator

Replace the Main Regulator spring with two springs

Replace the Pilot Valve A spring

Replace the Pilot Valve B spring

Getting ready to enlarge exiting holes in the Separator Plate with the provided drill bits.
This is the point of no return! Up until this step you still can just put everything back if you decided not to continue.

Drilled holes. It's hard to tell as they're only enlarged by tiny increment

After holes are drilled, it time to put the two halves back and tighten the 52 bolts to 65-70 inch pound
One final step is to tap an tapered orfice into the hole (immediate right of the center big hole) in the transmission before putting the Valve Body back in

Put the Valve Body back in, reconnect the wires, reinstall the pan and torque the bolts to 95 inch pound. Refill the transmission with new fluid.
Done, there I saved myself about $300 after 6 hours of works. Worth it? Hell yes.
Here is the DIY: http://g35driver.com/forums/engine-...iy/313499-diy-transgo-valve-body-upgrade.html
It is nerve wrecking at first as I have not done anything like this before. It took me 6 hours total. I definitely think this mod worth the money. I didn't bother to check on installation cost at local transmission shops, but from my readings, the labor is anywhere from $600 to $800. Some member on the G35 forum did it for other charge $300. So the minute I found the DIY, I knew I will do the installation myself.
Overall, the install not hard at all, just messy as you work under the car with transmission fluid dripping down on you and time consuming. Just have to take your time and organize as there are a total of 52 bolts on the Valve Body that you will have to take apart. The followings are pic of my install:
This is the kit
Here is the Valve Body after you remove the pan
The Valve Body out of the transmission
Here is the naked trans after the Valve Body removed
Taking bolts off the filter that is mounted to the lower Valve Boby
This is the upper Valve Body with the electronics and solenoids. There no need to remove the solenoids
Just another pic of the upper Valve Body with the electrical connectors removed
This is the lower Valve Body after you have removed 52 bolts and carefully separate the upper Valve Body off to the side with the Separator Plate so the balls will not be fall out of the upper Valve Body
This what the Valve Body looks like after about 3 hours taking it apart
Closer look of the Separator Plate with the upper Valve Body flipped up
Ok, here are the parts that will be installed. No, the Transgo sticker stays out, lol.
Remove the retainer to expose the valve
Replace the Direct Clutch Control valve
Replace the Input Clutch Control valve
Replace the High and Low Reverse Control valve
Tada, the three valves are done, here are the oe valves
Insert additional spring into the Torque Converter Regulator
Replace the Main Regulator spring with two springs
Replace the Pilot Valve A spring
Replace the Pilot Valve B spring
Getting ready to enlarge exiting holes in the Separator Plate with the provided drill bits.
This is the point of no return! Up until this step you still can just put everything back if you decided not to continue.
Drilled holes. It's hard to tell as they're only enlarged by tiny increment
After holes are drilled, it time to put the two halves back and tighten the 52 bolts to 65-70 inch pound
One final step is to tap an tapered orfice into the hole (immediate right of the center big hole) in the transmission before putting the Valve Body back in
Put the Valve Body back in, reconnect the wires, reinstall the pan and torque the bolts to 95 inch pound. Refill the transmission with new fluid.
Done, there I saved myself about $300 after 6 hours of works. Worth it? Hell yes.
Attachments
-
 DSC01879.jpg92 KB · Views: 302
 -
 DSC01879.jpg92 KB · Views: 290
 -
 DSC01879.jpg92 KB · Views: 314
 -
 DSC01878.jpg68.4 KB · Views: 286
 -
 DSC01878.jpg68.4 KB · Views: 331
 -
 DSC01878.jpg68.4 KB · Views: 309
 -
 DSC02370.jpg117 KB · Views: 330
 -
 DSC02370.jpg117 KB · Views: 291
 -
 DSC02370.jpg117 KB · Views: 299
 -
 DSC02375.jpg94.6 KB · Views: 316
 -
 DSC02375.jpg94.6 KB · Views: 300
 -
 DSC02375.jpg94.6 KB · Views: 331
 -
 DSC02384.jpg98 KB · Views: 312
 -
 DSC02384.jpg98 KB · Views: 322
 -
 DSC02384.jpg98 KB · Views: 306
 -
 DSC02386.jpg91.7 KB · Views: 301
 -
 DSC02386.jpg91.7 KB · Views: 347
 -
 DSC02386.jpg91.7 KB · Views: 312
 -
 DSC02391.jpg90.5 KB · Views: 299
 -
 DSC02391.jpg90.5 KB · Views: 299
 -
 DSC02391.jpg90.5 KB · Views: 319
 -
 DSC02393.jpg91.8 KB · Views: 307
 -
 DSC02393.jpg91.8 KB · Views: 301
 -
 DSC02393.jpg91.8 KB · Views: 330
 -
 DSC02397.jpg104.8 KB · Views: 318
 -
 DSC02397.jpg104.8 KB · Views: 303
 -
 DSC02397.jpg104.8 KB · Views: 295
 -
 DSC02401.jpg80 KB · Views: 302
 -
 DSC02401.jpg80 KB · Views: 284
 -
 DSC02401.jpg80 KB · Views: 298
 -
 DSC02402.jpg90.1 KB · Views: 290
 -
 DSC02402.jpg90.1 KB · Views: 278
 -
 DSC02402.jpg90.1 KB · Views: 285
 -
 DSC02407.jpg90.9 KB · Views: 286
 -
 DSC02407.jpg90.9 KB · Views: 300
 -
 DSC02407.jpg90.9 KB · Views: 288
 -
 DSC02413.jpg64.7 KB · Views: 286
 -
 DSC02413.jpg64.7 KB · Views: 308
 -
 DSC02413.jpg64.7 KB · Views: 294
 -
 DSC02415.jpg62 KB · Views: 318
 -
 DSC02415.jpg62 KB · Views: 296
 -
 DSC02415.jpg62 KB · Views: 310
 -
 DSC02416.jpg84.7 KB · Views: 282
 -
 DSC02416.jpg84.7 KB · Views: 302
 -
 DSC02416.jpg84.7 KB · Views: 294
 -
 DSC02417.jpg81.5 KB · Views: 283
 -
 DSC02417.jpg81.5 KB · Views: 272
 -
 DSC02417.jpg81.5 KB · Views: 296
 -
 DSC02418.jpg87.5 KB · Views: 295
 -
 DSC02418.jpg87.5 KB · Views: 301
 -
 DSC02418.jpg87.5 KB · Views: 273
 -
 DSC02419.jpg69.3 KB · Views: 307
 -
 DSC02419.jpg69.3 KB · Views: 292
 -
 DSC02419.jpg69.3 KB · Views: 283
 -
 DSC02420.jpg75.9 KB · Views: 296
 -
 DSC02420.jpg75.9 KB · Views: 283
 -
 DSC02420.jpg75.9 KB · Views: 277
 -
 DSC02423.jpg71.2 KB · Views: 300
 -
 DSC02423.jpg71.2 KB · Views: 314
 -
 DSC02423.jpg71.2 KB · Views: 270
 -
 DSC02424.jpg92 KB · Views: 282
 -
 DSC02424.jpg92 KB · Views: 292
 -
 DSC02424.jpg92 KB · Views: 282
 -
 DSC02427.jpg102.7 KB · Views: 322
 -
 DSC02427.jpg102.7 KB · Views: 283
 -
 DSC02427.jpg102.7 KB · Views: 295
 -
 DSC02430.jpg89.1 KB · Views: 283
 -
 DSC02430.jpg89.1 KB · Views: 270
 -
 DSC02430.jpg89.1 KB · Views: 277
 -
 DSC02443.jpg65.4 KB · Views: 302
 -
 DSC02443.jpg65.4 KB · Views: 295
 -
 DSC02443.jpg65.4 KB · Views: 266
Last edited: