Jumbo Dynamat / Insulation install

jumbosrule

Fully FX Invested
Premium
Location
Redondo Beach, CA
Car
2003 FX35T
Name
Brad
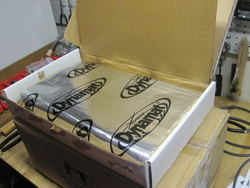
Pretty excited to be doing this to my car. Recently found a Dynamat bulk package on sale, shipped for $120 off eBay. The package arrived yesterday and it's heavy!!! Maybe 25lbs? Been reading up on this stuff for a while now and I wasn't set on getting the brand Dynamat, but the deal price was about the same as some of the other less expensive brands so I just went for it. 36 sq ft bulk package. Retail for this is usually $310.

http://www.dynamat.com/products_automotive_dynamat_xtreme.html

The .pdf file in this link describes the order of importance: Doors, Floor, Trunk, Ceiling.

Here's the IS thread that got me thinking about doing this install:

///684

I'm starting this thread to sort of document the process, as well as to ask and answer questions specific to my particular application.

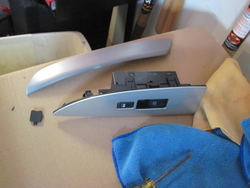
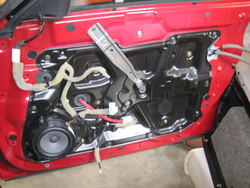
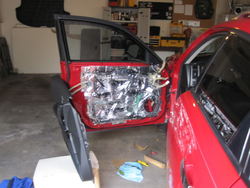
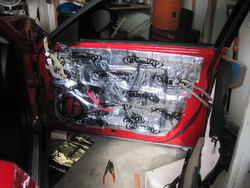
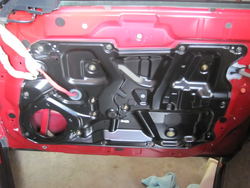
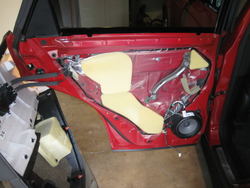
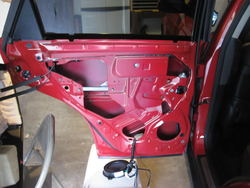
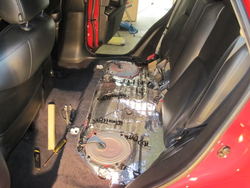
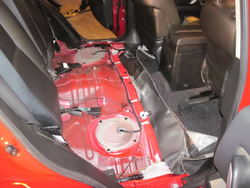
First of all, my plan is do lay down as much as possible in my interior without going too crazy on removing front seats and such. I have no problem peeling back the carpet or taking out the back seat bench. Current goal is to do all four doors, as much of the floor as I can reach, plus the sub-floor in the trunk and possibly the hatch as well. Might have to buy more mat to completely finish the job, and that's fine. Each time I have removed the plastic retainer clips that attach interior pieces to the frame, I have broken some. I worry a little about removing door panels and not being able to get them back on till I go find the right replacement clips.

When installing the dynamat on the doors or anywhere really, does the thickness of the insulation impact the ability to re-attach the interior panels? Are there any known areas where I'll need to trim the dynamat around clips so they will still engage properly? Are there any additional locations I should consider or do first?

General advice is welcome. I'm reading up online and educating myself, but any experience would be helpful.
 
Last edited:
nice dude, when the summer rolls around and I have more free time plus cash flow I will be doing the same...I should have done it when I did my wiper delete though.....
I was thinking of doing the hatch and the whole spare-area, to help keep the music in and to hekp keep some of the exhaust noise out.....

I helped my friend do this to his wrangler once and it wasn't too bad..

good luck!
 
I did the sub-floor in my trunk area and have a few little nuggets of wisdom to impart:

1. Make sure to poke holes in the dynamat for the clips. This seems obvious but I missed a couple and it is a serious PITA to find the hole after installation due to the thickness of the mat and the flexibility of the panels. I would suggest counting the clips on each interior (or door) section so you can be sure to account for every clip as you install.

2. There are a couple places where the plastic pieces are bolted into the sub floor. The subwoofer cable is also secured using clips which I found impossible not to break. Considering the nature and location of the cable, I just left it unsecured after I broke a couple of the clips. Upon replacing the interior sections I inadvertently drove one of the bolts through the hidden portion of the cable, which completely disabled my radio screen. I then had to disassemble the interior again just to unwrap and repair the cable in order to get my screen working again. Looking back I would suggest securing the subwoofer cable with a zip tie or something.

3. I didn't break any of the panel attachment clips, but the sound they made when I pulled them out worried me. The only thing I broke beyond repair was one of the bolt covers in the trunk area where the seat release handle is located. Those little guys have to be pried off and are very fragile.

4. I'm sure this is included in the instructions but its important to avoid leaving gaps in the mat where sound could come through. Even if it means cutting a 1"x12" strip to cover a seam.

Good luck with the install! I started out taking pics for a write-up but my camera battery died and then it started to rain. Not having a garage sucks. :tears: I was however able to finish the second half of the install from inside with the hatch closed. :cool:

I'll see about finding the pictures in a bit...
 
is your cabin currently too noisey or something?

Nope, definitely not too noisy. I've always had particular goals in mind for my particular FX build. I have always wanted to make my FX more of what it already is - sporty but also a luxury car. The sound system and seat leather were my first interior mods, now I have the dash cover coming and I want to improve the internal "feel" of the FX - to improve on the luxury or high class feel on the inside. From everything I have read and the couple of rides that I have been in that have insulation, it goes a long way towards changing the feel.

Some people with a more performance minded approach don't like insulation because it cuts back on the tactile feedback while driving the car and adds weight. You don't feel vibrations or the road as closely as before. I'm not worried about that - I'm looking for road isolation.

tchuck - Uh huh hm huh huh. You said, "nuggets".

Luckily I have a custom sub mounted into my sub-floor, so I probably won't have the same particular issues as you did - but thanks for the tips on the connectors & harnesses. I'll definitely plan to figure out routing and cut-outs before I start laying down the mat. Good advice. Definitely post some of those pix - or start a new thread I can reference from here.

Pulled up my electronic manual and found the page for the interior door trim:

View attachment 195447

I also found the body side trim (interior panels between doors). Probably won't attack that unless doing the doors and the floor isn't enough for me.
 
Last edited:
Oh yeah, I forgot about your sub.

Well I cant find the pics but you've inspired me to to install some more matting. I used less than half of the 50sqft I bought in the trunk area. I think I'm going to cover my Stillen "heat shield" and see if it tones down the intake noise at all. I'm also thinking since aluminum is one of the best barriers against radiant heat, and my Brown Bread Ultimate has an aluminum foil outer lining, it just might keep my filter a little cooler as well. We'll see. If not I can just take it off. So many uses for this stuff.

In regard to the additional weight, I'm laying off the Taco Bell this month to compensate. :tongue:

lol, oh yeah - the Bell is a weakness for me - seriously. I have one less than a block from my house lol.

Yeah the mat is heavy in large quantities but I removed the spare tire and all the tools which was about 75lbs. The custom sub enclosure and new trunk floor adds a bit of that weight back, but I'm still lighter than I was stock, even with the Dynamat installed.

Never seen anybody use this type of mat on a heat shield - not sure it would have that much benefit since the heat shield is open on the bottom and sides. Radiant heat isn't the problem as much as actual hot air from the engine is. IMO it would be more effective to build an air dam that isolates the filter and makes it draw more air from the front bumper area. But if you try out the mat anyway, I'd be interested in your MPGs before/after. Won't be a huge change, but anything helps long term.

Glad this thread could inspire you! According to the dynamat website, the #1 most effective place to apply is your door panels. Trunk is #3 on the list, after the #2 cabin floor. I plan to get started on the doors today and will post progress photos.
 
Last edited:
...
Never seen anybody use this type of mat on a heat shield - not sure it would have that much benefit since the heat shield is open on the bottom and sides. Radiant heat isn't the problem as much as actual hot air from the engine is. IMO it would be more effective to build an air dam that isolates the filter and makes it draw more air from the front bumper area. ...

I'm going to start a new thread about my intake plight. I worked on it about 4 hrs last night and suffice it to say I agree with you about the heat issue. As for the volume issue...stay tuned. I have to go reinstall everything right now.

BTW, that fragile little bolt cover I was talking about before is #5 on your door assembly exploded view above.
 
It's a learning process for sure! The Dynamat is pretty forgiving, but tedious to work with. Learning how to remove the door panel and applying the mat took me about two hours on the first door and then about one hour on the second door. I broke one plastic retainer on the first door and none on the second. Definitely a learning curve there.

I learned it was much easier to work with smaller pieces (about 12"X12") rather than one large piece.

Here's the new bulk package:

IMG_5664.jpg

And here are the trim pieces that come off the door first:

IMG_5665.jpg

The door opening cables can be left on if you prop up the door panel so there is no stress on the cables. Just easier than removing them.

IMG_5666.jpg

Then you need to unhook the wire harness connectors, remove the diagonal cross member, and take out the speaker. I moved this stuff up and out of the way.

IMG_5667.jpg
Then I cleaned the door surface well and applied the Dynamat. Used all sorts of tools to press the mat down into every crevice. I used a Sharpie to mark the areas where bolt access was needed, so I wouldn't have to hunt for the area after it was covered.

IMG_5668.jpg

Putting back on the wire harness, speaker and cross member was easy with the original holes exposed. Just repeated the process for the driver side door:

IMG_5670.jpg

Went out tonight. We picked places too close. I wanted to drive more.

When I lock or unlock the door the click sound the lock makes is a bit different. A bit quieter than well... for the last six years. Listening to music while driving hasn't changed much, though it almost seemed like I needed to fade the music more towards the front. Maybe I was just imagining it. Volume was fine, but the "sound stage" in the car had changed. I need to do the back doors before I go changing my settings.

My fingertips are sore from pressing the mat into all the corners. I found the butt end of a screwdriver to help a lot. And I also cut a radius on long block of wood, but that was better for flat surfaces. The instructions suggested using a blade to slice open the metal foil backing to press out any air pockets. Doing this causes the opening to spread a little, leaving a crack in the coverage. I just placed a larger piece of mat over the crack and rolled it down.

I used three sheets of Dynamat total for the two front doors. I have six more sheets. The back doors are smaller than the fronts, so I'm thinking I'll definitely have enough to insulate the rear doors and then the floor under the carpet in the front. Depending on the results of all that, I might end up with another bulk pack to finish the floor in the back, the trunk and the hatch. But we will cross that bridge later. I might be sick of Dynamat after installing six more sheets.
 

Attachments

  • IMG_5664.jpg
    IMG_5664.jpg
    81.6 KB · Views: 34
  • IMG_5665.jpg
    IMG_5665.jpg
    73.4 KB · Views: 17
  • IMG_5670.jpg
    IMG_5670.jpg
    81.3 KB · Views: 29
  • IMG_5668.jpg
    IMG_5668.jpg
    107.9 KB · Views: 19
  • IMG_5667.jpg
    IMG_5667.jpg
    79.2 KB · Views: 35
  • IMG_5666.jpg
    IMG_5666.jpg
    90.3 KB · Views: 14
  • IMG_5667.jpg
    IMG_5667.jpg
    79.2 KB · Views: 17
  • IMG_5666.jpg
    IMG_5666.jpg
    90.3 KB · Views: 21
  • IMG_5665.jpg
    IMG_5665.jpg
    73.4 KB · Views: 28
  • IMG_5664.jpg
    IMG_5664.jpg
    81.6 KB · Views: 30
  • IMG_5670.jpg
    IMG_5670.jpg
    81.3 KB · Views: 18
  • IMG_5668.jpg
    IMG_5668.jpg
    107.9 KB · Views: 18
  • IMG_5664.jpg
    IMG_5664.jpg
    81.6 KB · Views: 33
  • IMG_5665.jpg
    IMG_5665.jpg
    73.4 KB · Views: 18
  • IMG_5666.jpg
    IMG_5666.jpg
    90.3 KB · Views: 33
  • IMG_5667.jpg
    IMG_5667.jpg
    79.2 KB · Views: 16
  • IMG_5668.jpg
    IMG_5668.jpg
    107.9 KB · Views: 16
  • IMG_5670.jpg
    IMG_5670.jpg
    81.3 KB · Views: 27
  • IMG_5665.jpg
    IMG_5665.jpg
    73.4 KB · Views: 28
  • IMG_5664.jpg
    IMG_5664.jpg
    81.6 KB · Views: 18
  • IMG_5667.jpg
    IMG_5667.jpg
    79.2 KB · Views: 13
  • IMG_5666.jpg
    IMG_5666.jpg
    90.3 KB · Views: 16
  • IMG_5668.jpg
    IMG_5668.jpg
    107.9 KB · Views: 16
  • IMG_5670.jpg
    IMG_5670.jpg
    81.3 KB · Views: 16
  • IMG_5666.jpg
    IMG_5666.jpg
    90.3 KB · Views: 17
  • IMG_5665.jpg
    IMG_5665.jpg
    73.4 KB · Views: 15
  • IMG_5664.jpg
    IMG_5664.jpg
    81.6 KB · Views: 15
  • IMG_5668.jpg
    IMG_5668.jpg
    107.9 KB · Views: 16
  • IMG_5670.jpg
    IMG_5670.jpg
    81.3 KB · Views: 13
  • IMG_5667.jpg
    IMG_5667.jpg
    79.2 KB · Views: 22
  • IMG_5664.jpg
    IMG_5664.jpg
    81.6 KB · Views: 16
  • IMG_5665.jpg
    IMG_5665.jpg
    73.4 KB · Views: 17
  • IMG_5666.jpg
    IMG_5666.jpg
    90.3 KB · Views: 33
  • IMG_5667.jpg
    IMG_5667.jpg
    79.2 KB · Views: 38
  • IMG_5668.jpg
    IMG_5668.jpg
    107.9 KB · Views: 26
  • IMG_5670.jpg
    IMG_5670.jpg
    81.3 KB · Views: 15
Last edited:
Cool, did you weigh the mat? I wonder how much weight this total install will add.

Edit: I need to read more :wink:
 
Re

Very nice!

Regarding your doors: This situation is very similar to how an acoustic guitar works. The vibration of the string (in your case the door speaker) resonates with the body of the guitar (in your case the door) in effect turning the entire body of the guitar (door) into a giant speaker. The reason it works for an acoustic guitar is that the shape/material of the body is very precisely tuned/chosen to amplify the frequencies produced by the strings. The point being uniform sound output. The same is unfortunately not true of automotive door panels.
The result of your insulation installation is that the door itself is no longer "contributing" to your overall sound. That's also why the rear speakers seem to be disproportionately loud now. Either adjust the fader or Dynamat the back doors, but either way with what you've already done you should enjoy slightly higher sound quality with slightly less sound quantity.

I think I'm going to do my doors soon. The reason I did my trunk area before was to combat my Flowmaster muffler drone (totally worked) but now you've got me thinking about sound quality... Ahh the projects never end. :wink:
 
Guess I was motivated to finish up today. Got the rear doors done as well as under the back seat.

Here is Nissan's attempt and a sound and vapor barrier: foam covers the areas where there are cut-outs in the door.

IMG_5671.jpg

I stripped off everything.

IMG_5672.jpg

Notice you can see the outer skin of the door through the cut-outs? Well, I went ahead and covered the inside of that with Dynamat as well. I didn't go over the structural members - only the flat sections. Then I went ahead and covered the door normally.

When I was finished with the two rear doors, I had more than enough to do under the back seat.

IMG_5674.jpg

I covered the entire back, plus the kick plate under each seat.

IMG_5675.jpg

I learned a lot about the interior and once again feel like I know my car on a whole new level. The results are still TBD - driving to work in the morning will give me a chance to see how it feels.

---------- Post added at 08:01 PM ---------- Previous post was at 07:53 PM ----------

man dynamat is pretty expensive stuff
sound deadning is same things but cheaper lool
but nicely done jumbo

Thanks! Ain't no foo - got 60% off retail price via eBay. $120 for 36 sq ft. It's up in the beginning of the thread.

Ive heard second skin is a comparable sound deadner and i think it is cheaper

I looked up a few different brands like Brown Bead Ultimate, Fatmat, etc. This Dynamat bulk pack was competitive with the price I found on eBay. Maybe I could have done a few dollars cheaper, but whatever. It's a done deal now.
 

Attachments

  • IMG_5671.jpg
    IMG_5671.jpg
    80.4 KB · Views: 29
  • IMG_5672.jpg
    IMG_5672.jpg
    82.2 KB · Views: 15
  • IMG_5674.jpg
    IMG_5674.jpg
    100.6 KB · Views: 24
  • IMG_5675.jpg
    IMG_5675.jpg
    95.4 KB · Views: 17
  • IMG_5672.jpg
    IMG_5672.jpg
    82.2 KB · Views: 19
  • IMG_5671.jpg
    IMG_5671.jpg
    80.4 KB · Views: 13
  • IMG_5675.jpg
    IMG_5675.jpg
    95.4 KB · Views: 50
  • IMG_5674.jpg
    IMG_5674.jpg
    100.6 KB · Views: 15
  • IMG_5675.jpg
    IMG_5675.jpg
    95.4 KB · Views: 20
  • IMG_5674.jpg
    IMG_5674.jpg
    100.6 KB · Views: 17
  • IMG_5672.jpg
    IMG_5672.jpg
    82.2 KB · Views: 48
  • IMG_5671.jpg
    IMG_5671.jpg
    80.4 KB · Views: 18
  • IMG_5671.jpg
    IMG_5671.jpg
    80.4 KB · Views: 22
  • IMG_5672.jpg
    IMG_5672.jpg
    82.2 KB · Views: 15
  • IMG_5675.jpg
    IMG_5675.jpg
    95.4 KB · Views: 20
  • IMG_5674.jpg
    IMG_5674.jpg
    100.6 KB · Views: 43
  • IMG_5672.jpg
    IMG_5672.jpg
    82.2 KB · Views: 27
  • IMG_5674.jpg
    IMG_5674.jpg
    100.6 KB · Views: 21
  • IMG_5675.jpg
    IMG_5675.jpg
    95.4 KB · Views: 16
  • IMG_5671.jpg
    IMG_5671.jpg
    80.4 KB · Views: 24
  • IMG_5671.jpg
    IMG_5671.jpg
    80.4 KB · Views: 51
  • IMG_5675.jpg
    IMG_5675.jpg
    95.4 KB · Views: 32
  • IMG_5674.jpg
    IMG_5674.jpg
    100.6 KB · Views: 14
  • IMG_5672.jpg
    IMG_5672.jpg
    82.2 KB · Views: 50

What are those circular panels under each seat?

---------- Post added at 09:05 PM ---------- Previous post was at 09:01 PM ----------

...

sound deadning is same things but cheaper lool

...

Are you saying "sound deadening" is a brand? I've never heard of it...
 

Attachments

  • IMG_5674.jpg
    IMG_5674.jpg
    100.6 KB · Views: 48
  • IMG_5674.jpg
    IMG_5674.jpg
    100.6 KB · Views: 16
  • IMG_5674.jpg
    IMG_5674.jpg
    100.6 KB · Views: 53
  • IMG_5674.jpg
    IMG_5674.jpg
    100.6 KB · Views: 15
  • IMG_5674.jpg
    IMG_5674.jpg
    100.6 KB · Views: 26
  • IMG_5674.jpg
    IMG_5674.jpg
    100.6 KB · Views: 15
Back
Top