Wheel Spacer Install

fxlr8

Staff
Administrator
-----------------------------------------
IF YOU USE AND LIKE THIS DIY PLEASE +1
-----------------------------------------
(THIS MAY BE ONE OF MANY WAYS OF DOING THIS DIY/WRITE-UP, PLEASE FOLLOW THE PROCEDURE YOU ARE MOST COMFORTABLE WITH.)​

-----------------------------------------------------------------------------------------------------------------------------------------------------------
FRONT SPACER INSTALL

H&R 20mm spacer kit with extended studs.

1.JACK UP CAR AND PUT ON JACK STANDS. (DO NOT WORK ON A CAR WITHOUT QUALITY JACK STANDS!)

2.REMOVE WHEELS

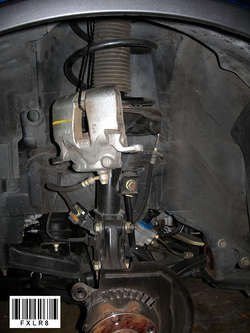
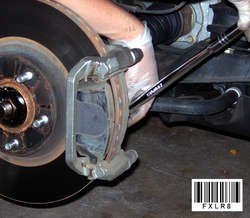
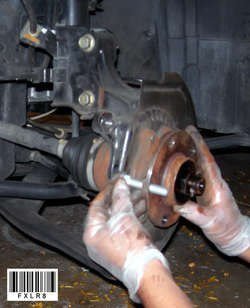
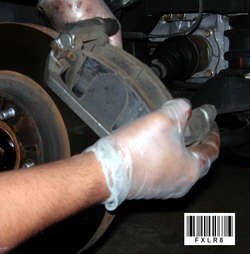
3.REMOVE CALIPERS BY REMOVING 2 BOLTS FROM THE REAR OF THE CALIPER AND HANG ON SPRING WITH A ZIP TIE.
hangcaliper.jpg

4.REMOVE CALIPER HOLDER BY REMOVING 2 BOLTS FROM REAR OF CALIPER MOUNT.
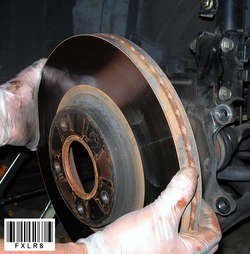
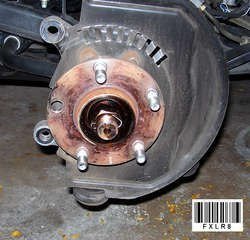
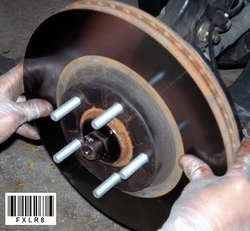
calipermount.jpg

5.REMOVE ROTOR
rotorremove.jpg

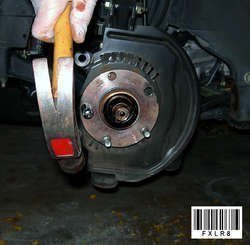
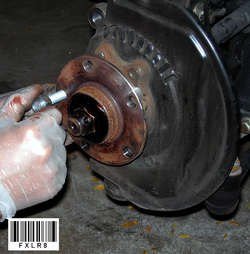
6.REMOVE OLD STUDS BY USING A SMALLER SOCKET ON THE STUD AND HITTING WITH A HAMMER.
removestud.jpg

7.ONCE THE STUDS ARE LOOSE YOU CAN REMOVE THEM FROM THE REAR.
removedstud.jpg

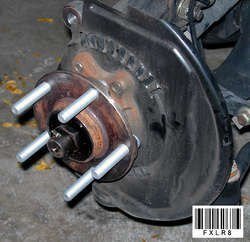
8.WITH THE 20MM NEW STUDS YOU WILL HAVE TO TURN ROTOR TOWARDS THE FRONT OF THE CAR AND PUT IN THE NEW STUDS WHERE THERE IS A GROOVE IN THE DUST SHIELD.
installlug1.jpg

9.TAKE ONE OF YOUR OLD STOCK LUGNUTS AND REVERSE THEM SO THE FLAT SIDE OF THE LUG GOES ON FIRST.. SCREW THE LUG NUT ALL THE WAY DOWN AS FAR AS YOU CAN SO THE NEW STUDS GET FORCED IN.
installlug.jpg

10.GET ALL THE NEW STUDS ON.
studsinstalled.jpg

11.PUT ROTOR BACK ON.
rotorinstall.jpg

12.PUT CALIPER MOUNT AND CALIPER BACK ON.
removecalipermount.jpg

13.INSTALL THE NEW SPACERS AND PUT YOUR WHEELS BACK ON.

14.ONCE YOU HAVE YOUR WHEELS ON YOU ARE GOING TO TIGHTEN THE LUGS DOWN AND THIS SHOULD FORCE THE REST OF THE NEW STUD IN ALL THE WAY.

15.MAKE SURE YOU TORQUE YOUR LUGS TO AROUND 85 FT/LBS.

16.RETORQUE YOUR LUGS AFTER 60 MILES OF DRIVING.

ENJOY
 

Attachments

  • hangcaliper.jpg
    hangcaliper.jpg
    100.2 KB · Views: 68
  • hangcaliper.jpg
    hangcaliper.jpg
    100.2 KB · Views: 51
  • calipermount.jpg
    calipermount.jpg
    86.7 KB · Views: 48
  • calipermount.jpg
    calipermount.jpg
    86.7 KB · Views: 56
  • rotorremove.jpg
    rotorremove.jpg
    96.7 KB · Views: 75
  • rotorremove.jpg
    rotorremove.jpg
    96.7 KB · Views: 38
  • removestud.jpg
    removestud.jpg
    73.3 KB · Views: 49
  • removestud.jpg
    removestud.jpg
    73.3 KB · Views: 41
  • removedstud.jpg
    removedstud.jpg
    135.2 KB · Views: 58
  • removedstud.jpg
    removedstud.jpg
    135.2 KB · Views: 55
  • installlug1.jpg
    installlug1.jpg
    68.3 KB · Views: 61
  • installlug1.jpg
    installlug1.jpg
    68.3 KB · Views: 58
  • installlug.jpg
    installlug.jpg
    97.6 KB · Views: 78
  • installlug.jpg
    installlug.jpg
    97.6 KB · Views: 43
  • studsinstalled.jpg
    studsinstalled.jpg
    105.6 KB · Views: 53
  • studsinstalled.jpg
    studsinstalled.jpg
    105.6 KB · Views: 54
  • rotorinstall.jpg
    rotorinstall.jpg
    73.2 KB · Views: 61
  • rotorinstall.jpg
    rotorinstall.jpg
    73.2 KB · Views: 63
  • removecalipermount.jpg
    removecalipermount.jpg
    56.7 KB · Views: 53
  • removecalipermount.jpg
    removecalipermount.jpg
    56.7 KB · Views: 48
Jeff, what tools do i need to finish the job? like the size sockets and wrenches. I dont want to start and be half way through it with the wrong size wrench!
 
Jeff, what tools do i need to finish the job? like the size sockets and wrenches. I dont want to start and be half way through it with the wrong size wrench!

I am sorry I don't remember, but I am certain all you will need are the normal everyday sizes, like 14mm 16mm.

do you have before and after pics?

I don't have any pictures of before, but here is a super old picture of after
http://i85.photobucket.com/albums/k46/FXLR8/front2.jpg
 
After all said and done when your wheel is back on, in the front,does the stud fill in the lug all the way, or is there a little bit of the stud hanging out pass the top of the lug or does the stud not reach the top of the lug?

I ask this because I just had a rotation and noticed my studs don't
fill in my lugs. My dad said that's dangerous.I have not checked my rears.

Thanks

Tkr

That depends on if you used the bolts that came with the spacer or you can can change out to different lugs to fit or use an open ended lug.
 
this seems like a pretty hard job...would you even recommend it to somebody with no experience doing this type of thing before?

i will be putting new brake pads on within next month, i figured i can put some spacers on for my stock rims at the same time...or just get them both installed by somebody at the same time...
 
It doesn't look like that difficult of a job if you have the time and inclination. And it looks like Jeff's write up is pretty dead on. But I left it for the pros to do with the right tools :laugh:.
 
Since you'll be putting new pads on I say do the spacers yourself. It's pretty straight forward. I had never put new lugs on and it was easy, just time consuming.
 
DR2..I'm not sure if they used the same lugs.I just thought about it and I
forgot that the Studs that came with the spacer came without lugs,should I have changed them out?

I started having some slight rubbing noise and it's been driving me nuts,now that I drive the car downtown evryday.

So I had drilled rotors put all around, because the rt front was a little warped but not horrible,upgraded pads and it's been 2 weeks and it feels better but still felt a little off.So I had everything rotated and rebalance and checked my alignment,this was just tonight,so they took the spacers
off and there was rust build up in the rear, so they cleaned them and coming home it felt alot better but that's at low speeds I'll see in the morning when I'm doing 90 to work.

Thanks for the insight

TKR
 
Keep us updated how it goes. I never had any issues when I had my spacers but when I did remove them one of the rears were rusted badly and was hell to remove.
 
Guys,

Pleae help a Noob! I recall someone saying to get the DRM style for the H&R spacer. Should I be buying the DRM or DRS style? It looks to me like the pictures posted on this thread are using the DRS style...

Please help!
 
Is it necessary to remove the brake caliper assembly? From the looks of it, it seems like you can just keep everythign on and just knock on the stud into the groove and remove it.

Sake_yo
 
Is it necessary to remove the brake caliper assembly? From the looks of it, it seems like you can just keep everythign on and just knock on the stud into the groove and remove it.

Sake_yo

I had to replace a broken stud few weeks ago and had to remove the brake caliper. I thought the same by being able to squeeze through the little space but no way......you'll need to take off the brakes and even with the brakes off, you still need to chisel the stud through the small space to get through the rotors.
 
Guys,

Pleae help a Noob! I recall someone saying to get the DRM style for the H&R spacer. Should I be buying the DRM or DRS style? It looks to me like the pictures posted on this thread are using the DRS style...

Please help!

They are the DRS style, which is better IMO because you eliminate an extra set of studs and lugs.
 
Any part number on the H&R Studs. Need to order new and good onces as my current gave me a lot of trouble.
Can't seem to find it here on the scene.

Jeff...??
 
Back
Top