You are using an out of date browser. It may not display this or other websites correctly.
You should upgrade or use an alternative browser.
You should upgrade or use an alternative browser.
What did you do to your FX / QX70 today?
- Thread starter pmanliu
- Start date
^ Let the modding begin! :burnout:
Well this will be my 3rd mod.... right?
1. exhaust
2. stillen stb
3. key hole delete
4. crawford plenum
ok 4th mod so far
I like your style... Step one, get car... Step 1.5, modify!
So i guess step 2 would be paying it off huh?:tongue (2):
Nice. Here is the Crawford Plenum Installation Instruction in case you need it. http://www.crawfordzcar.com/support/PlenumInstallation.pdf
Have fun man, don't rush.
Have fun man, don't rush.
Nice. Here is the Crawford Plenum Installation Instruction in case you need it. http://www.crawfordzcar.com/support/PlenumInstallation.pdf
Have fun man, don't rush.
sweet! thanks man i appreciate that, one question though since i bought it used and don't have any hardware with do you happen to know the size and lengths of the new bolts? 4 short and 2 long ones?
sweet! thanks man i appreciate that, one question though since i bought it used and don't have any hardware with do you happen to know the size and lengths of the new bolts? 4 short and 2 long ones?
I don't know off the top. I will have to take those long bolt out and measure. It would be too much trouble to take the entire plenum off to get to the 4 short ones. I post that up later tonight.
---------- Post added at 11:43 PM ---------- Previous post was at 08:33 PM ----------
Ok, the length of the two long bolts are 80 mm and 75 mm, they're 10 mm in size. I'm sorry to leave you hanging on the 4 short ones. My guess, they're probably 15 mm - 20 mm in length. I'm certain they're 10 mm in size. Just get some in various length to try them out or call Crawford for specs.
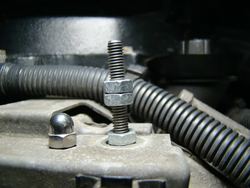
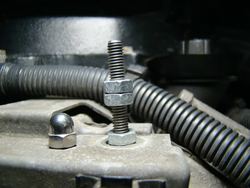
This is how I put the engine cover back on with the Crawford plenum if you decided to put the engine cover back on too.

- Using four 10 mm x 40 mm bolts full body thread and twelve 10 mm nuts.
- Hack saw the hex head off the 4 bolts.
- Use a vise grip to grip onto the existing mounting bolt and then turn it counter clockwise to loosen it from the mounting hole.
- Screw the 10 mm x 40 mm bolts with the hex head cut off into the mounting hole by hand.
- Set the first nut close to the bottom bolt. Make sure the nut is not tighten down just yet.
- Set the second nut in the middle of the bolt.
- Set the third nut right on top of the second nut and tighten it down against the second nut.
When you tighten down the third nut make sure the second nut doesn't turn at the same time as you tight down the third nut. The idea here is use the second nut as a limiter, as you tighten down on the third nut, you're essentially tighten the bolt into the mounting hole. Once you feel the bolt is tighten down, now tighten down the bottom nut so that the bolt will be lock in place.
- Do the above steps to replace the other three mounting bolts.
- Now that you have planted four longer mounting bolts, it is time to adjust the height to how the cover will seat over the Crawford plenum.
- With two 10 mm wrenches, use one to hold the second nut while using the other wrench to lossen the third nut. Doing so will not causing the bolt coming lose.
- Now that the second and third nuts are lose, adjust the second nut such that the cover clears the plenum. Once you find the proper height, tighten down the third nut against the second nut to lock in the height where the engine cover will seat.
- Place the engine cover onto the mounting bolts and tighten down the cap nuts.
Attachments
Last edited:
I took off my winter rims and put my Lexani rims for the summer. I had a hard time taking off one of the rims it appeared that it was stuck. It took me like ten minutes to take the rim. Then after one of the studs appeared to be damaged I had a hard time putting on one of the lug nuts. Hopefully I don't have a hard time taking off the rim at a later date.
I don't know off the top. I will have to take those long bolt out and measure. It would be too much trouble to take the entire plenum off to get to the 4 short ones. I post that up later tonight.
Thanks for all the info man! I'm gonna call crawford later on today about the other screws,and ill have to try out the cover install too. Thanks again!
Slamming45
Member
So I'm going to my machine shop today to pick up a 3.5" custom maf housing for the fx45. After a week of research, research, more research and planning I truly believe that I will have an intake with solid Hp and torque gains across the board, I'm really excited to the point of having troubble sleeping with this idea bouncing around in my mind. Gimme a week and I should have all the pieces to make this dream into a thing of reality. :ninja:
no the stud was not bent it just appeared that the grooves were chipping off because i actually got a piece of metal in my thumb. It might have bee that when Infiniti put my rims on they tightened the rims to hard and possibly stripped it a little.
So I'm going to my machine shop today to pick up a 3.5" custom maf housing for the fx45. After a week of research, research, more research and planning I truly believe that I will have an intake with solid Hp and torque gains across the board, I'm really excited to the point of having troubble sleeping with this idea bouncing around in my mind. Gimme a week and I should have all the pieces to make this dream into a thing of reality. :ninja:
Sweet -- where are you getting this done at? Good handful of us FXers in Chicago or close suburbs.
I've had 4 custom intakes on my 2003 FX45 -- best one, which I have on now, is the JWT pop charger.
Just be careful where you position the MAF housing -- the distance from the throttle body I've found should ideally be the same as OEM or else you can end up with a rich or lean condition unless you tune.
Are you going to do a dyno before and after?
Slamming45
Member
Well I spent over 150 for a very dissapointing bolt on intake kit, Putting this new intake together with all premium components is costing a pretty penny as well ( VERY happy with the maf housing I picked up today). It is the key, forget that sloppy 4 bolt adapter junk. The dyno before and after will come with the uprev tune when I'm ready. Sounds like GRD is booked up for the time being. But then why not get the exhast done too. Still trying to find the best hp gains, does anyone know? hks, invidia, nismo, not sure yet, i'm sure they all sound great. I am a fan of go big or go home. I want the most possible HP!
...Still trying to find the best hp gains, does anyone know? hks, invidia, nismo, not sure yet, i'm sure they all sound great. I am a fan of go big or go home. I want the most possible HP!
///9415
If you want juice Jumbos build is indeed big.....I would also like to contribute that the interim add-ons suck up a lot of cash, IF you truly want power I'd save for FI and lay out a plan first. There are members who have dropped a lot on small bits and pieces to only wish that they had gone with something big in the first place........
Steering Shimmy repaired Finally.
Finally got around to doing the steering rack adjustment and it took all of 10 minutes to do. This was by far the easiest repair to the FX I have ever done. It took about half a turn in untill lightly snug then I backed the adjuster screw out about an eighth of a turn. Just went for a test drive and no more shimmy at all.
Finally got around to doing the steering rack adjustment and it took all of 10 minutes to do. This was by far the easiest repair to the FX I have ever done. It took about half a turn in untill lightly snug then I backed the adjuster screw out about an eighth of a turn. Just went for a test drive and no more shimmy at all.
Share:

