Jumbo Boost

Circumstances aside, this is a great thread to follow. I feel that I can't find the time to follow many long term threads in detail, but there are definitely the choice few (and an always growing number) that I must read every post. I'm not only amazed by the speed and efficiency at which upgrades are completed on Red, Silver, and Jumbata, but constantly impressed by the thourough documentation and detail explained.
Always, very well done and excited to read every step.
 
Wow.. your going fast. As always a great read and follow. Hate to see big red taken apart like that, but at least she'll live on.

Are you going to swap Big Red's headunit into Big Silver? If new BS is skipping and BR's was ok.. no reason not to.
 
Looking good....you realy bit yourself into this again didn´t you....?! Maybe i missed this but are you staying with the Silver color of the car...??Did you by any change had the time to take a look at Big Red outside temp sensor....?? :wink (2):
 
Circumstances aside, this is a great thread to follow. I feel that I can't find the time to follow many long term threads in detail, but there are definitely the choice few (and an always growing number) that I must read every post. I'm not only amazed by the speed and efficiency at which upgrades are completed on Red, Silver, and Jumbata, but constantly impressed by the thourough documentation and detail explained.
Always, very well done and excited to read every step.

Thanks man that means a lot. I guess I just post threads as I would like to read them. When other threads have similar documentation it often gives me the confidence to try something I've never done before. That being said, the REASON I have speed and efficiency is because I have two cars. Being able to take one down for several days to knock out the next item on the project list while I drive the other - unbelievably enabling. Couple that with the fact that I'm a Project Engineer - complex custom hardware building is what I've been doing for 15 years. When the product is a cooler FX and it's mine... what more motivation do I need?

+1
i enjoy reading your progress and enthusiasm. I think a Jumbo Boost Part II thread is in order for 'Big Silver'

Wow.. your going fast. As always a great read and follow. Hate to see big red taken apart like that, but at least she'll live on. Are you going to swap Big Red's headunit into Big Silver? If new BS is skipping and BR's was ok.. no reason not to.

No Big Silver! I didn't actually name Big Red either - the build shop (Powerfab Auto) sort of tossed it out there during conversation. At first I really didn't like it but I didn't have much in the way of alternatives and after I used it once or twice it sort of stuck.

I have Big Red's head unit sitting on my workbench. Unfortunately the CD player was having the same problems as the unit in Silver. In fact, the one in Red contained my THIRD CD player. After counting Silver's CD player, I've gone through four. I think I may finally go for some type of aftermarket unit but that's another project.

Looking good....you realy bit yourself into this again didn´t you....?! Maybe i missed this but are you staying with the Silver color of the car...??Did you by any change had the time to take a look at Big Red outside temp sensor....?? :wink (2):

I really, really, really loved my Laser Red. I've always wanted to do some custom flares, removing the flat edge on the fenders and getting rid of the gray plastic trim. When I finally pull the trigger on the body work, I think I'll have the whole car painted.

I did take a look for the sensor and did not see it. I'm pretty sure we moved it when we installed the Koyo and the oil/tranny coolers. The crash mangled the front of the car pretty badly so I was not able to remove the grills or the front bumper to take a better look. The shop is going to remove the suspension and brakes sometime in the next week and I'll ask them to pull the sensor when they get it up on a rack.
 
I did take a look for the sensor and did not see it. I'm pretty sure we moved it when we installed the Koyo and the oil/tranny coolers. The crash mangled the front of the car pretty badly so I was not able to remove the grills or the front bumper to take a better look. The shop is going to remove the suspension and brakes sometime in the next week and I'll ask them to pull the sensor when they get it up on a rack.

Ok cool keep me posted please...?? So with a full paint ( in time ) another color would be an option as well then....?? I like silver also. My audi S4 was silver. :smile (2):
 
Yesterday instead of driving up to the shop after work, I just stopped by EPO and snagged an Qpower ACL fuse holder & fuse. I'm using 4 AWG wire (rated for 150A max) and my JL amplifier is 300W RMS, so 300/6.25 = 48A. The ACL fuses available were 50, 60 & 100A so I went with 60A. I like that kind of margin in my audio build. Makes me... comfortable.

So here's a shot of the Optima yellow top and you can see the adapter wire connected to the terminal and looped back to the harness connection. The new power wire is attached to the harness post and the new ground wire is attached to the factory ground coming off the battery. The current wire routing is temporary because I still have the kill switch to install.

IMG_3455.jpg

Shot of the Epicenter & power/ground distribution under the amplifier:

IMG_3078.jpg

The silver FX's trunk with no finishing panel:

IMG_3457.jpg

And with the panel - already played a round of golf and used the trunk normally

IMG_3456.jpg

Next I swapped out the driver's door speaker - which I thought was blown because when I balanced everything left and faded all the way front, the left front speaker is definitely blown. Turns out - it's the dash speaker, not the door speaker. Foiled! I didn't remove the dash speakers from Big Red so it will have to wait.

At least I got my bass back! I spent about 20 minutes in the car tweaking the settings last night. The amplifier gain is actually set to a little less than 50% because more than that overplays the rest of the system. Using the Epicenter volume control knob mounted at my right knee is a matter of finding a particular level for a particular song (or disc). Generally once I tweak that knob for a song it's good to go for the whole album. It's nice to boost it when the music calls for it and this setup offers the punch that comes from extending the lower range of the system and giving it enough power.

Taking the weekend off from car projects - heading to Breckenridge to visit some friends. On my way to the airport this afternoon I'll drop off Big Red's OEM suspension so the shop can swap it in and remove the Wheels, Ichiba V2 20mm spacers, BC coilovers, Stoptech rotors Stainless brake lines and BBK. It might be a couple weeks before I get to those - got some weekend travel planned for the next couple weekends. Sort of feels like I'm getting all these parts again for the first time. Kind of fun I gotta say.
 

Attachments

  • IMG_3455.jpg
    IMG_3455.jpg
    115 KB · Views: 30
  • IMG_3455.jpg
    IMG_3455.jpg
    115 KB · Views: 58
  • IMG_3078.jpg
    IMG_3078.jpg
    42.9 KB · Views: 31
  • IMG_3078.jpg
    IMG_3078.jpg
    42.9 KB · Views: 29
  • IMG_3457.jpg
    IMG_3457.jpg
    63.9 KB · Views: 27
  • IMG_3457.jpg
    IMG_3457.jpg
    63.9 KB · Views: 41
  • IMG_3456.jpg
    IMG_3456.jpg
    106.2 KB · Views: 29
  • IMG_3456.jpg
    IMG_3456.jpg
    106.2 KB · Views: 28
  • IMG_3455.jpg
    IMG_3455.jpg
    115 KB · Views: 30
  • IMG_3078.jpg
    IMG_3078.jpg
    42.9 KB · Views: 38
  • IMG_3456.jpg
    IMG_3456.jpg
    106.2 KB · Views: 30
  • IMG_3457.jpg
    IMG_3457.jpg
    63.9 KB · Views: 39
  • IMG_3455.jpg
    IMG_3455.jpg
    115 KB · Views: 29
  • IMG_3078.jpg
    IMG_3078.jpg
    42.9 KB · Views: 63
  • IMG_3456.jpg
    IMG_3456.jpg
    106.2 KB · Views: 27
  • IMG_3078.jpg
    IMG_3078.jpg
    42.9 KB · Views: 33
  • IMG_3455.jpg
    IMG_3455.jpg
    115 KB · Views: 30
  • IMG_3457.jpg
    IMG_3457.jpg
    63.9 KB · Views: 29
  • IMG_3456.jpg
    IMG_3456.jpg
    106.2 KB · Views: 31
  • IMG_3457.jpg
    IMG_3457.jpg
    63.9 KB · Views: 28
  • IMG_3455.jpg
    IMG_3455.jpg
    115 KB · Views: 52
  • IMG_3457.jpg
    IMG_3457.jpg
    63.9 KB · Views: 41
  • IMG_3456.jpg
    IMG_3456.jpg
    106.2 KB · Views: 36
  • IMG_3078.jpg
    IMG_3078.jpg
    42.9 KB · Views: 45
Last edited:
Sweet, having mods lined up for you for awhile must be a nice feeling :smile (2):. Thanks for taking the time to share your progress, very enjoyable to follow.
 
Sweet, having mods lined up for you for awhile must be a nice feeling
smile%20%282%29.png
. Thanks for taking the time to share your progress, very enjoyable to follow.

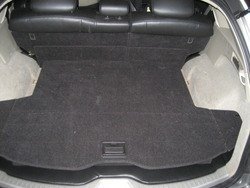
That's exactly how I feel! Plenty of projects to do - a lot of projects I always meant to do with Big Red. The difference now is that I have so many extra parts, it makes starting those projects much easier. I can work them out on the bench, then just swap them into Silver when I'm ready. A few I have in the very beginning stages on my workbench. I'll have to take a shot of the bench - I'm usually very organized but with the volume of stuff I just had to keep... it's a little cluttered.

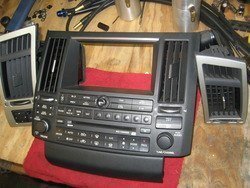
For Example - the HU screen move up to the headliner console. I now have extra wired connectors I can use to extend the OEM harness. Same wires down to the color coding. I also have Big Red's Sunglass/headliner console that I can mold into a custom enclosure.

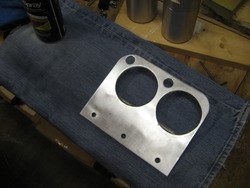
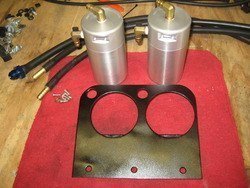
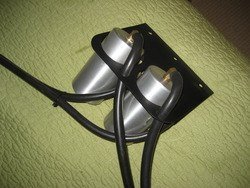
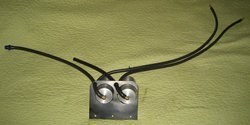
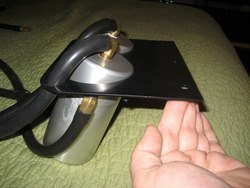
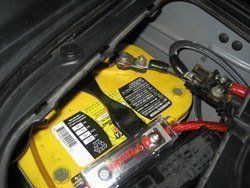
I have Big Red's dual oil catch system laid out on the bench with a few of the hoses and fittings. I still love just looking at these cans. Heh.
More to come since it depends on the new setup.

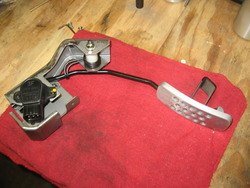
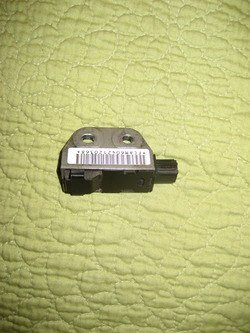
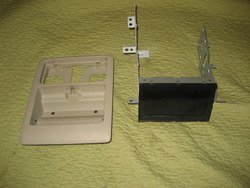
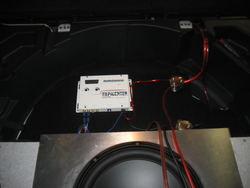
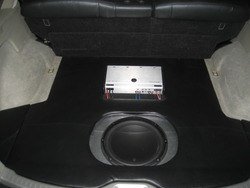
The aftermarket gages on the driver's side pillar are on the bench. After uninstalling the PLX data modules, I plan a much cleaner install for Silver behind the glovebox. The haltech will go behind the passenger side kickplate and will have Big Red's setup; a USB cable extending through the glovebox for tuning access. I took a really good look at these areas when I was swapping out the interior. A couple custom brackets should really organize it well.

The list goes on... there are a few Miata projects on the bench too.


I've been getting into discussions with Powerfab about where we go after the motor swap. The existing piping is all tweaked and we would be cutting out any damaged areas and essentially refabricating both hot & cold sides on Silver. That's almost as much effort as just staring over, so I've been considering options. In increasing levels of cost... Jumbo's new boost options:

Option 1 - Leave Silver stock, sell Big Red's goodies, use money for new project.
Commentary: Whatever. I love a modified FX. Don't think Option 1 is going to make the cut.
$ - obviously the easiest to finance.

Option 2 - Recreate Silver exactly the way I had Big Red set up. We know everything about the system what work has to be done to get there.
Commentary: Seems to be a safe plan - I know what to expect and about what it will cost me.
$$$ - This ain't cheap and while it hurts to have to pay this again, I'm willing because I loved the product that much.

Option 3 - Recreate essentially what was in Big Red, but with a couple upgrades like an additional wastegate & composite driveshaft.
Commentary: Will pretty much be another development/new build project. Will get spendy and I'm not sure exactly what that means. This is probably my favorite Option for what I get out of it in the end.
$$$$ - If the project takes months (which it will) it is pretty easy to spread out the cost with scheduled payments. Doing it this way throws cost control out the window and I'm going to take a financial hit. Sacrifice for such a noble cause though... isn't that priceless? I feel like this is the most I can justify in terms of money. I hate saying that though because if there were EVER about the money, I wouldn't have modified the first FX.

Option 4 - New layout, turbo placement (single or twin), custom intercooler, an additional wastegate, custom forward facing manifolds, SFR built 5AT, Composite drive shaft. We would be cutting out any of Big Red's useable hot & cold side piping and essentailly use it for raw material. This is pretty much what Turbocad is doing with his FX - except with major differences as compared to my RWD 2003. I.e. we would be into a new development/build project.
Commentary: Well crap. This sounds really fun and I'm sure I'd get what I want. Hard to justify or rationalize but I'll try anyway.
$$$$$ - So we are saying if I spread out the payments I could possibly hide the final total from my wife. Because if she found out how much I spent over the course of this project and last... *shudder*

Option 5 - There's a chance... yes a chance... that I could purchase one of the only three existing front center feed plenums for the VQ35DE. The current owner of the GORGEOUS setup has had it for a while and thinking about something else. If I can land his setup, it's proven and has been maintained by Powerfab since it was built. That includes what began life as a Greddy TT kit, modified to what it is now.
Commentary: There would obviously have to be some fabrication to get it all integrated into Silver but talking about it much more is premature... not even sure what the guy is asking for his setup and if I really do have first dibs on it. The owner is the guy who build my FX so I'm hoping the unique nature of the whole thing will get him interested. After all - he'd be installing it on Silver.
$$$$$$ - Heaven help me if he comes to me with an offer I have to think about. I'll have to save for another year just to get it installed.
 
Last edited:
Last night I spent a little time on the seats. When I swapped out the Silver's interior for Big Red's interior, I kept the driver's seat from Silver. Big Red's seat was ripped open with the deployment of the SRS airbag. I've figured out how to remove the good airbags from the Silver FX and swap them into Big Red's seats. The only thing I still need to do is have the rips repaired. Before I was thinking I would have Siliver's seat reupholstered but using Big Red's seats, I'll only need to replace two panels rather than the whole cover.

I've also figured out how to swap Big Red's head unit into Silver. There seems to be a different connector between the 2003/2004 models, so along with the head unit I have to bring the faceplate. Which is cool with me because Big Red's is black.

I get my stance back starting tomorrow morning. Hitting up the shop first thing in the morning to pull the wheels, coilovers, brakes, spacers, rear sway and rear subframe brace. I'm going to try to get all this swapped over in the next few days, pending a close damage inspection. I guess it's possible something could have been tweaked enough that I need to re-order. Hope not because getting lower, the custom dampening, wider stance... I can't wait to have that back!!!

Also planning on taking the door lock & window actuators, rear hatch trim, window vent visors, headliner console, rearview and side view mirrors, some head unit wiring... and I really want to take the entire rear hatch. It seems to be undamaged but might be out of shape a little. I've got this vision of the rear hatch mounted to my garage wall.

The shop wants to cut the chassis in half so they can wheel around each half like a wheel barrow. We will be disconnecting the driveshaft & sending it out for a composite makeover before that happens, also checking on all the exhaust components to see what can be re-used.

I transfered the title and paid taxes on the purchase at the courthouse today - Silver is officially under Jumbo's heavy hand.
 
Compositie makeover ?? Are they using any parts from your own shaft or just using it for a model ?? Could you ask them to document the spec for any future interested in the same product ?? ;)

Ohhhhh and just a little reminder for the sensor tommorow bud...


Thanks and Enjoy your day tommorow
Verstuurd van mijn GT-I9100 met
 
I guess I could have waited to post my last post till I had all these photos but oh well.

Both headlights looked to be intact but both housings cracked. I'm thinking these will make great parts for some related project.

IMG_9292.jpg

Pulled the whole vent assembly just to save the brushed aluminum trim. The stereo bezel can be installed after I swap over the head unit from Big Red.

IMG_9287.jpg

IMG_9288.jpg

Already transferred the dead pedal. I pulled the brake pedal pad as well, which leaves only this to install

IMG_9286.jpg

The beginnings of my OEM screen relocation:

IMG_9284.jpg

The oil can plate was damaged in the wreck but I did my best to bang it out flat again.

IMG_9283.jpg

IMG_9278.jpg

2 coats of enamel - still need to sand and spray on some clear:

IMG_9290.jpg

Ray's Temperature sensor!

IMG_9285.jpg
 

Attachments

  • IMG_9292.jpg
    IMG_9292.jpg
    113.6 KB · Views: 30
  • IMG_9287.jpg
    IMG_9287.jpg
    121.5 KB · Views: 41
  • IMG_9292.jpg
    IMG_9292.jpg
    113.6 KB · Views: 60
  • IMG_9287.jpg
    IMG_9287.jpg
    121.5 KB · Views: 39
  • IMG_9288.jpg
    IMG_9288.jpg
    98.9 KB · Views: 30
  • IMG_9286.jpg
    IMG_9286.jpg
    124.8 KB · Views: 29
  • IMG_9286.jpg
    IMG_9286.jpg
    124.8 KB · Views: 30
  • IMG_9288.jpg
    IMG_9288.jpg
    98.9 KB · Views: 42
  • IMG_9283.jpg
    IMG_9283.jpg
    84.5 KB · Views: 27
  • IMG_9283.jpg
    IMG_9283.jpg
    84.5 KB · Views: 51
  • IMG_9278.jpg
    IMG_9278.jpg
    107.5 KB · Views: 48
  • IMG_9284.jpg
    IMG_9284.jpg
    105.9 KB · Views: 37
  • IMG_9284.jpg
    IMG_9284.jpg
    105.9 KB · Views: 28
  • IMG_9278.jpg
    IMG_9278.jpg
    107.5 KB · Views: 31
  • IMG_9285.jpg
    IMG_9285.jpg
    144.1 KB · Views: 36
  • IMG_9290.jpg
    IMG_9290.jpg
    137.5 KB · Views: 32
  • IMG_9290.jpg
    IMG_9290.jpg
    137.5 KB · Views: 65
  • IMG_9285.jpg
    IMG_9285.jpg
    144.1 KB · Views: 36
  • IMG_9287.jpg
    IMG_9287.jpg
    121.5 KB · Views: 49
  • IMG_9292.jpg
    IMG_9292.jpg
    113.6 KB · Views: 60
  • IMG_9286.jpg
    IMG_9286.jpg
    124.8 KB · Views: 32
  • IMG_9288.jpg
    IMG_9288.jpg
    98.9 KB · Views: 45
  • IMG_9284.jpg
    IMG_9284.jpg
    105.9 KB · Views: 44
  • IMG_9283.jpg
    IMG_9283.jpg
    84.5 KB · Views: 31
  • IMG_9278.jpg
    IMG_9278.jpg
    107.5 KB · Views: 32
  • IMG_9290.jpg
    IMG_9290.jpg
    137.5 KB · Views: 37
  • IMG_9285.jpg
    IMG_9285.jpg
    144.1 KB · Views: 27
  • IMG_9292.jpg
    IMG_9292.jpg
    113.6 KB · Views: 37
  • IMG_9287.jpg
    IMG_9287.jpg
    121.5 KB · Views: 32
  • IMG_9286.jpg
    IMG_9286.jpg
    124.8 KB · Views: 29
  • IMG_9284.jpg
    IMG_9284.jpg
    105.9 KB · Views: 59
  • IMG_9288.jpg
    IMG_9288.jpg
    98.9 KB · Views: 37
  • IMG_9292.jpg
    IMG_9292.jpg
    113.6 KB · Views: 30
  • IMG_9283.jpg
    IMG_9283.jpg
    84.5 KB · Views: 32
  • IMG_9287.jpg
    IMG_9287.jpg
    121.5 KB · Views: 29
  • IMG_9286.jpg
    IMG_9286.jpg
    124.8 KB · Views: 33
  • IMG_9288.jpg
    IMG_9288.jpg
    98.9 KB · Views: 43
  • IMG_9285.jpg
    IMG_9285.jpg
    144.1 KB · Views: 29
  • IMG_9278.jpg
    IMG_9278.jpg
    107.5 KB · Views: 62
  • IMG_9290.jpg
    IMG_9290.jpg
    137.5 KB · Views: 37
  • IMG_9278.jpg
    IMG_9278.jpg
    107.5 KB · Views: 38
  • IMG_9283.jpg
    IMG_9283.jpg
    84.5 KB · Views: 31
  • IMG_9284.jpg
    IMG_9284.jpg
    105.9 KB · Views: 31
  • IMG_9285.jpg
    IMG_9285.jpg
    144.1 KB · Views: 39
  • IMG_9290.jpg
    IMG_9290.jpg
    137.5 KB · Views: 33
  • IMG_9292.jpg
    IMG_9292.jpg
    113.6 KB · Views: 29
  • IMG_9287.jpg
    IMG_9287.jpg
    121.5 KB · Views: 61
  • IMG_9284.jpg
    IMG_9284.jpg
    105.9 KB · Views: 29
  • IMG_9286.jpg
    IMG_9286.jpg
    124.8 KB · Views: 30
  • IMG_9288.jpg
    IMG_9288.jpg
    98.9 KB · Views: 61
  • IMG_9290.jpg
    IMG_9290.jpg
    137.5 KB · Views: 49
  • IMG_9285.jpg
    IMG_9285.jpg
    144.1 KB · Views: 43
  • IMG_9278.jpg
    IMG_9278.jpg
    107.5 KB · Views: 29
  • IMG_9283.jpg
    IMG_9283.jpg
    84.5 KB · Views: 61
Finished up the oil catch "restoration". The plate isn't perfectly flat and I'm ok with that because of the history. I was actually able to match the flat black of the Strut tower brace by wetsanding the rattle can gloss enamel with 3000 grit.

IMG_9293.jpg

IMG_9295.jpg

IMG_9294.jpg

Also finished up with the brakes, wheels and suspension - she got an alignment this morning and the shop had to slot the rear subframe (just like Big Red) to get camber in spec. The wheels still have mud on them from the wreck and one tire was sliced by the fender so I'll need to replace two tires before attempting to repair/polish out the cosmetic damage on one wheel.
 

Attachments

  • IMG_9293.jpg
    IMG_9293.jpg
    74.2 KB · Views: 26
  • IMG_9295.jpg
    IMG_9295.jpg
    94.8 KB · Views: 27
  • IMG_9294.jpg
    IMG_9294.jpg
    111.9 KB · Views: 22
  • IMG_9293.jpg
    IMG_9293.jpg
    74.2 KB · Views: 47
  • IMG_9295.jpg
    IMG_9295.jpg
    94.8 KB · Views: 25
  • IMG_9294.jpg
    IMG_9294.jpg
    111.9 KB · Views: 42
  • IMG_9293.jpg
    IMG_9293.jpg
    74.2 KB · Views: 27
  • IMG_9294.jpg
    IMG_9294.jpg
    111.9 KB · Views: 27
  • IMG_9295.jpg
    IMG_9295.jpg
    94.8 KB · Views: 25
  • IMG_9295.jpg
    IMG_9295.jpg
    94.8 KB · Views: 24
  • IMG_9293.jpg
    IMG_9293.jpg
    74.2 KB · Views: 26
  • IMG_9293.jpg
    IMG_9293.jpg
    74.2 KB · Views: 33
  • IMG_9294.jpg
    IMG_9294.jpg
    111.9 KB · Views: 27
  • IMG_9294.jpg
    IMG_9294.jpg
    111.9 KB · Views: 26
  • IMG_9295.jpg
    IMG_9295.jpg
    94.8 KB · Views: 56
  • IMG_9293.jpg
    IMG_9293.jpg
    74.2 KB · Views: 28
  • IMG_9295.jpg
    IMG_9295.jpg
    94.8 KB · Views: 37
  • IMG_9294.jpg
    IMG_9294.jpg
    111.9 KB · Views: 23
Life got in the way these past few weekends so progress has been slow but I finally have something to show for it.

BC Coilovers, Ichiba 20mm spacers, stock 20" wheels, rear Stoptech rotors, DIY painted rear calipers, front Stoptech BBK

Front fitment/calipers
IMG_9302.jpg

Rear fitment/calipers
IMG_9301.jpg

BC coilovers & GTSpec STB
IMG_9303.jpg

Silver's engine bay as it stands today
IMG_9304.jpg

The ride is exactly like I remember!
IMG_9305.jpg

The weathertech window visors lost adhesive on the rears. 3M to the rescue... tomorrow!
 

Attachments

  • IMG_9302.jpg
    IMG_9302.jpg
    95.3 KB · Views: 25
  • IMG_9302.jpg
    IMG_9302.jpg
    95.3 KB · Views: 24
  • IMG_9301.jpg
    IMG_9301.jpg
    92 KB · Views: 29
  • IMG_9301.jpg
    IMG_9301.jpg
    92 KB · Views: 37
  • IMG_9303.jpg
    IMG_9303.jpg
    116.8 KB · Views: 27
  • IMG_9303.jpg
    IMG_9303.jpg
    116.8 KB · Views: 24
  • IMG_9304.jpg
    IMG_9304.jpg
    122.8 KB · Views: 23
  • IMG_9304.jpg
    IMG_9304.jpg
    122.8 KB · Views: 26
  • IMG_9305.jpg
    IMG_9305.jpg
    97.1 KB · Views: 26
  • IMG_9305.jpg
    IMG_9305.jpg
    97.1 KB · Views: 29
  • IMG_9301.jpg
    IMG_9301.jpg
    92 KB · Views: 25
  • IMG_9302.jpg
    IMG_9302.jpg
    95.3 KB · Views: 26
  • IMG_9303.jpg
    IMG_9303.jpg
    116.8 KB · Views: 30
  • IMG_9304.jpg
    IMG_9304.jpg
    122.8 KB · Views: 28
  • IMG_9305.jpg
    IMG_9305.jpg
    97.1 KB · Views: 40
  • IMG_9301.jpg
    IMG_9301.jpg
    92 KB · Views: 38
  • IMG_9302.jpg
    IMG_9302.jpg
    95.3 KB · Views: 27
  • IMG_9303.jpg
    IMG_9303.jpg
    116.8 KB · Views: 30
  • IMG_9304.jpg
    IMG_9304.jpg
    122.8 KB · Views: 55
  • IMG_9305.jpg
    IMG_9305.jpg
    97.1 KB · Views: 24
  • IMG_9302.jpg
    IMG_9302.jpg
    95.3 KB · Views: 57
  • IMG_9304.jpg
    IMG_9304.jpg
    122.8 KB · Views: 33
  • IMG_9303.jpg
    IMG_9303.jpg
    116.8 KB · Views: 36
  • IMG_9301.jpg
    IMG_9301.jpg
    92 KB · Views: 26
  • IMG_9305.jpg
    IMG_9305.jpg
    97.1 KB · Views: 29
  • IMG_9302.jpg
    IMG_9302.jpg
    95.3 KB · Views: 33
  • IMG_9301.jpg
    IMG_9301.jpg
    92 KB · Views: 27
  • IMG_9303.jpg
    IMG_9303.jpg
    116.8 KB · Views: 23
  • IMG_9304.jpg
    IMG_9304.jpg
    122.8 KB · Views: 39
  • IMG_9305.jpg
    IMG_9305.jpg
    97.1 KB · Views: 28
Last edited:
Back
Top