Front differential axle seals

4rs fed

Member
Location
Bay Area, CA
Kind of an emergency, hoping you guys can help me out.

2 weeks ago, my wifes 2003 FX45 broke the propshaft and the front differential, it split the diff in half.
I ordered a used front diff and it arrived today but the axle shaft seals are shot.
I have spent the last hour online looking for a part # OEM or aftermarket for these seals, but I can't find ANYTHING.

Any experts here who can help?
I need to source some seals tomorrow so I can have the shop install everything on Saturday.
 
Last edited:
Figured I'd add here rather than start another thread. Thought my engine had a very minor oil seepage issue for about a year before discovering the passenger side diff. seal was the issue. It's leaking right at the flange, where the 1/2 shaft enters the pumpkin.
Been reading over the FSM and it's time I deal with this. Couldn't find any write-ups on this so I might have to do one myself unless I pass it on to a mechanic.
Anyone that's done this have any tips? What kind of puller did you use to remove the seal & sleeve to place the new seal? Was there anything else internally that you found needed to be dealt with? CV or shaft replaced when you did the seal?
 
Bummer. Guess I'll buy Lisle's 56650 adjustable seal puller & rent a slide-hammer & whatever other puller I can find & the right size sleeve to tap in the new seal. I'll do a write-up if I fix it.
My fear is what caused it to leak? Out-of-round tire, wheel bearing & leaking seal all around the same time yet goodyear doesn't think the tire had anything to do with it. They think it's because it's lowered. BS. I performed a test to determine if my cv joints are shot but everything seems fine. The seal could just go bad I guess. I hope it's not just a symptom of an underlying issue.
 
Well, the verdict is what I thought was a seal issue is in fact a leak via the diff housing itself. Had someone put there eyes on it today while getting the state inspection done. I thought I did well figuring out the leak coming from the seal because it really looked like the upper pan leaking at first glance. The smell of the gear oil iirc gave it away and made me investigate further. The fix involves pulling the whole damn thing apart and replacing the seal. This is a fixed joint seal, so Ima try and rig it. Gonna clean the shit out of it, get all up in, down and around there and JB Weld it. Not sure if I'll go with the 2 part putty or the original which has a runny toothpaste-like consistency but it's such a minor leak, I think it's worth a bit of my time to give it a shot. If this fails and I can't tolerate the drip drip dripity drips any longer, than I'll have to cough up... Ima guess $1500-2000k? This is no diy, not for me.
 
The verdict is undecided. Good mechanic thought it was the diff seal. I took another look and I think he's wrong. I cleaned the area up more than I had many moons ago and I'll take another look in a week or two and see where fresh gear oil is coming from. I think it's high up on the 1/2 shaft seal because shortly after I discovered it was the diff and not engine oil seepage I checked the gear oil level and added some. I couldn't add much. Slow leak. Days after adding and after driving, the amount of oil leaking increased noticeably and it did this for a couple weeks, then went back to a drop here and a drop there. I suspect once the oil level receded below the area of the seal that's damaged, the leak slowed back down. Looks like I'll be doing a diy on this after all.
First 2 photos of before cleaning and last 2 are after. Even before cleaning I didn't see fresh oil above in photo 1 but I do see it along the bottom of the seal in photo 2.
DSC00853.JPG DSC00857.JPG DSC00861.JPG DSC00862.JPG
 
It doesn't look like a bad seal to me. The before show no evident of any dripping trace.
 
It doesn't look like a bad seal to me. The before show no evident of any dripping trace.
I tried to get the camera close up enough in the 2nd "before" photo but the flash kept getting blocked so had to back it off. If you look closely to the left of the only bolt that's 100% visible in photo 2, you'll see a little dirty golden gear oil right on the flange and below that circular plate that covers the seal. I had to take the photo at a slight angle to get a good enough shot, so that little bit of gear oil sitting there marks lowest point. There's no fresh gear oil anywhere else and I've already convinced myself that I'm correct and the tech is wrong but will give it a couple weeks and look again.
The seal replacement looks fairly simple to do but when I inquired about it with Goodyear awhile back (when I cannot or do not want to basic mechanical work, like install the high flow cats for example, I go here) they told me there MAY be some protocol that would need to be done which they don't get involved with. No idea what their referring to but the fsm says nothing about it.
 
1st youtube vid made. Not exactly a "social media" person. No twitter, fbook or any of that other crap. Just infinitiscene & 350z site.
It turned out alright I guess. Didn't put much effort in it as you can tell. Oil seems to favor upper back area of the seal. Called goodyear about this "protocol" and he was referring to potentially having to take the whole damn diff apart depending on the issue. Na, just a seal. I'll do a diy soon enough.
Loaded the video twice. Site kicks it off. Whataya gonna do.
 
Last edited:
Sent this to a member via pm so figured I'd put it out for all to see. The last one is a diy for a nissan murano on youtube. Guy knows his shit. If I do a diy, it'll be simple with just a few photos of the seal replacement as I don't think I can top the youtuber. The seal on the right side looks like a breeze but the one on the left is an entirely different deal.
PG. 9 & 14 Factory Service Manuals - NICO Club

PG. 13 Factory Service Manuals - NICO Club

PG. 8 Factory Service Manuals - NICO Club

DIY NISSAN MURANO
 
Bought the seal and thanks to DH an o-ring which regardless of it's condition is supposed to be replaced. Both of these things are supposed to be replaced if you pull the axle(s).
Bought some other crap too online from www.orderinfinitiparts.com. Guess they recently got into the online bus. Cost was damn close to 1/2 what I would normally pay at the counter. Not paying shipping though. They're close so will pick up. I think they are the only Infiniti online store that's taking phone calls anymore? One guy running the show, Sean, so you might not get through right away but it's nice to verify before you buy.

Some pics of my replacement seal and o ring.LINE_P20171202_091020624.jpg
 

Attachments

  • LINE_P20171202_091020627.jpg
    LINE_P20171202_091020627.jpg
    95.5 KB · Views: 397
  • LINE_P20171202_091020627.jpg
    LINE_P20171202_091020627.jpg
    95.5 KB · Views: 363
  • LINE_P20171202_091020636.jpg
    LINE_P20171202_091020636.jpg
    63.2 KB · Views: 361
  • LINE_P20171202_091020633.jpg
    LINE_P20171202_091020633.jpg
    125.5 KB · Views: 466
  • DSC_0061.JPG
    DSC_0061.JPG
    161.5 KB · Views: 343
Replaced the differential side oil seal today on the passenger side. Not a big deal.
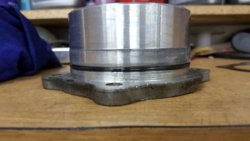
It was obvious to me where the leak was coming from and with the axle out, it's clear that it was this seal.
DSC01053.JPG
Sections of the FSM I had copied to my spreadsheet to study before doing the job.
REPLACE FRONT PASS. DIFF. OIL SEAL
PG. 9 & 14 Factory Service Manuals - NICO Club
PG. 13 Factory Service Manuals - NICO Club
PG. 8 Factory Service Manuals - NICO Club
DIY NISSAN MURANO

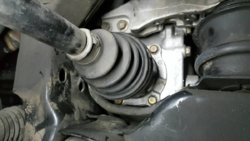
I've already replaced both front wheel bearing assemblies so I wasn't about to undo all that work and pull'em agan. Hell NO! I did as the fella in the diy nissan murano did. In the vid, he's doing what we'd have to should the driver side need service. The passenger side is much easier.
Drop the outer tie rod, 2 bolts in the strut, the big hub bolt and the 2 bolts holding the caliper. I didn't pull the abs sensor. That things a pos. Don't trust the cheap little bolt holding it. Removing the wires from the 3(?) hold downs gives plenty of slack. Same with the s.s. brake line. Bungie cord the caliper to the spring, tap the axle out of the steering knuckle with a hammer and then pry the cv axle (FSM calls it a drive shaft) out of the differential case.
The only hang up was prying out the cv axle. Took me a few minutes to figure it out. I used a pry bar that's for roofing and a stubby but thick flat head screwdriver. Placed the bar at the top right corner using the curved end and the flat head bottom left and just went back and forth for 15 seconds and it popped right out. There's not a lot of room to gain leverage in this area.
DSC01050.JPG DSC01055.JPG DSC01051.JPG
DSC01056.JPG DSC01057.JPG
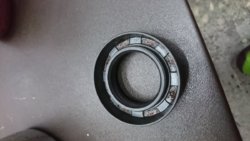
Used a slide hammer with a master seal puller kit to snatch the seal. I used the old seal after removing the rubber portion of the seal that would be facing away from the diff case along with an aluminum flat drift to beat the new seal in place. The side of the seal that faces inside the diff. case is absolutely perfect for driving in the new seal. You don't want to tear up the new rubber on the new seal. Good luck finding a drift with the correct wall size. Not needed.
DSC01059.JPG DSC01054.JPG DSC01065.JPG DSC01064.JPG
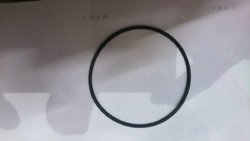
Almost forgot, new part # for seal, so I think they revised it for the passenger side as it seems to be a common problem. There were some minor differences between the 2.
38342-03V01 SEAL-OIL, Part number 38342-03V01 replaces 38342-0
 
Last edited:
This little pump is the shit! Used it to replace the power steering fluid, drain the brake reservoir before filling it to replace the brake fluid and did both diff's with it. Finally get to toss the cardboard. The diff started to quietly hum on a short trip yesterday. Gear oil was getting low. Perfect timing.
Tools I rented from an Autozone that's a bit out of the way but they have a big selection and everythings always in good shape. Photo 3 is the drift or seal/bearing press, photo 4 is the ball joint puller and 5-6 is the master axle puller. Master seal and bearing puller as far as I'm concerned. Don't think it's a good idea to "pull" an axle. This and the other tools mentioned and photographed are all I used, along with a couple torque wrenches, a braker bar and the obvious wrenches, ratchets and sockets.
Wish I got some other photos of the new seal in place but dude came to take away my old crapho tires in exchange for $125 and I got sidetracked.
DSC01068.JPG DSC01067.JPG DSC01063.JPG DSC01062.JPG DSC01061.JPG DSC01060.JPG
 
Last edited:
I'm not sure how the my like disappeared. It put my like back ;)
Hey, thanks for that lafx. It's not a great diy like your's typically are but I did it because you wanted one. The important parts are the type of puller but even more important that the old seal can be used in place of the correctly sized drift wall.
 
Last edited:
Back
Top