eJay's FX

Thanks for your help Ejay,


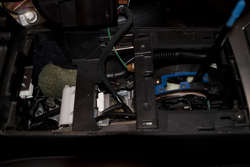
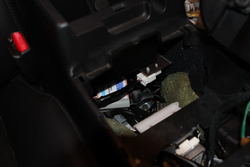
I've attached a pic of how I installed the wires in the back of the radio. These are the only 2 harnesses that are able to connect. Is this the same as yours? I also read on this forum that someone mentioned that he had to actually start the car once to get the PA15-NIS to work initally. I was trying the PA15 without starting the car. Was that the same case for you as well? If so then that might be my answer. My car does not have the sat button but instead has the preset a-b-c button and radio button but I dont think that matters since the PA15 works with both SAT and Non-Sat radios. Thanks again for your help and suggestions.


View attachment 195153

View attachment 195154
 
Last edited:
Sup Ejay,


Thanks for asking but I've been busy with work but will try first thing this morning and report back the results. I was also able to get a rca cable to try out. I will try the am/fm then cd instructions u gave and see if that works also. BTW if it does work I will be wiring the cable the same as you. Thanks for your instructions/ how to's :tup:


Sorry I didn't get a chance to answer your question. Did you get it to work?

Sent from my ADR6300
 
Sup Ejay,


Thanks for all your help man, I finally got my usaspec to work and wired it exactly like u, i find it is so much easier to take apart the shifter panel than having to go behind the radio again. I had to set my dip switches to (1-4)(on-off-on-off) for my usapec to work, if i set it to (on-on-on-on) it doesnt seem to work for some strange reason. With the dip switch settings that work, it displays XM channel 003 when it is playing my iphone. Is it the same with yours? Thanks for all your help again bro. :tup:


Sorry I didn't get a chance to answer your question. Did you get it to work?

Sent from my ADR6300
 
Thanks! I am not sure about putting it in one of the 6 screws cuz I don't know if they're even grounded (I think they're just metal clips placed in plastic just to hold the unit in place). Since the screen & the head unit are grounded by wires connecting to the back, I mounted my grounding wire to the back of the screen. I am pretty sure there was one screw that I took out from the back of the screen (or the radio) and added the grounding wire to. Any metal contacting screws in the back would do in my opinion. If you can't figure it out, let me know and I'll open it up and see where I attached it to.

Also if you're trying to get the ipod installed, I found this set up very helpful as I can hide the wires under the center console and access it anytime. It's only an option and you can choose to do whatever you find most comfortable!

I took out the center panel and fed the iPod cable that connects the adapter and the radio through this.
IMG_5100a.jpg

I placed the adapter right underneath the center console. I didn't secure it to anything but I don't hear any vibrations or noise while driving.
IMG_5097.jpg

So I drilled a small hole in the front/right side of the console and fed the wires through. As you can see from the picture, there's a little groove for you to feed the wires through and still be able to close the console.
IMG_5096.jpg

I hope it helped! Let me know if you have any other questions.


The end part that plugs into your ipod is a dock cable or stereo cable or does it even matter?
 

Attachments

  • IMG_5100a.jpg
    IMG_5100a.jpg
    64.7 KB · Views: 49
  • IMG_5100a.jpg
    IMG_5100a.jpg
    64.7 KB · Views: 52
  • IMG_5100a.jpg
    IMG_5100a.jpg
    64.7 KB · Views: 40
  • IMG_5096.jpg
    IMG_5096.jpg
    66.1 KB · Views: 42
  • IMG_5096.jpg
    IMG_5096.jpg
    66.1 KB · Views: 62
  • IMG_5096.jpg
    IMG_5096.jpg
    66.1 KB · Views: 45
  • IMG_5097.jpg
    IMG_5097.jpg
    41.9 KB · Views: 38
  • IMG_5097.jpg
    IMG_5097.jpg
    41.9 KB · Views: 29
  • IMG_5097.jpg
    IMG_5097.jpg
    41.9 KB · Views: 40
  • IMG_5100a.jpg
    IMG_5100a.jpg
    64.7 KB · Views: 36
  • IMG_5097.jpg
    IMG_5097.jpg
    41.9 KB · Views: 47
  • IMG_5096.jpg
    IMG_5096.jpg
    66.1 KB · Views: 40
  • IMG_5100a.jpg
    IMG_5100a.jpg
    64.7 KB · Views: 40
  • IMG_5097.jpg
    IMG_5097.jpg
    41.9 KB · Views: 44
  • IMG_5096.jpg
    IMG_5096.jpg
    66.1 KB · Views: 35
Sup Ejay,


Thanks for all your help man, I finally got my usaspec to work and wired it exactly like u, i find it is so much easier to take apart the shifter panel than having to go behind the radio again. I had to set my dip switches to (1-4)(on-off-on-off) for my usapec to work, if i set it to (on-on-on-on) it doesnt seem to work for some strange reason. With the dip switch settings that work, it displays XM channel 003 when it is playing my iphone. Is it the same with yours? Thanks for all your help again bro. :tup:

Congrats! I'm glad to hear that you got it to work.

The end part that plugs into your ipod is a dock cable or stereo cable or does it even matter?

If you use the dock cable you'll be able to control your ipod with the buttons on the stereo. Also with the ipod cable (if you have SAT radio) you'll be able to see the song titles & album names on the display. I use the stereo cable to connect to my Droid to listen to online radio or play YouTube audio through the stereo.
 
green_lantern.jpg
 
Got the replacement CREE DTRL bulbs from JLC and I did a DTRL/ turn signal swap! I am very pleased with the result!

HL: 6k Morimoto Bixenon HIDs
Fog: 6k DDM HIDs
DTRL: Superbright CREE LEDs from JLC
Stock turn signal bulbs in the DTRL housing

IMG_7098-1.jpg
IMG_7100-1.jpg
IMG_7105.jpg
 

Attachments

  • IMG_7100-1.jpg
    IMG_7100-1.jpg
    57.7 KB · Views: 42
  • IMG_7100-1.jpg
    IMG_7100-1.jpg
    57.7 KB · Views: 42
  • IMG_7100-1.jpg
    IMG_7100-1.jpg
    57.7 KB · Views: 45
  • IMG_7098-1.jpg
    IMG_7098-1.jpg
    43.8 KB · Views: 34
  • IMG_7098-1.jpg
    IMG_7098-1.jpg
    43.8 KB · Views: 40
  • IMG_7098-1.jpg
    IMG_7098-1.jpg
    43.8 KB · Views: 38
  • IMG_7105.jpg
    IMG_7105.jpg
    57.7 KB · Views: 41
  • IMG_7105.jpg
    IMG_7105.jpg
    57.7 KB · Views: 36
  • IMG_7105.jpg
    IMG_7105.jpg
    57.7 KB · Views: 34
  • IMG_7098-1.jpg
    IMG_7098-1.jpg
    43.8 KB · Views: 34
  • IMG_7100-1.jpg
    IMG_7100-1.jpg
    57.7 KB · Views: 48
  • IMG_7105.jpg
    IMG_7105.jpg
    57.7 KB · Views: 39
  • IMG_7100-1.jpg
    IMG_7100-1.jpg
    57.7 KB · Views: 46
  • IMG_7098-1.jpg
    IMG_7098-1.jpg
    43.8 KB · Views: 35
  • IMG_7105.jpg
    IMG_7105.jpg
    57.7 KB · Views: 42
Back
Top