IN CABIN FILTER CHANGE
MATERIALS:
http://www.amazon.com/FilterMaster-...13?ie=UTF8&s=automotive&qid=1193932761&sr=8-1
or
Amazon.com: FRAM CF10140 Fresh Breeze Cabin Air Filter: Automotive@@AMEPARAM@@http://ecx.images-amazon.com/images/I/51wZc2gx2vL.@@AMEPARAM@@51wZc2gx2vL
TOOLS:
PHILLIPS SCREWDRIVER
SAFETY:
(EVEN IF THIS PROCEDURE DOES NOT REQUIRE RAISING OF THE VEHICLE, WE CANNOT STRESS ENOUGH...NEVER GET UNDER A RAISED VEHICLE WITHOUT THE USE OF QUALITY JACK-STANDS)
-------------------------------------------------------------------------------------------------------------------------------------------
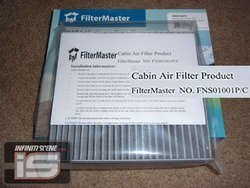
ORDER YOUR FILTER (MAKE SURE YOU GET THE ACTIVATED CARBON FILTER)

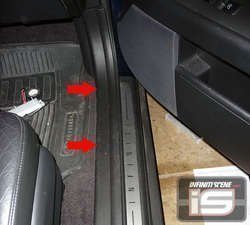
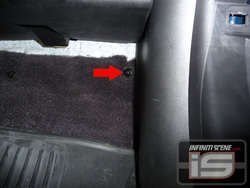
1. REMOVE THE DOOR SILL BY PULLING UP AND UN-POPPING THE CLIPS.

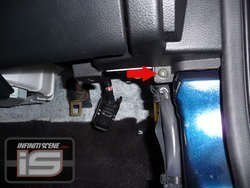
2. UNSCREW THIS PLASTIC NUT AND REMOVE THE SIDE PLASTIC PANEL. THE PLASTIC NUT SHOULD COME OFF BY HAND, IF NOT USE A WRENCH.

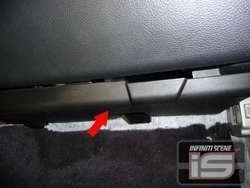
3. LOOK UNDER THE GLOVE-BOX AND REMOVE THIS PLASTIC PANEL, PULL DOWN ON THE FRONT AND IT WILL UNCLIP.


4. USING YOUR PHILLIPS SCREWDRIVER UNSCREW THESE 2 PHILLIPS SCREWS UNDER THE GLOVE BOX.


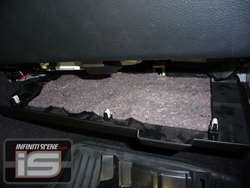
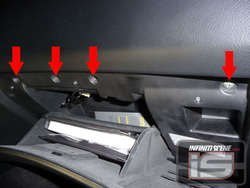
5. OPEN YOUR GLOVEBOX AND UNSCREW THESE 4 SCREWS.

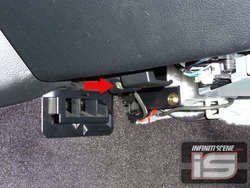
6. YOUR GLOVEBOX SHOULD NOW COME OFF (DISCONNECT ANY WIRES NECESSARY - DO NOT DISCONNECT THE YELLOW AIR BAG PLUG/WIRE).
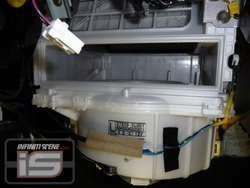
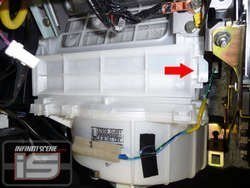
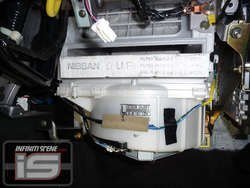
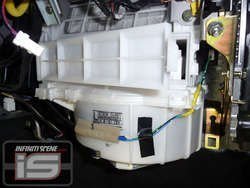
7. TO REMOVE THE FILTER YOU WILL PUSH ON THIS TAB TO RELEASE THE FILTER COVER.


8. PULL OUT THE OLD FILTER.


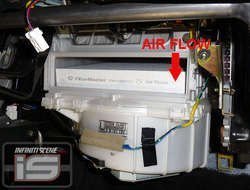
9. INSTALL YOUR FILTER **(NOTE THE DIRECTION OF AIR FLOW ON THE NEW FILTER - THE AIR FLOWS DOWNARDS IN OUR CARS, SO MAKE SURE YOU INSTALL YOUR FILTER PROPERLY).

**NOTE: WHEN PUTTING THE FILTER COVER (DOOR) BACK ON YOU WILL NEED TO LIFT THE FILTER UP WHILE CLOSING THE COVER, THE DOOR HAS TABS ON IT AND THE FILTER NEEDS TO SIT ABOVE THESE TABS.
10. REVERSE THE STEPS FOR INSTALL AND YOU ARE DONE!
-------------------------------------------------------------------------------------------------------------------------------------------

THIS WRITE-UP HAS BEEN BROUGHT TO YOU BY YOUR FRIENDS AT WWW.INFINITISCENE.COM
MATERIALS:
http://www.amazon.com/FilterMaster-...13?ie=UTF8&s=automotive&qid=1193932761&sr=8-1
or
Amazon.com: FRAM CF10140 Fresh Breeze Cabin Air Filter: Automotive@@AMEPARAM@@http://ecx.images-amazon.com/images/I/51wZc2gx2vL.@@AMEPARAM@@51wZc2gx2vL
TOOLS:
PHILLIPS SCREWDRIVER
SAFETY:
(EVEN IF THIS PROCEDURE DOES NOT REQUIRE RAISING OF THE VEHICLE, WE CANNOT STRESS ENOUGH...NEVER GET UNDER A RAISED VEHICLE WITHOUT THE USE OF QUALITY JACK-STANDS)
-------------------------------------------------------------------------------------------------------------------------------------------
ORDER YOUR FILTER (MAKE SURE YOU GET THE ACTIVATED CARBON FILTER)
1. REMOVE THE DOOR SILL BY PULLING UP AND UN-POPPING THE CLIPS.
2. UNSCREW THIS PLASTIC NUT AND REMOVE THE SIDE PLASTIC PANEL. THE PLASTIC NUT SHOULD COME OFF BY HAND, IF NOT USE A WRENCH.
3. LOOK UNDER THE GLOVE-BOX AND REMOVE THIS PLASTIC PANEL, PULL DOWN ON THE FRONT AND IT WILL UNCLIP.
4. USING YOUR PHILLIPS SCREWDRIVER UNSCREW THESE 2 PHILLIPS SCREWS UNDER THE GLOVE BOX.
5. OPEN YOUR GLOVEBOX AND UNSCREW THESE 4 SCREWS.
6. YOUR GLOVEBOX SHOULD NOW COME OFF (DISCONNECT ANY WIRES NECESSARY - DO NOT DISCONNECT THE YELLOW AIR BAG PLUG/WIRE).
7. TO REMOVE THE FILTER YOU WILL PUSH ON THIS TAB TO RELEASE THE FILTER COVER.
8. PULL OUT THE OLD FILTER.
9. INSTALL YOUR FILTER **(NOTE THE DIRECTION OF AIR FLOW ON THE NEW FILTER - THE AIR FLOWS DOWNARDS IN OUR CARS, SO MAKE SURE YOU INSTALL YOUR FILTER PROPERLY).
**NOTE: WHEN PUTTING THE FILTER COVER (DOOR) BACK ON YOU WILL NEED TO LIFT THE FILTER UP WHILE CLOSING THE COVER, THE DOOR HAS TABS ON IT AND THE FILTER NEEDS TO SIT ABOVE THESE TABS.
10. REVERSE THE STEPS FOR INSTALL AND YOU ARE DONE!
-------------------------------------------------------------------------------------------------------------------------------------------
THIS WRITE-UP HAS BEEN BROUGHT TO YOU BY YOUR FRIENDS AT WWW.INFINITISCENE.COM
Attachments
-
 filter.jpg43.5 KB · Views: 41
 -
 1.jpg44.7 KB · Views: 59
 -
 2.jpg34.2 KB · Views: 47
 -
 3.jpg42.1 KB · Views: 51
 -
 4.jpg37.5 KB · Views: 70
 -
 8.jpg41.3 KB · Views: 58
 -
 7.jpg35.6 KB · Views: 54
 -
 6.jpg41.4 KB · Views: 65
 -
 5.jpg52 KB · Views: 63
 -
 flow.jpg43.1 KB · Views: 46
 -
 11.jpg31.5 KB · Views: 60
 -
 10.jpg41.1 KB · Views: 49
 -
 9.jpg38.8 KB · Views: 69
 -
 IS_LONG_COLOR.png2.6 KB · Views: 68