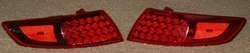
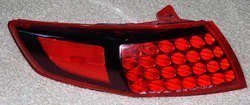
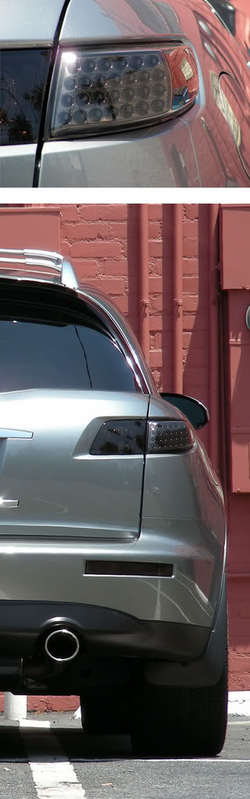
Thanks all, hey Ash when I'm do the other sets I might just send them back to you. but I'm sure you'd like them in DG correct. They are not perfect because I'm too impatient. But the effect is nice. they almost look covered. I plan on taking some pictures of the whole car so everyone can see what they look like on the ride.
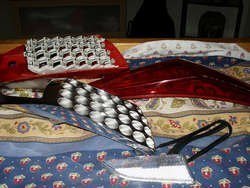
As far as a do it yourself here is what you can do, cause this is what I half azz did. I use window tint as a template. Cut the shape I wanted (circles, reflective shape) two rows I just painted over thus, is where the IS sits at the rear. I had my soapy water solution, and began laying the WT over the areas I didn't want the paint to cover.
After I masked off the areas, I used Dupli-color black Lacquer close to matching the OB paint on the car. I wet sanded the lights first, then sprayed 3-4 coats of the Dupli-color over the lights. Let it dry, peeled off the window tint to uncover the now un-painted areas. Wet sanded using 1000 grit paper, to smooth the edges down, and used 3 coats of clear over the black paint and uncovered portions of the lenses. Once that was dry I wet sanded again probably not necessary. And then used the IS stickers I got from Jeff. Laid them on, using soapy water solution and applying pressure. Just like window tinting. Let dry or use a heat gun to help the process. Then cleared over the stickers using 2 more coats. So Jeff I'll need 2 more stickers if you can spare them lol..
If you do this process please take your time, I'm not a pro at painting and always want it done now. Ensure that you have no air under any of your tint/ IS stickers or you run the risk of having paint getting under it, as mine did in small areas. And definitely space your time in between coats of paint to reduce any running. because of the shape of the lenses that is always a possibility. if you are patient your project will come out perfect. if not they will look like mine or worst, lol... I will try to do a DIY with pictures to give you all a better illustration. All in all I like the effect but will definitely take my time on the next set. I hope this helps... it took a few hours, well maybe a lil more then a few and about 20 bucks - paint, clear, sand paper, window tint (I use the 6" wide 26 ' roll for 4.99 cheap stuff) at auto pride.