Talk to AndrewBigA ....look at his work...awesome..he should be able to give you some advice.
From Meguiars.com....I have TypeII myself, wifey left the car outside next to the sprinklers on a hot day..:mad.::frown:...mine is bad enough that it may require colorsanding.
How To Remove Water Spots off Automotive Paints
Swirls, scratches and water spots are the three most common paint defects car enthusiasts struggle with when it comes to removing them and preventing them from coming back. In this how-to article we'll take a look at water spots, where they come from, how to remove them and also how to prevent them.
There are two basic kinds of water spots or water marks found on automotive paints.
- Type I Water Spots - Above Surface Mineral Deposits
- Type II Water Spots - Below Surface Water Spot Etchings
Type I Water Spots
Type I Water Spots are what Meguiar's refers to as
Above Surface Bonded Contaminants. A Type I water spot is some type of
deposit, often times a
mineral deposit that was suspended in the water source to begin with, then after the water evaporated off the finish the mineral is left behind where it bonds to the finish usually in a circular or pattern or shape.
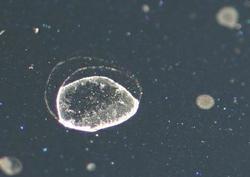
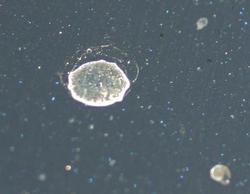
Type I Water Spots - Mineral deposits sitting on top of the paint

 How to Remove Type I Water Spots
If you discover
Type I Water Spots on your car's finish, it will often times require the use of both detailing clay and a paint cleaner to completely remove all trace of the mark left behind.
- Step by step process for removing Type I Water Spots
Step 1 - Wash & Dry the Car
First wash the car thoroughly using a quality car washto remove any loose contaminants and to also remove any portion of the mineral deposit that has not yet bonded to the paint. After washing the car, dry the car to remove any standing water and to prevent further accumulation of Type I Water Spots.
Step 2 - Clay the Paint
Use Meguiar's Smooth Surface Clay Kitto clay all affected paint panels. Meguiar's Detailing clay is a special clay that you knead into a wafer or patty, somewhat like a pancake, and then rub over the finish using Meguiar's Quik Detaileras a lubricant between the clay and the paint. As you're rubbing the clay over the finish, the specialized abrasives will loosen and remove any deposits sitting on top of the paint and trap them into the clay and our clay will do this without instilling scratches into the paint.
Because as you're claying, you're removing these mineral deposits and trapping them into the clay itself, you'll want to take your clay patty and fold it into itself and then re-knead it to expose a fresh side of clay. Also keep a microfiber polishing cloth handy and wipe down the clayed area as you work to remove any excess Quick Detailer from the paint so that you won't have to re-wash the car.
Repeat the above process until you've clayed all of the horizontal panels on your car and possibly even the vertical panels should you discover Type I Water Spots on the sides of your car's paint.
Step 3 - Clean the Paint with a Paint Cleaner
After claying the finish, re-inspect the affected areas, the paint should look smooth and clean as well as feel smooth like a piece of new glass. If you see any trace outlines in the paint where the water deposits were previously, then you'll now need to use a paint cleaner like ScratchX to remove these imperfections out of the paint.
Any water spots or marks left in the paint after claying the paint are actually etchings in the paint and must be removed using a paint cleaner. Water Mark Etchings are what Meguiar's calls, Below Surface Defects, that is these water marks are where the mineral deposits, (left after the water evaporated off the finish), actually etched into, or ate into the paint. This is why the detailing clay did not completely remove these marks, it's because these marks are below the surface and detailing clay only removes contaminants sitting on top of the surface.
ScratchX is a paint cleaner that uses Meguiar's Microscopic Diminishing Abrasive Technology to safely remove swirls, scratches and other below surface imperfections out of the paint. Simply apply ScratchX using a clean, soft foam applicator padand then work the product against the finish with firm pressure. Work a small area or directly on the affected area for 2-3 minutes and then immediately remove any leftover product from the paint and inspect. If the mark is no longer visible, apply a coat of wax to protect the paint. If the mark is still visible, then repeat paint cleaning step using ScratchX. Some swirls, scratches and water spot etchings will require multiple applications to remove depending on how hard the paint is and how deep the defects are.
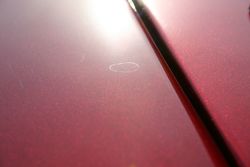
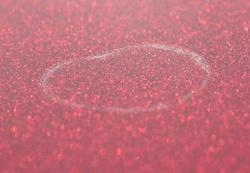
Type II Water Spots - Etchings below the surface
Type II Water Spots are what Meguiar's refers to as
Below Surface Defects. A Type II Water Spot is actually an
etching in the surface where whatever was in the water was strong enough in its chemical composition to actually eat or dissolve the paint and thus
etch into the paint.
Type II Water Spots - Etchings below the surface
 Close-up of same photo above

If you discover
Type II Water Spots in your car's finish, you can use a paint cleaner by hand such as ScratchX and the procedure outlined above in Step 3 for removing below surface etchings left by
Type I Water Spots, or you can use a machine applied product such as a Meguiar's paint cleaner, or cleaner/polish to remove the water spot etchings using Meguiar's
G100 Dual Action Polisher.
Meguiar's Dual Action Polisher will safely clean your car's finish removing a small amount of paint in an effort to level, or smooth-out the paint. The goal is to remove just enough paint to level the upper most portions of the surface with the lowest depths of the defect you're trying to remove. In some cases you may want to check with a seasoned professional for their advice before attempting to remove below surface defects like
Type II Water Spots.
Important Note: Anytime you use detailing clay and/or a paint cleaner on your car's finish, you need to reapply a coat of wax to the paint as detailing clay and paint cleaners will remove any previously applied wax off the paint.
How to prevent water spots from coming back
There are two important things you can do to help prevent water spots from coming back, one is to remove water from the finish before it can dry and potentially leave a water spot. Meguiar's offers a number of different tools to help you do this including, our waffle weave
Water Magnet Drying Towel, our
Soft Touch Microfiber Chamois, and our
Premium-Natural-Chamois which comes in 4 different sizes.
Besides keeping water off your car, the next best thing you can do is to keep maintain a good coat of wax on all the painted surfaces, to help with this Meguiar's offers a number of different waxes to suit everyone's preferences including,
NXT Generation Tech Wax,
Gold Class Liquid Wax and
Deep Crystal System Carnauba Wax.
__________________