
You are using an out of date browser. It may not display this or other websites correctly.
You should upgrade or use an alternative browser.
You should upgrade or use an alternative browser.
Volvo S40 mirror lens retrofit
- Thread starter GetLuckiFX
- Start date
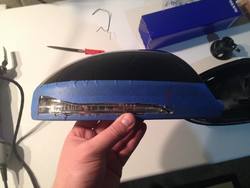
the turn signal slightly sticks away from the back of the cover, and I kind of like the fact I can see the little halo of it being on, at night people behind me can see it too, so it's just an extra indication I am making a turn, and no it's not distracting at all, the angle it is in, while seated inside the car doesn't create a weird reflection or annoyance. In the daylight you can't see it.
---------- Post added at 09:16 PM ---------- Previous post was at 09:15 PM ----------
but if it does, you can use a black silicone from inside the cover around the turn signal to seal any light leak into the mirror housing.
---------- Post added at 09:16 PM ---------- Previous post was at 09:15 PM ----------
but if it does, you can use a black silicone from inside the cover around the turn signal to seal any light leak into the mirror housing.
Cool, I was originally thinking of placing the LED arrows behind the mirror glass, but then the way those shine after a chunk of mirror housing is cut away to make room for it, it makes up for it better ")
Looks real good now u just need to start mass production and selling it to members.
ha ha if you wanna figure out the logistics we might
Awesome!! Can't wait to see your results Justin. I'll be around if you have any questions. Have fun
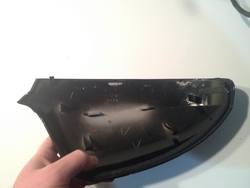
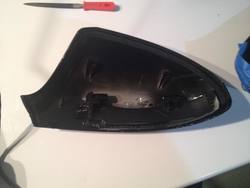
Hey Adam, I'm starting to work on this and I'm interested as to how you were able to get the cover to connect on the bottom. The stock cover has some plastic clips built in that will have to be removed to mount the lens. Is that where you used the tape or did you have something else in place?
Yes I cut the bottom clips off. I used hot glue (glue gun) on there to keep it in place. Silicone would work too.
Oh, didn't really do anything special for it to stay in place, it just lined up fine after the whole cover was back on the mirror housing.
But I did run a sealer from inside to fill in the gap between the signal and the cover/housing so that kind of assed overall sturdiness. If that makes sense
But I did run a sealer from inside to fill in the gap between the signal and the cover/housing so that kind of assed overall sturdiness. If that makes sense
Cool, looking forward to see how yours will come out.
Slamming45
Member
- Location
- Illinois
- Car
- 1965 mustang
Nice write up, great results! Looks fantastic!
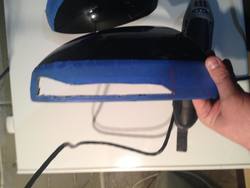
Today's progress, now just need to figure out how to affix it to the cover.


Attachments
Last edited:
- Location
- Brooklyn New York/Queens
- Car
- 2007 FX35 AWD
Wow looks good!
Sent from my SAMSUNG-SGH-I337
Sent from my SAMSUNG-SGH-I337
Great job so far bro, looks good
Share: