Noticed I was losing air in my left rear tire a couple days ago. Filled it up and watched it closely over the next couple days - definitely a leak.
Bought a tire repair kit for $12 at an auto parts store and thought I'd document it for the scene. On a scale from 1-10, this fix is a 2. Anybody can do this with the repair kit, jack and tools to remove the wheel. This kit is meant to repair punctures/holes in the tread only. Not good for sidewall punctures.
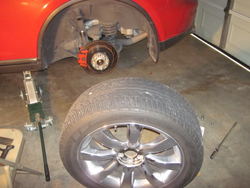
Step 1 is jacking up the car and removing the wheel.

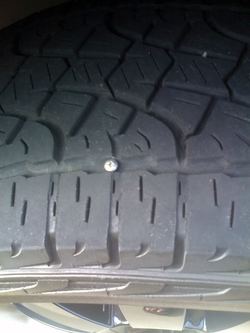
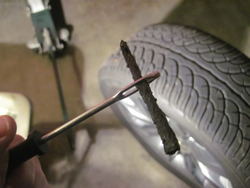
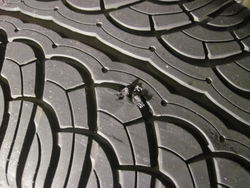
Step 2 is finding the hole. This could be easy if there is an obvious nail or in my case, a threaded bolt! It was sitting right on top of the wheel and was staring me in the face when the wheel came off.

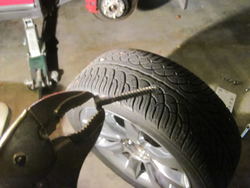
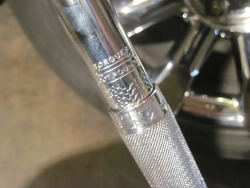
Gotta remove the offending object, so I locked onto it with some vice grips.

No idea when I ran over this thing. As soon as I pulled it out, the air began escaping from the tire. It hissed for a couple minutes.

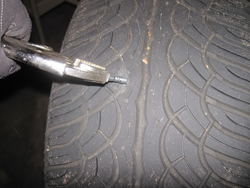
Next you have to clean up the hole using a rasp tool provided in the repair kit. The purpose of this is to clean the hole, make it more uniform, and to make sure it's the right size for the repair "strip". Just insert the tool and saw it back and forth till it moves smoothly through the hole.
Edit: Doing this while the tire is under pressure will push the particles out of the tire, rather than allowing them to fall inside.

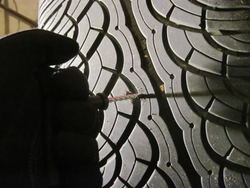
Now it's time for the repair strip from the kit. I removed a strip from the package and threaded it into the insertion tool like a giant needle and thread. Then I coated the strip with rubber cement. All this stuff was provided in the kit.

Next, just push the giant needle into the hole. The strip will fold over and the rubber cement surrounds the hole. Only push in the strip about 1/2 or 2/3 of the way into the hole - you want the end of the strip still sticking out. Then with a quick jerking motion, pull the "needle" out. There is a slot at the eye that allows the repair strip to stay in the hole while the needle is removed.

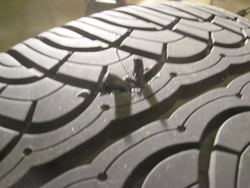
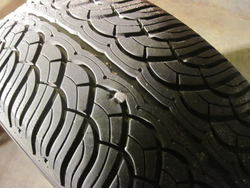
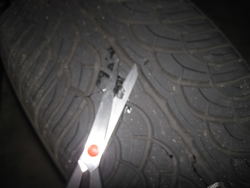
Next, I trimmed off the excess with scissors.

Finished repair:

After letting the glue cure for about an hour, I hooked up a compressor to the wheel and filled it to the correct pressure to check for leaks. I dropped a few drops of soapy water on the area to check for bubbles. None, so I was good to go.

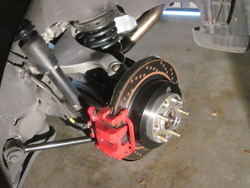
I always clean up the wheel well when I'm working in there so I can see any damage or corrosion that might be hiding under the brake dust and dirt. Eibachs look good - no cracking or corrosion I can see. Same with the Stillen exhaust.

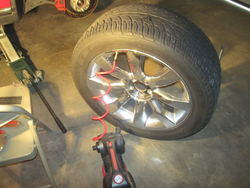
All that's left is to do is put the wheel back on. Don't forget to use a torque wrench. To me this is just as important as the repair!!! I have snapped bolts in the past and replacing them is a major pain. Do yourself a favor and buy a torque wrench if you plan on rotating, changing or repairing anything in the wheel well. Specification says 83ft-lbs. I use 90ft-lbs due to the spacers I have.

Watch the tire for the next few days. The repair kit says this is a temporary fix, but I have used these patches till the tire wears out and needs to be replaced during it's normal course of life. I carry the kit with me, in case I'm ever on a road trip and need to do this on the fly.
Bought a tire repair kit for $12 at an auto parts store and thought I'd document it for the scene. On a scale from 1-10, this fix is a 2. Anybody can do this with the repair kit, jack and tools to remove the wheel. This kit is meant to repair punctures/holes in the tread only. Not good for sidewall punctures.
Step 1 is jacking up the car and removing the wheel.
Step 2 is finding the hole. This could be easy if there is an obvious nail or in my case, a threaded bolt! It was sitting right on top of the wheel and was staring me in the face when the wheel came off.
Gotta remove the offending object, so I locked onto it with some vice grips.
No idea when I ran over this thing. As soon as I pulled it out, the air began escaping from the tire. It hissed for a couple minutes.
Next you have to clean up the hole using a rasp tool provided in the repair kit. The purpose of this is to clean the hole, make it more uniform, and to make sure it's the right size for the repair "strip". Just insert the tool and saw it back and forth till it moves smoothly through the hole.
Edit: Doing this while the tire is under pressure will push the particles out of the tire, rather than allowing them to fall inside.
Now it's time for the repair strip from the kit. I removed a strip from the package and threaded it into the insertion tool like a giant needle and thread. Then I coated the strip with rubber cement. All this stuff was provided in the kit.
Next, just push the giant needle into the hole. The strip will fold over and the rubber cement surrounds the hole. Only push in the strip about 1/2 or 2/3 of the way into the hole - you want the end of the strip still sticking out. Then with a quick jerking motion, pull the "needle" out. There is a slot at the eye that allows the repair strip to stay in the hole while the needle is removed.
Next, I trimmed off the excess with scissors.
Finished repair:
After letting the glue cure for about an hour, I hooked up a compressor to the wheel and filled it to the correct pressure to check for leaks. I dropped a few drops of soapy water on the area to check for bubbles. None, so I was good to go.
I always clean up the wheel well when I'm working in there so I can see any damage or corrosion that might be hiding under the brake dust and dirt. Eibachs look good - no cracking or corrosion I can see. Same with the Stillen exhaust.
All that's left is to do is put the wheel back on. Don't forget to use a torque wrench. To me this is just as important as the repair!!! I have snapped bolts in the past and replacing them is a major pain. Do yourself a favor and buy a torque wrench if you plan on rotating, changing or repairing anything in the wheel well. Specification says 83ft-lbs. I use 90ft-lbs due to the spacers I have.
Watch the tire for the next few days. The repair kit says this is a temporary fix, but I have used these patches till the tire wears out and needs to be replaced during it's normal course of life. I carry the kit with me, in case I'm ever on a road trip and need to do this on the fly.
Attachments
-
 IMG_5611.jpg83.5 KB · Views: 60
 -
 IMG_5612.jpg101.4 KB · Views: 51
 -
 IMG_5613.jpg98.2 KB · Views: 61
 -
 IMG_5614.jpg68.7 KB · Views: 76
 -
 IMG_5621.jpg63.9 KB · Views: 62
 -
 IMG_5619.jpg55.5 KB · Views: 50
 -
 IMG_5615.jpg93.4 KB · Views: 49
 -
 IMG_5622.jpg37.4 KB · Views: 64
 -
 IMG_5623.jpg108.2 KB · Views: 48
 -
 IMG_5625.jpg90.2 KB · Views: 53
 -
 IMG_5630.jpg66.7 KB · Views: 54
 -
 IMG_5628.jpg76.5 KB · Views: 58
 -
 IMG_5611.jpg83.5 KB · Views: 63
 -
 IMG_5612.jpg101.4 KB · Views: 47
 -
 IMG_5613.jpg98.2 KB · Views: 48
 -
 IMG_5614.jpg68.7 KB · Views: 63
 -
 IMG_5615.jpg93.4 KB · Views: 85
 -
 IMG_5619.jpg55.5 KB · Views: 54
 -
 IMG_5621.jpg63.9 KB · Views: 52
 -
 IMG_5623.jpg108.2 KB · Views: 74
 -
 IMG_5622.jpg37.4 KB · Views: 53
 -
 IMG_5625.jpg90.2 KB · Views: 50
 -
 IMG_5628.jpg76.5 KB · Views: 53
 -
 IMG_5630.jpg66.7 KB · Views: 46
 -
 IMG_5611.jpg83.5 KB · Views: 52
 -
 IMG_5612.jpg101.4 KB · Views: 54
 -
 IMG_5614.jpg68.7 KB · Views: 70
 -
 IMG_5613.jpg98.2 KB · Views: 49
 -
 IMG_5615.jpg93.4 KB · Views: 47
 -
 IMG_5619.jpg55.5 KB · Views: 61
 -
 IMG_5621.jpg63.9 KB · Views: 50
 -
 IMG_5623.jpg108.2 KB · Views: 70
 -
 IMG_5622.jpg37.4 KB · Views: 58
 -
 IMG_5625.jpg90.2 KB · Views: 44
 -
 IMG_5628.jpg76.5 KB · Views: 72
 -
 IMG_5630.jpg66.7 KB · Views: 54
 -
 IMG_5611.jpg83.5 KB · Views: 63
 -
 IMG_5612.jpg101.4 KB · Views: 80
 -
 IMG_5615.jpg93.4 KB · Views: 63
 -
 IMG_5614.jpg68.7 KB · Views: 52
 -
 IMG_5613.jpg98.2 KB · Views: 53
 -
 IMG_5619.jpg55.5 KB · Views: 55
 -
 IMG_5621.jpg63.9 KB · Views: 61
 -
 IMG_5622.jpg37.4 KB · Views: 66
 -
 IMG_5623.jpg108.2 KB · Views: 45
 -
 IMG_5625.jpg90.2 KB · Views: 66
 -
 IMG_5628.jpg76.5 KB · Views: 49
 -
 IMG_5630.jpg66.7 KB · Views: 53
 -
 IMG_5611.jpg83.5 KB · Views: 84
 -
 IMG_5612.jpg101.4 KB · Views: 51
 -
 IMG_5615.jpg93.4 KB · Views: 63
 -
 IMG_5619.jpg55.5 KB · Views: 46
 -
 IMG_5614.jpg68.7 KB · Views: 53
 -
 IMG_5613.jpg98.2 KB · Views: 65
 -
 IMG_5622.jpg37.4 KB · Views: 45
 -
 IMG_5623.jpg108.2 KB · Views: 51
 -
 IMG_5621.jpg63.9 KB · Views: 79
 -
 IMG_5625.jpg90.2 KB · Views: 42
 -
 IMG_5628.jpg76.5 KB · Views: 66
 -
 IMG_5630.jpg66.7 KB · Views: 71
Last edited: