StealthFX 45 Stillen Exhaust

HumbertoCALI

Premium Member
Premium
Car
2003 FX45 AWD
Well the wait is over for me. Finally got a Stillen Exhaust installed on my FX45.

I will edit this post on Monday (July 23, 2007) with pictures and sound clips.

Thanks to all for you help and especially Rookie (Viet) for providing me with the exhaust and the "Yoda" like advice durring my install.
 
First of all. WOW

This mod was so worth the wait. Got the results that I was looking for. Since there are currently only a half dozen choices that I know about for the FX45, I had to choose wisely.

Thanks again to VIET in helping me get this all together and helping me trouble shoot the install over the phone...:wink:

Stillen caught my eye for a number of reasons. One of the major reasons was the actual set up. I like that the set up is a a kind of Dual Exhaust and had a hunch that the results would be ideal to create a some what of a loud round and unique exotic sound to my FX.

I really can't measure the increase in HP or torque, since there is not a AWD Dino out there that I can test iton. (If anyone knows of one let me know). But, I can definetly feel the incerease in Torque and HP, more now that when I was with the Stock set up, when I floor it and when I am going about 80 to 85 MPH and trun from Automatic to Manual Shiffting and floor it to about 110 MPH on 4th gear, it feels and sounds great.

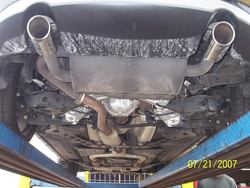
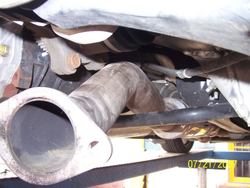
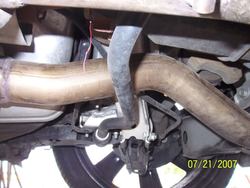
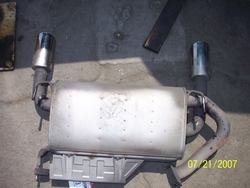
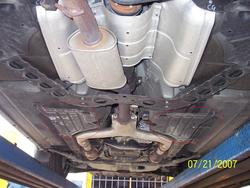
Here are some pictures of the Stock Exhaust Set Up.(bare with me for those who have never really seen the bottom of their FX :wink:)
100_1790.jpg
100_1791.jpg
100_1792.jpg


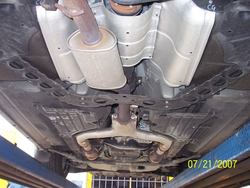
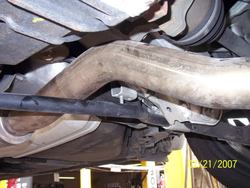
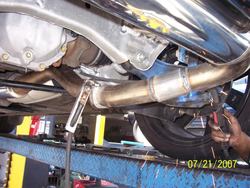
I did run into an Install issue. The pipe that leads out of the Resonator for the right exhaust was not clearing the Rear Sway bar and the arm that transfer the power to the rear tire. Since this set up came from an FX35 it would not fit. I called Viet and determined that the reason I had this problem is due to the diffrence in size of the Gear Box (I hope this is what you call it) from the FX35 and FX45.

Here are the pics of the Problem..
100_1795.jpg
100_1796.jpg
100_1794.jpg
100_1793.jpg

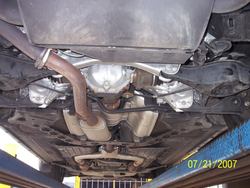
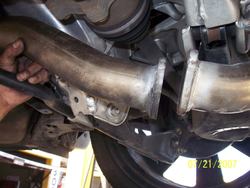
So we determined that the problem and began to make the adjustments.
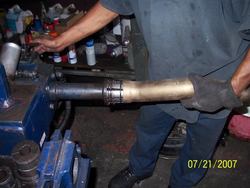
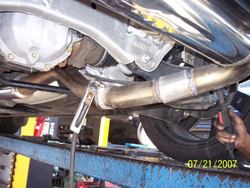
We had to cut the piece that came from the Resonator to the actual Exhaust...
100_1797.jpg

Then proceded to mold the piece to fit the curveture of the resonator and keep the arch that would clear the Rear Sway Bar...
100_1799.jpg

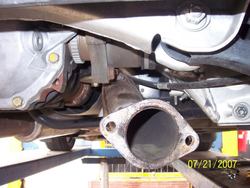
....... now came the part where we had to mod the final piece that conected the Exhaust to the X pipe...
100_1804.jpg
100_1802.jpg
100_1803.jpg

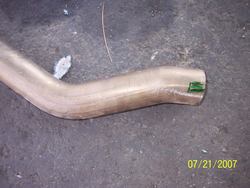
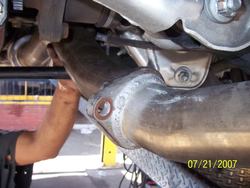
In order to know how much we were going to have to add to the exhaust we actuall istalled it to see what the differece was going to be.

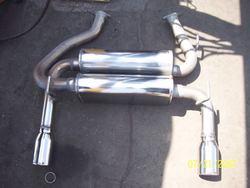
Just wanted to show the actual difference of the Stock Exhaust and the Stillen Exhaust..

STOCK
100_1800.jpg

Stillen
100_1801.jpg

We determined that about 1 1/2 inches would do the trick...
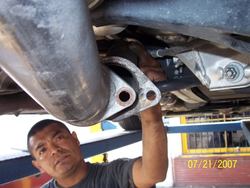
Here is Hector working on adding the right piece....

100_1807.jpg
100_1806.jpg
100_1805.jpg

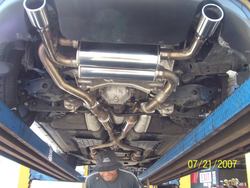
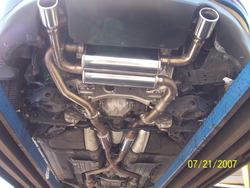
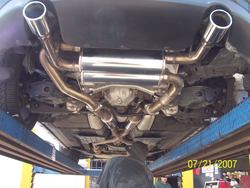
Here is the Final Set Up Installed....
100_1811.jpg
100_1810.jpg
100_1809.jpg

AND FINALLY THE SOUND CLIP.... I will post some more latter on.... Blurred out and shaded the new color from the bumper for you Spies out there..... :wink:

Stillen Exhaust :: Stillen Sound Clip V1 video by HumbertoCALI - Photobucket@@AMEPARAM@@http://vid170.photobucket.com/player.swf?file=http://vid170.photobucket.com/albums/u245/HumbertoCALI/Stillen%20Exhaust/9ba5930f.flv@@AMEPARAM@@vid170@@AMEPARAM@@170@@AMEPARAM@@u245/HumbertoCALI/Stillen%20Exhaust/9ba5930f
 

Attachments

  • 100_1790.jpg
    100_1790.jpg
    132 KB · Views: 354
  • 100_1791.jpg
    100_1791.jpg
    144.6 KB · Views: 357
  • 100_1792.jpg
    100_1792.jpg
    136.7 KB · Views: 861
  • 100_1790.jpg
    100_1790.jpg
    132 KB · Views: 213
  • 100_1791.jpg
    100_1791.jpg
    144.6 KB · Views: 921
  • 100_1795.jpg
    100_1795.jpg
    122.9 KB · Views: 136
  • 100_1796.jpg
    100_1796.jpg
    113.1 KB · Views: 141
  • 100_1792.jpg
    100_1792.jpg
    136.7 KB · Views: 224
  • 100_1795.jpg
    100_1795.jpg
    122.9 KB · Views: 164
  • 100_1797.jpg
    100_1797.jpg
    150.5 KB · Views: 140
  • 100_1794.jpg
    100_1794.jpg
    133.9 KB · Views: 155
  • 100_1793.jpg
    100_1793.jpg
    105.7 KB · Views: 155
  • 100_1796.jpg
    100_1796.jpg
    113.1 KB · Views: 157
  • 100_1794.jpg
    100_1794.jpg
    133.9 KB · Views: 145
  • 100_1799.jpg
    100_1799.jpg
    116.9 KB · Views: 116
  • 100_1804.jpg
    100_1804.jpg
    103.7 KB · Views: 129
  • 100_1797.jpg
    100_1797.jpg
    150.5 KB · Views: 165
  • 100_1799.jpg
    100_1799.jpg
    116.9 KB · Views: 170
  • 100_1793.jpg
    100_1793.jpg
    105.7 KB · Views: 149
  • 100_1802.jpg
    100_1802.jpg
    108.2 KB · Views: 142
  • 100_1804.jpg
    100_1804.jpg
    103.7 KB · Views: 128
  • 100_1803.jpg
    100_1803.jpg
    107.6 KB · Views: 122
  • 100_1802.jpg
    100_1802.jpg
    108.2 KB · Views: 125
  • 100_1803.jpg
    100_1803.jpg
    107.6 KB · Views: 114
  • 100_1800.jpg
    100_1800.jpg
    106.5 KB · Views: 173
  • 100_1800.jpg
    100_1800.jpg
    106.5 KB · Views: 150
  • 100_1801.jpg
    100_1801.jpg
    99.3 KB · Views: 139
  • 100_1807.jpg
    100_1807.jpg
    127.2 KB · Views: 111
  • 100_1806.jpg
    100_1806.jpg
    154 KB · Views: 150
  • 100_1801.jpg
    100_1801.jpg
    99.3 KB · Views: 149
  • 100_1807.jpg
    100_1807.jpg
    127.2 KB · Views: 114
  • 100_1805.jpg
    100_1805.jpg
    153.8 KB · Views: 125
  • 100_1811.jpg
    100_1811.jpg
    117.2 KB · Views: 99
  • 100_1806.jpg
    100_1806.jpg
    154 KB · Views: 95
  • 100_1805.jpg
    100_1805.jpg
    153.8 KB · Views: 119
  • 100_1810.jpg
    100_1810.jpg
    123.6 KB · Views: 140
  • 100_1811.jpg
    100_1811.jpg
    117.2 KB · Views: 114
  • 100_1809.jpg
    100_1809.jpg
    122.7 KB · Views: 95
  • 100_1810.jpg
    100_1810.jpg
    123.6 KB · Views: 135
  • 100_1809.jpg
    100_1809.jpg
    122.7 KB · Views: 122
Last edited:
didnt have time to look at the pictures but quickly watched the video and have to say im impressed:laugh: cant wait to see pictures of the new paint job:wink:
 
Very good pictures of the process. I now finally get to see the output shaft (side flanges) of the 45 diff. The flange diameter is the difference between the 45 and the 35.
 
Very good pictures of the process. I now finally get to see the output shaft (side flanges) of the 45 diff. The flange diameter is the difference between the 45 and the 35.

Thanks for the correction and the Overall help with my Ride.
 
Nice mod, & great doc. to go with it. Cant wait to hear this live:biggrin::biggrin:
& no loss on the low, right?
 
Happy for you Humberto I know you waited along time for this. Also, the stillen does sound alot better on the 45.
 
Humberto, is your FX 2007 model?
I bought my 07 FX45 here in Korea and it seems i am having trouble installing my stillen also..
i quit after trying to put on the midpipe and the exhaust is just collecting dust... strange thing is i had to remove these two plastic Covers(see pic) for the Y pipe to fit.. i thought.. "i guess it's ok" but then after seeeing what you had to go through to make urs fit.. my problem seems juvenile.
so.. im just concerned if i have to do all that crap to make mine work also..even though this fuggin exhaust is supposedly ""BOLT ON"" :wub:
46a5d4b5e18c5.jpg
 

Attachments

  • 46a5d4b5e18c5.jpg
    46a5d4b5e18c5.jpg
    124.7 KB · Views: 72
  • 46a5d4b5e18c5.jpg
    46a5d4b5e18c5.jpg
    124.7 KB · Views: 74
Humberto ... right above those red circles is the chassis support I think (V- shape with holes in them). In case of side impact it keeps the chassis or the frame intact. Did you remove it to make way for the bigger pipe?? .. On my FX, it's actually hitting that piece and it makes a sound everytime i go over a bump. Should I just remove it?
 
Last edited:
Humberto ... right above those red circles is the chassis support I think (V- shape with holes in them). In case of side impact in keeps the chassis or the frame intact. Did you remove it to make way for the bigger pipe?? .. On my FX, it's actually hitting that piece and it makes a sound everytime i go over a bump. Should I just remove it?


Hey jc, I actually had this same problem (even worse because it rattled every time I accelerated) after I installed my y-pipe. What I ended up doing was adding another hanger above that area and welding a hanger onto the mid pipe to give it a lift and support. Do not remove that black v-shaped bar. That will eliminate the rattling/rubbing.
 
That piece is called the tunnel stay, I refer to is as the w brace. Mine rattle on it as well, what we did was held up the exhaust in place when we welded the x to the mid pipes for clearance. Min had the same rattling with his Stillen and the hanger mod helped him.
 
Humberto, is your FX 2007 model?
I bought my 07 FX45 here in Korea and it seems i am having trouble installing my stillen also..
i quit after trying to put on the midpipe and the exhaust is just collecting dust... strange thing is i had to remove these two plastic Covers(see pic) for the Y pipe to fit.. i thought.. "i guess it's ok" but then after seeeing what you had to go through to make urs fit.. my problem seems juvenile.
so.. im just concerned if i have to do all that crap to make mine work also..even though this fuggin exhaust is supposedly ""BOLT ON"" :wub:
46a5d4b5e18c5.jpg
I have a 2005 model and did not have any of these issues. One of the things you might consider is to weld the x pipe together. This is how I received it from Rookie. This is the reason I had no issues with rubbing.

I do suggest you do the same with the exhaust....
 

Attachments

  • 46a5d4b5e18c5.jpg
    46a5d4b5e18c5.jpg
    124.7 KB · Views: 62
  • 46a5d4b5e18c5.jpg
    46a5d4b5e18c5.jpg
    124.7 KB · Views: 68
Hey jc, I actually had this same problem (even worse because it rattled every time I accelerated) after I installed my y-pipe. What I ended up doing was adding another hanger above that area and welding a hanger onto the mid pipe to give it a lift and support. Do not remove that black v-shaped bar. That will eliminate the rattling/rubbing.

That piece is called the tunnel stay, I refer to is as the w brace. Mine rattle on it as well, what we did was held up the exhaust in place when we welded the x to the mid pipes for clearance. Min had the same rattling with his Stillen and the hanger mod helped him.

Thanks guys. I really appreciate it, I'll see if I can go to a muffler shop and have that extra hanger welded on....:biggrin:
 
Back
Top