
WietseFX35
Member
- Location
- Netherlands
- Car
- 2009 FX50S AWD
Replace inner tierod: Write up
I changed out the driver side inner tie rod today because it was bend.
I made some pictures during the process and describe the ins and outs here for future reference if you need to change them also.
This job includes removing the wheel and placing the car on a jack, always make sure to do this in a safe way so the car can't fall off!!
Tool list:
-spanners
-big adjustable
-pliers for split pin
-ball joint press
-torque wrench
-tool for inner tie rod (optional)
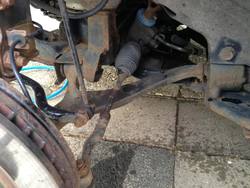
Ok, so after the car is placed on a jack stand and the wheel is removed you have a clear access to the tie rod.

Remove the rubber boot and pull it back so you get access on the square piece to fit a spanner on it to loosen it.
There should be some special tool to get a hold on it but i used a big adjustable wrench and got a good hold on the square part and "hammered" with my hand on the wrench and it came loose.
On the gear shaft behind it there is another flattened piece to fit a spanner, this should be used to prevent putting all the torque on the gear linkage inside.
Luckily mine was not that tight and came loose quite easy so i was not afraid of damaging something but i must recommend you that when you notice it's very tight to make sure to use a backup wrench on the gear linkage to prevent damaging it.
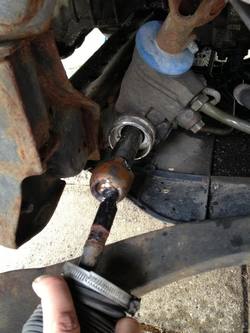
On this picture you can see what is inside the rubber boot, also here you can see the damage on my inner tie rod.

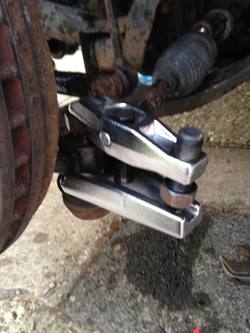
Next thing up is to loosen the outer tie rod, for this job a ball joint press is a must to be used.
Remove the split pin and loosen the nut, do not remove it yet as you want it there to keep the rod a bit in place when it comes off.
They do come off with quite some force so be prepared for it.
Adjust the ball joint press till it makes a good fitment with the tensioner rod fully retracted and slowly start putting tension on it.
When you are going to reuse the outer tie rods make sure the rubber protection boot is not between the ball joint press as this will damage it and allows dust/sand and water to enter the balljoint which will wear it out very fast.

Once this one popped out you are able to unscrew the complete tie rod (inner and outer).
Put the tie rod in a vice and loosen the lock nut behind the outer tie rod and unscrew the outer from the inner tie rod, counting the amount of turns.
When installing you need to turn it back on the same amount of turns!!
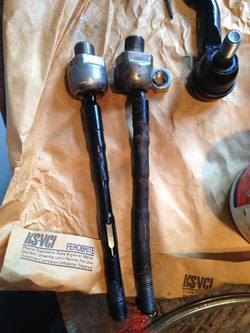
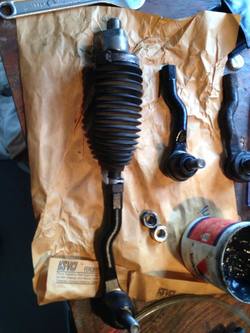
Here a pic of the old and new inner tie rod, you can see it's bend on the threaded end and also on the other side where the ball joint sits its bent completely.

As for me, i simply did the same amount of turns on the new tie rods so it should be around the same as the old one.
When putting the inner and outer tie rod together make sure all parts are back on such as the rubber boot, clamp and locking nut otherwise you have to remove the outer tie rod again later on.
New one ready to go:

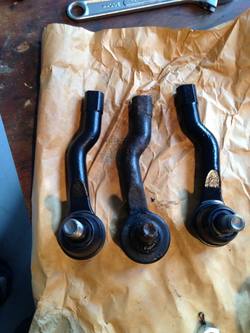
If you do the same as me and change out the outer rods as well, make sure you install the correct one on each side as the left and right version are different.
See picture,

For installation i found it easiest to install the inner tie rod first, and after screw on the outer tie rod as the knuckle will be in the way to turn it.
The ball joint of the inner tie rod is still stiff to move and it will not be easy to turn in that case and cross thread it can end up in changing out the complete steering gear linkage....but then you really need to screw it up.
One at the time will be easiest.
Once they are in place and you turned the outer tie rod the same amounts of turns back on the inner you can stick the ball joint back in the knuckle and install the nut loose for now to keep it in place.
Thighten the inner tie rod back to the steering gear link, i recommend to get a back up spanner and get a hold on the steering gear and thighten the inner tie rod.
After that you can thighten the nut on the balljoint (85Nm) and install the split pin. (best to use a new one, there where new ones in the kit with the outer tie rods anyway)
Last job is to put the wheel back on and go for a test drive.
It's recommended to get the car aligned by a specialist after doing any change out of parts on the steering linkage!
That's all, if i missed anything, questions or remarks you are free to post.
I changed out the driver side inner tie rod today because it was bend.
I made some pictures during the process and describe the ins and outs here for future reference if you need to change them also.
This job includes removing the wheel and placing the car on a jack, always make sure to do this in a safe way so the car can't fall off!!
Tool list:
-spanners
-big adjustable
-pliers for split pin
-ball joint press
-torque wrench
-tool for inner tie rod (optional)
Ok, so after the car is placed on a jack stand and the wheel is removed you have a clear access to the tie rod.
Remove the rubber boot and pull it back so you get access on the square piece to fit a spanner on it to loosen it.
There should be some special tool to get a hold on it but i used a big adjustable wrench and got a good hold on the square part and "hammered" with my hand on the wrench and it came loose.
On the gear shaft behind it there is another flattened piece to fit a spanner, this should be used to prevent putting all the torque on the gear linkage inside.
Luckily mine was not that tight and came loose quite easy so i was not afraid of damaging something but i must recommend you that when you notice it's very tight to make sure to use a backup wrench on the gear linkage to prevent damaging it.
On this picture you can see what is inside the rubber boot, also here you can see the damage on my inner tie rod.
Next thing up is to loosen the outer tie rod, for this job a ball joint press is a must to be used.
Remove the split pin and loosen the nut, do not remove it yet as you want it there to keep the rod a bit in place when it comes off.
They do come off with quite some force so be prepared for it.
Adjust the ball joint press till it makes a good fitment with the tensioner rod fully retracted and slowly start putting tension on it.
When you are going to reuse the outer tie rods make sure the rubber protection boot is not between the ball joint press as this will damage it and allows dust/sand and water to enter the balljoint which will wear it out very fast.
Once this one popped out you are able to unscrew the complete tie rod (inner and outer).
Put the tie rod in a vice and loosen the lock nut behind the outer tie rod and unscrew the outer from the inner tie rod, counting the amount of turns.
When installing you need to turn it back on the same amount of turns!!
Here a pic of the old and new inner tie rod, you can see it's bend on the threaded end and also on the other side where the ball joint sits its bent completely.
As for me, i simply did the same amount of turns on the new tie rods so it should be around the same as the old one.
When putting the inner and outer tie rod together make sure all parts are back on such as the rubber boot, clamp and locking nut otherwise you have to remove the outer tie rod again later on.
New one ready to go:
If you do the same as me and change out the outer rods as well, make sure you install the correct one on each side as the left and right version are different.
See picture,
For installation i found it easiest to install the inner tie rod first, and after screw on the outer tie rod as the knuckle will be in the way to turn it.
The ball joint of the inner tie rod is still stiff to move and it will not be easy to turn in that case and cross thread it can end up in changing out the complete steering gear linkage....but then you really need to screw it up.
One at the time will be easiest.
Once they are in place and you turned the outer tie rod the same amounts of turns back on the inner you can stick the ball joint back in the knuckle and install the nut loose for now to keep it in place.
Thighten the inner tie rod back to the steering gear link, i recommend to get a back up spanner and get a hold on the steering gear and thighten the inner tie rod.
After that you can thighten the nut on the balljoint (85Nm) and install the split pin. (best to use a new one, there where new ones in the kit with the outer tie rods anyway)
Last job is to put the wheel back on and go for a test drive.
It's recommended to get the car aligned by a specialist after doing any change out of parts on the steering linkage!
That's all, if i missed anything, questions or remarks you are free to post.
Attachments
Last edited: