
- Location
- Westchester, New York
- Car
- 09 FX50
Although already described in another thread, I will go into a little bit more detail.
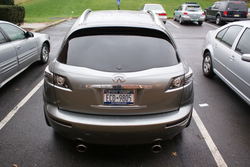
REAR HATCH WIPER DELETE.
TOOLS NEEDED:
10mm ratchet
prying tool (small knife, screwdriver)
"sink hole cover" from lowe's or home depot(see pictures below)
saw to cut plastic
Spray paint (for plastics, or buy plastic primer and regular paint)
elbow grease
:INTERIOR HATCH/WIPER BLADE MOTOR ASSEMBLY REMOVAL:
(will add real pictures tommorow)
Step 1:
open rear hatch

Step 2:
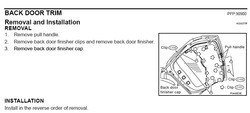
remove the "handles": i did this by inserting a small blade into the top part and popping them out downwards
Step 3:
remove the entire inside part of the hatch by pulling: start near where the glass starts and pull towards you: you will pop out 2 big clips and 2 smaller clips, so make sure you can find them after they pop out
Step 4: you can now see the wiper blade motor assembly.

First, unclip the wires that are connected with the white plastic, then wrap the hanging wires with electrical tape.
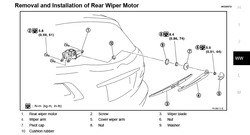
Step 5: Next, unbolt the 3 10mm bolts holding the motor in place.
Then, remove the wiper from the outside by first taking off the "elbow", removing the 10mm nut then "unscrewing" the entire blade.
Step 6: you need to now wiggle off the black plastic cone with the bolt hanging out of it, after you do this, there will be a LARGE NUT exposed. Take a pair of pliers or channel locks and loosen it, then take it off with your fingers. Then, the entire motor assembly will fall down (MAKE SURE TO CATCH IT!). then remove the rubber insulator piece in the hole...you will now have a nice 4cm circular hole in your back window.
**note: you can remove the wiper first then unbolt the motor if you please**
Step 7:
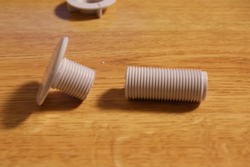
buy this: "Sink hole cover"

Step 8: cut the threaded part and leave about a third of it still attached.

Step 9: (optional) Glue foam ring to top part to ensure it will not move during tightening
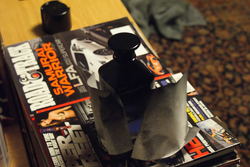
Step 10: Sand the top of the "cap" with 400+ grit sandpaper.
Step 11: Paint the cap with two light coats waiting 5-10 minutes in between. an easy way to help it stand up while painting is to insert it into the top of a water bottle half-full, the weight will keep it from tipping over and you don't have to touch it to pick it up
let itdry/cure for atleast 10 hours (or overnight)
if you are using primer, spray one layer of primer, wait 30 minutes, then paint
**optional: sand after painting and apply more coats**

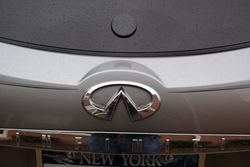
Step 12: after letting your paint cure, it is time to cover up that hole!
Insert the top part with the cap in from the outside, then go on the inside and screw on the nut and be sure to make it VERY tight to ensure a proper seal.
optional: silicone from the inside just to make sure it is sealed.

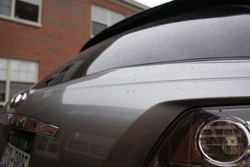
Step 13: step back and admire your work!


REAR HATCH WIPER DELETE.
TOOLS NEEDED:
10mm ratchet
prying tool (small knife, screwdriver)
"sink hole cover" from lowe's or home depot(see pictures below)
saw to cut plastic
Spray paint (for plastics, or buy plastic primer and regular paint)
elbow grease
:INTERIOR HATCH/WIPER BLADE MOTOR ASSEMBLY REMOVAL:
(will add real pictures tommorow)
Step 1:
open rear hatch
Step 2:
remove the "handles": i did this by inserting a small blade into the top part and popping them out downwards
Step 3:
remove the entire inside part of the hatch by pulling: start near where the glass starts and pull towards you: you will pop out 2 big clips and 2 smaller clips, so make sure you can find them after they pop out
Step 4: you can now see the wiper blade motor assembly.
First, unclip the wires that are connected with the white plastic, then wrap the hanging wires with electrical tape.
Step 5: Next, unbolt the 3 10mm bolts holding the motor in place.
Then, remove the wiper from the outside by first taking off the "elbow", removing the 10mm nut then "unscrewing" the entire blade.
Step 6: you need to now wiggle off the black plastic cone with the bolt hanging out of it, after you do this, there will be a LARGE NUT exposed. Take a pair of pliers or channel locks and loosen it, then take it off with your fingers. Then, the entire motor assembly will fall down (MAKE SURE TO CATCH IT!). then remove the rubber insulator piece in the hole...you will now have a nice 4cm circular hole in your back window.
**note: you can remove the wiper first then unbolt the motor if you please**
Step 7:
buy this: "Sink hole cover"
Step 8: cut the threaded part and leave about a third of it still attached.
Step 9: (optional) Glue foam ring to top part to ensure it will not move during tightening
Step 10: Sand the top of the "cap" with 400+ grit sandpaper.
Step 11: Paint the cap with two light coats waiting 5-10 minutes in between. an easy way to help it stand up while painting is to insert it into the top of a water bottle half-full, the weight will keep it from tipping over and you don't have to touch it to pick it up
let itdry/cure for atleast 10 hours (or overnight)
if you are using primer, spray one layer of primer, wait 30 minutes, then paint
**optional: sand after painting and apply more coats**
Step 12: after letting your paint cure, it is time to cover up that hole!
Insert the top part with the cap in from the outside, then go on the inside and screw on the nut and be sure to make it VERY tight to ensure a proper seal.
optional: silicone from the inside just to make sure it is sealed.
Step 13: step back and admire your work!
Attachments
-
 reardoorfinisher.gif21.5 KB · Views: 51
 -
 reardoorfinisher.gif21.5 KB · Views: 58
 -
 reardoorfinisher.gif21.5 KB · Views: 68
 -
 rearwiper.gif25.7 KB · Views: 59
 -
 rearwiper.gif25.7 KB · Views: 78
 -
 rearwiper.gif25.7 KB · Views: 62
 -
 DSC01560.jpg118.8 KB · Views: 48
 -
 DSC01560.jpg118.8 KB · Views: 52
 -
 DSC01560.jpg118.8 KB · Views: 55
 -
 DSC01561.jpg99.5 KB · Views: 51
 -
 DSC01561.jpg99.5 KB · Views: 81
 -
 DSC01561.jpg99.5 KB · Views: 44
 -
 DSC01564.jpg152.5 KB · Views: 41
 -
 DSC01564.jpg152.5 KB · Views: 55
 -
 DSC01564.jpg152.5 KB · Views: 87
 -
 DSC01570-Copy.jpg146.9 KB · Views: 59
 -
 DSC01570-Copy.jpg146.9 KB · Views: 59
 -
 DSC01570-Copy.jpg146.9 KB · Views: 69
 -
 DSC01566-Copy2.jpg185.9 KB · Views: 50
 -
 DSC01566-Copy2.jpg185.9 KB · Views: 70
 -
 DSC01566-Copy2.jpg185.9 KB · Views: 51
 -
 DSC01567-Copy2.jpg185.2 KB · Views: 55
 -
 DSC01567-Copy2.jpg185.2 KB · Views: 77
 -
 DSC01567-Copy2.jpg185.2 KB · Views: 50
 -
 DSC01571-Copy.jpg119.9 KB · Views: 80
 -
 DSC01571-Copy.jpg119.9 KB · Views: 65
 -
 DSC01571-Copy.jpg119.9 KB · Views: 98
Last edited:

