
I got the rear bumper light kit from KM Garage in Tokyo (Option #6).
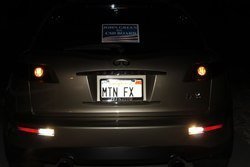
I needed these because after the rear light tint my back up lights were non effective.
They are planning a US Offering of many of their aftermarket Mods. They do the installs in house in Tokyo at this time but as they can get some DIY instructions done in English they plan on offering more of their FX Mods to the US Market.Here is their website link-- http://www.onix-kmg.co.jp/infiniti/option/option02.html
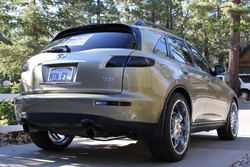
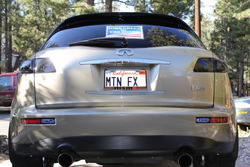
I saw some pix of these lights at a Tokyo car show so I contacted them and they agreed to send me some if I could do the English DIY so here it is. I really like the way they turned out they look great! I should have a price for this option some time soon.--------
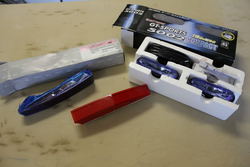
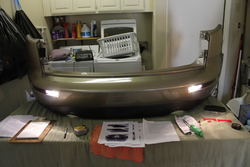
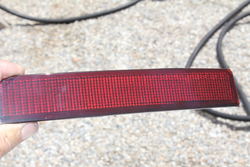
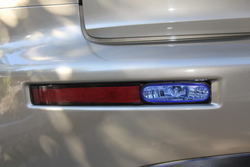
1) This is the KM Garage Option #6 Rear Light Kit.-----***100 watt H3's***

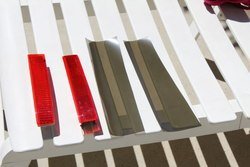
Supplied cut and formed reflectors----


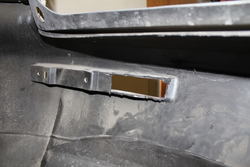
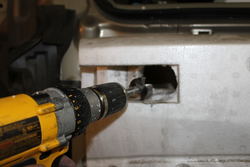
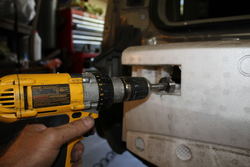
2) Remove the rear bumper and stock reflectors then cut out the area shown.(Note-You will need to cut the end of the cut out area down to accomodate for the curve of the light housing it's important to make a nice straight cut here because the face of the light housing sets up against this cut)


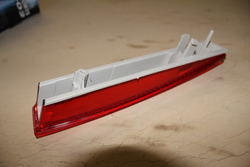
3) Set the light housing and then new reflector in the cut out so you can get proper placement of the light housing-----

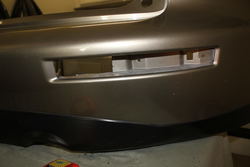
4) Once you have a good placement of the light housing use a good glue to set the lamp into the bumper. (I used GOOP Plumbers glue).---

5) At this point I tested the light operation and harness wiring.----

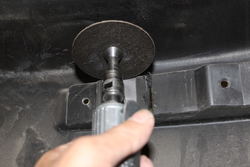
6) Now you will need to auger out some of the Bumper energy asorbing material for clearance for the back of the lamp and the wire routing.---


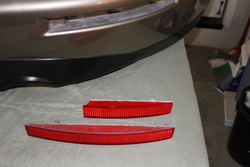
7) This was an optional step---I tinted the kit's reflectors---


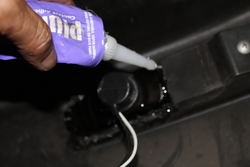
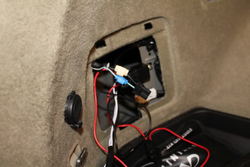
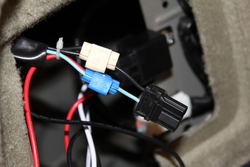
8) Next hook up the wiring harness and get power from the rear cargo area 12V power
jacK (Note this is keyed power source). Just pull the plug off the back of the jack and use both the Positive and Negative wires to splice in for main power to the light relay. (Note--The kit comes with a light switch you can use to turn the lights on and off manually or just cut the WHITE wire going to the switch assembbly disccard the switch assembly and hook the white wire to the positive side of whatever you want to turn the lights on. (In my case it was the backup lamps)---


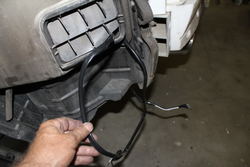
9) Next run the wires from the harness through the drainage vent to the back of the energy absorber and attach to it.---

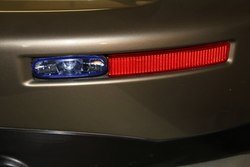
10) Plug the lights into the bumper and reinstall bunper DONE -----
-----


I needed these because after the rear light tint my back up lights were non effective.
They are planning a US Offering of many of their aftermarket Mods. They do the installs in house in Tokyo at this time but as they can get some DIY instructions done in English they plan on offering more of their FX Mods to the US Market.Here is their website link-- http://www.onix-kmg.co.jp/infiniti/option/option02.html
I saw some pix of these lights at a Tokyo car show so I contacted them and they agreed to send me some if I could do the English DIY so here it is. I really like the way they turned out they look great! I should have a price for this option some time soon.--------
1) This is the KM Garage Option #6 Rear Light Kit.-----***100 watt H3's***
Supplied cut and formed reflectors----
2) Remove the rear bumper and stock reflectors then cut out the area shown.(Note-You will need to cut the end of the cut out area down to accomodate for the curve of the light housing it's important to make a nice straight cut here because the face of the light housing sets up against this cut)
3) Set the light housing and then new reflector in the cut out so you can get proper placement of the light housing-----
4) Once you have a good placement of the light housing use a good glue to set the lamp into the bumper. (I used GOOP Plumbers glue).---
5) At this point I tested the light operation and harness wiring.----
6) Now you will need to auger out some of the Bumper energy asorbing material for clearance for the back of the lamp and the wire routing.---
7) This was an optional step---I tinted the kit's reflectors---
8) Next hook up the wiring harness and get power from the rear cargo area 12V power
jacK (Note this is keyed power source). Just pull the plug off the back of the jack and use both the Positive and Negative wires to splice in for main power to the light relay. (Note--The kit comes with a light switch you can use to turn the lights on and off manually or just cut the WHITE wire going to the switch assembbly disccard the switch assembly and hook the white wire to the positive side of whatever you want to turn the lights on. (In my case it was the backup lamps)---
9) Next run the wires from the harness through the drainage vent to the back of the energy absorber and attach to it.---
10) Plug the lights into the bumper and reinstall bunper DONE
-----Attachments
-
 1.jpg80 KB · Views: 56
 -
 2.jpg55.9 KB · Views: 74
 -
 3.jpg72.5 KB · Views: 41
 -
 4.jpg85.8 KB · Views: 62
 -
 5.jpg85.3 KB · Views: 61
 -
 6.jpg54.1 KB · Views: 70
 -
 10.jpg63.5 KB · Views: 47
 -
 7.jpg45.5 KB · Views: 86
 -
 12.jpg79.7 KB · Views: 50
 -
 8.jpg62.3 KB · Views: 62
 -
 9.jpg75.4 KB · Views: 99
 -
 16.jpg73.6 KB · Views: 63
 -
 17.jpg95.1 KB · Views: 50
 -
 13.jpg75.9 KB · Views: 90
 -
 14.jpg71.5 KB · Views: 51
 -
 15.jpg76.9 KB · Views: 73
 -
 18.jpg64.8 KB · Views: 70
 -
 19.jpg138.5 KB · Views: 60
 -
 20.jpg109.4 KB · Views: 61
 -
 21.jpg45.5 KB · Views: 76
Last edited: