QX70S 5.0

How I tackled the rear...

License plate inlay

F55E4F13-C9C7-4D4C-9226-ED87348799A3.jpg

Initial stretch with relief cuts:

E4759767-BEA8-402A-8C39-A1720E2617E3.jpg

Finished product:

BBB3EB28-D5BD-4E29-8797-42CCDC0F7C01.jpg
 

Attachments

  • F55E4F13-C9C7-4D4C-9226-ED87348799A3.jpg
    F55E4F13-C9C7-4D4C-9226-ED87348799A3.jpg
    93.1 KB · Views: 152
  • F55E4F13-C9C7-4D4C-9226-ED87348799A3.jpg
    F55E4F13-C9C7-4D4C-9226-ED87348799A3.jpg
    93.1 KB · Views: 118
  • F55E4F13-C9C7-4D4C-9226-ED87348799A3.jpg
    F55E4F13-C9C7-4D4C-9226-ED87348799A3.jpg
    93.1 KB · Views: 101
  • F55E4F13-C9C7-4D4C-9226-ED87348799A3.jpg
    F55E4F13-C9C7-4D4C-9226-ED87348799A3.jpg
    93.1 KB · Views: 163
  • F55E4F13-C9C7-4D4C-9226-ED87348799A3.jpg
    F55E4F13-C9C7-4D4C-9226-ED87348799A3.jpg
    93.1 KB · Views: 107
  • BBB3EB28-D5BD-4E29-8797-42CCDC0F7C01.jpg
    BBB3EB28-D5BD-4E29-8797-42CCDC0F7C01.jpg
    92.6 KB · Views: 157
  • BBB3EB28-D5BD-4E29-8797-42CCDC0F7C01.jpg
    BBB3EB28-D5BD-4E29-8797-42CCDC0F7C01.jpg
    92.6 KB · Views: 136
  • BBB3EB28-D5BD-4E29-8797-42CCDC0F7C01.jpg
    BBB3EB28-D5BD-4E29-8797-42CCDC0F7C01.jpg
    92.6 KB · Views: 171
  • BBB3EB28-D5BD-4E29-8797-42CCDC0F7C01.jpg
    BBB3EB28-D5BD-4E29-8797-42CCDC0F7C01.jpg
    92.6 KB · Views: 166
  • BBB3EB28-D5BD-4E29-8797-42CCDC0F7C01.jpg
    BBB3EB28-D5BD-4E29-8797-42CCDC0F7C01.jpg
    92.6 KB · Views: 111
  • E4759767-BEA8-402A-8C39-A1720E2617E3.jpg
    E4759767-BEA8-402A-8C39-A1720E2617E3.jpg
    94.4 KB · Views: 164
  • E4759767-BEA8-402A-8C39-A1720E2617E3.jpg
    E4759767-BEA8-402A-8C39-A1720E2617E3.jpg
    94.4 KB · Views: 96
  • E4759767-BEA8-402A-8C39-A1720E2617E3.jpg
    E4759767-BEA8-402A-8C39-A1720E2617E3.jpg
    94.4 KB · Views: 158
  • E4759767-BEA8-402A-8C39-A1720E2617E3.jpg
    E4759767-BEA8-402A-8C39-A1720E2617E3.jpg
    94.4 KB · Views: 122
  • E4759767-BEA8-402A-8C39-A1720E2617E3.jpg
    E4759767-BEA8-402A-8C39-A1720E2617E3.jpg
    94.4 KB · Views: 91
i bought a gloss black vinyl to wrap my fender vent but it doesn't stick very well on areas that are stretched. It would lift right back up within a minute. I bought it on eBay for like 5 bucks for 1' x 5'. You said you wrapped your fender vent in gloss black, what brand did you go with and how difficult wrapping that piece? Any problem of the vinyl lifting on the stretched area?
 
I used 3M and it was extremely easy. you're going to have to make a relief cut going down the full length of the inside louvers and press everything into place. You should get zero resistance once you've cut it. Don't forget to post heat the vinyl when you're done or you risk it separating.

5F713575-2AD0-4FF7-8B30-A499183B9DC6.jpg

AE109489-4158-440C-9D19-B7284577173D.jpg
 

Attachments

  • 5F713575-2AD0-4FF7-8B30-A499183B9DC6.jpg
    5F713575-2AD0-4FF7-8B30-A499183B9DC6.jpg
    125.2 KB · Views: 138
  • 5F713575-2AD0-4FF7-8B30-A499183B9DC6.jpg
    5F713575-2AD0-4FF7-8B30-A499183B9DC6.jpg
    125.2 KB · Views: 152
  • AE109489-4158-440C-9D19-B7284577173D.jpg
    AE109489-4158-440C-9D19-B7284577173D.jpg
    104.2 KB · Views: 86
  • 5F713575-2AD0-4FF7-8B30-A499183B9DC6.jpg
    5F713575-2AD0-4FF7-8B30-A499183B9DC6.jpg
    125.2 KB · Views: 164
  • AE109489-4158-440C-9D19-B7284577173D.jpg
    AE109489-4158-440C-9D19-B7284577173D.jpg
    104.2 KB · Views: 135
  • 5F713575-2AD0-4FF7-8B30-A499183B9DC6.jpg
    5F713575-2AD0-4FF7-8B30-A499183B9DC6.jpg
    125.2 KB · Views: 165
  • AE109489-4158-440C-9D19-B7284577173D.jpg
    AE109489-4158-440C-9D19-B7284577173D.jpg
    104.2 KB · Views: 152
  • AE109489-4158-440C-9D19-B7284577173D.jpg
    AE109489-4158-440C-9D19-B7284577173D.jpg
    104.2 KB · Views: 101
  • AE109489-4158-440C-9D19-B7284577173D.jpg
    AE109489-4158-440C-9D19-B7284577173D.jpg
    104.2 KB · Views: 155
  • 5F713575-2AD0-4FF7-8B30-A499183B9DC6.jpg
    5F713575-2AD0-4FF7-8B30-A499183B9DC6.jpg
    125.2 KB · Views: 111
Last edited:
Thanks for the pics! It's like you were ready for me. Haha do you recommend removing them to wrap them?

How do you remove them? Do they just pop right off?
 
If you look at the pic you'll see that the wheel trim has been removed. Do that and then reach behind the wheel well to access them. They're held in place by 3 clips just Squeeze them with the tips of your finger and it'll pop right out.

Remove it if you want to wrap it the right way. Or you can Wrap it while attached and hope for the best.
 
Vinyl wrapped the internal reflector and eyelid, replaced old dying halos with a new set of switchbacks.

D1787E19-269A-49AB-8EB1-8647AD4519AB_1.jpg
 

Attachments

  • D1787E19-269A-49AB-8EB1-8647AD4519AB_1.jpg
    D1787E19-269A-49AB-8EB1-8647AD4519AB_1.jpg
    77.1 KB · Views: 157
  • D1787E19-269A-49AB-8EB1-8647AD4519AB_1.jpg
    D1787E19-269A-49AB-8EB1-8647AD4519AB_1.jpg
    77.1 KB · Views: 169
  • D1787E19-269A-49AB-8EB1-8647AD4519AB_1.jpg
    D1787E19-269A-49AB-8EB1-8647AD4519AB_1.jpg
    77.1 KB · Views: 114
  • D1787E19-269A-49AB-8EB1-8647AD4519AB_1.jpg
    D1787E19-269A-49AB-8EB1-8647AD4519AB_1.jpg
    77.1 KB · Views: 131
  • D1787E19-269A-49AB-8EB1-8647AD4519AB_1.jpg
    D1787E19-269A-49AB-8EB1-8647AD4519AB_1.jpg
    77.1 KB · Views: 113
Finalizing fitment then off to be painted. Those side vents will be bondo'd.

19688E64-96D6-4E0C-8F72-3EF7B2100E41.jpg
 

Attachments

  • 19688E64-96D6-4E0C-8F72-3EF7B2100E41.jpg
    19688E64-96D6-4E0C-8F72-3EF7B2100E41.jpg
    66.8 KB · Views: 104
  • 19688E64-96D6-4E0C-8F72-3EF7B2100E41.jpg
    19688E64-96D6-4E0C-8F72-3EF7B2100E41.jpg
    66.8 KB · Views: 113
  • 19688E64-96D6-4E0C-8F72-3EF7B2100E41.jpg
    19688E64-96D6-4E0C-8F72-3EF7B2100E41.jpg
    66.8 KB · Views: 150
  • 19688E64-96D6-4E0C-8F72-3EF7B2100E41.jpg
    19688E64-96D6-4E0C-8F72-3EF7B2100E41.jpg
    66.8 KB · Views: 107
  • 19688E64-96D6-4E0C-8F72-3EF7B2100E41.jpg
    19688E64-96D6-4E0C-8F72-3EF7B2100E41.jpg
    66.8 KB · Views: 157
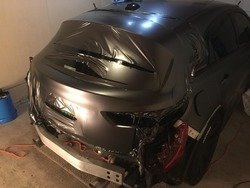
Although I'm still busy figuring things out, it's actually it's not too bad. I was a little worried in the beginning because nothing was matching up correctly and the bumper was sitting out with a good 1.5" gap from where the bottom of the hatch sits while closed. Once I realized that some of the tabs are leftover from the casting mold, and not needed for fitment, it was a matter of using the Dremmel to file things down until it started to look right.

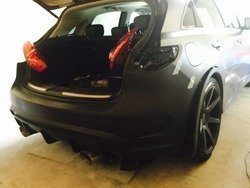
I still have a ways to go but it's definitely coming together.
 
Fitment completed. Now off to the painters so I can finally finish the wrap.

C2220E7A-09C5-4217-9695-FE7341D202ED.jpg

526479B4-C1DF-4CCB-A212-2F07160582C8.jpg
 

Attachments

  • 526479B4-C1DF-4CCB-A212-2F07160582C8.jpg
    526479B4-C1DF-4CCB-A212-2F07160582C8.jpg
    112.9 KB · Views: 143
  • 526479B4-C1DF-4CCB-A212-2F07160582C8.jpg
    526479B4-C1DF-4CCB-A212-2F07160582C8.jpg
    112.9 KB · Views: 176
  • 526479B4-C1DF-4CCB-A212-2F07160582C8.jpg
    526479B4-C1DF-4CCB-A212-2F07160582C8.jpg
    112.9 KB · Views: 107
  • 526479B4-C1DF-4CCB-A212-2F07160582C8.jpg
    526479B4-C1DF-4CCB-A212-2F07160582C8.jpg
    112.9 KB · Views: 94
  • C2220E7A-09C5-4217-9695-FE7341D202ED.jpg
    C2220E7A-09C5-4217-9695-FE7341D202ED.jpg
    87.5 KB · Views: 159
  • C2220E7A-09C5-4217-9695-FE7341D202ED.jpg
    C2220E7A-09C5-4217-9695-FE7341D202ED.jpg
    87.5 KB · Views: 150
  • C2220E7A-09C5-4217-9695-FE7341D202ED.jpg
    C2220E7A-09C5-4217-9695-FE7341D202ED.jpg
    87.5 KB · Views: 112
  • C2220E7A-09C5-4217-9695-FE7341D202ED.jpg
    C2220E7A-09C5-4217-9695-FE7341D202ED.jpg
    87.5 KB · Views: 117
  • C2220E7A-09C5-4217-9695-FE7341D202ED.jpg
    C2220E7A-09C5-4217-9695-FE7341D202ED.jpg
    87.5 KB · Views: 153
  • 526479B4-C1DF-4CCB-A212-2F07160582C8.jpg
    526479B4-C1DF-4CCB-A212-2F07160582C8.jpg
    112.9 KB · Views: 142
Back
Top