Jumbo's BBK Thread

the sad part is, as far as strictly performance, I think the front's are really all you need, the rears are more for esthetics & just to have the complete "look". really is kinda silly to spend an extra 2k or so just to compliment the look of the fronts, but then again I guess there are more silly things to waste your $$ on too, so...

I guess in the end there probably is a bit of a performance increase with the rears too, but not nearly as much as the fronts... now, with the large rears I think it's almost gonna look like the front's should be even larger... ah, it never ends, but I think I'm just going to stay with the 6 pot fronts... famous last words? dunno...
 
Lol - once again, I smell what yer cookin.

Proof will be in the first few weeks of trying it out, I guess. And I won't worry about the cold weather thing.

This is from Stoptech:

“Stopping power” is an oft misapplied term. What most think it means is more clamping power to push the pads against the rotor with more force, which is only part of the equation. The more correct term is “brake torque”, which is a combination of pressure output of the caliper (controlled by piston size and overall system pressure, i.e. how hard you push on the pedal), the radius at which that force is applied (bigger rotor diameter means more torque if all else is equal) and the coefficient of friction of the brake pads. We are NOT looking to increase brake torque as it will throw off the balance of the brakes. The vehicle manufacturer spent a lot of time and money getting the front to rear balance optimized, and we work to maintain that balance, or maybe very slightly tweak it, which yields the best performance in terms of stopping distance and integration with the rest of the vehicle systems. Adding brake torque to the front (let’s slap on the most pistons we can find) will place too much load on the front tires and likely INCREASE stopping distance and could mess with the ABS. The G-Meter in your butt may think the thing is standing on its nose, which it probably is, but using proper instruments in controlled conditions will show a different result. The over amplified signal from oversized components will also make the pedal more like a micro-switch, which is also misinterpreted as “Man, I barely touch the pedal and the thing is already into ABS.” Again, the butt G-Meter says “Woo Hoo!”, but is it really predictable and drivable that way? Adding torque to the rear (such as moving the front calipers to the back) can cause rear lock-up and/or adverse ABS intervention and cause the vehicle to lose control. The benefit of a brake upgrade is not dramatically shorter stopping distances, though we do usually see a slight improvement. Buy really good tires and the stock brakes will stop in a measurably shorter distance. What a brake kit WILL provide is much increased heat capacity and better pedal feel due to a stiffer caliper and the addition of stainless lines. The stiffness of the new components does help with stopping distance as the signal from your foot to the tires is shortened due to less loss of efficiencies due to flex in the stock system.

Just to emphasize the point, OE manufacturer’s design all the dynamic control systems around stock components. ANY change to the vehicle may have an adverse affect on how the platform reacts in a panic situation. Sometimes it may be better, sometimes it may be worse. ABS is taking data from the wheel sensors and responding to that data based on how it was programmed with STOCK components. If you dramatically change something, lets say much larger piston volume in the front calipers, as ABS is reading data and trying to correct things, the signals it is sending to the brakes (apply/release/apply/release/apply/release) may not have the expected result due to the increased volume of fluid needed to actuate the brakes and the over amplified brake torque that results. It’s working overtime to figure out if you’re on locking up all 4 wheels on ice or 2 wheels off in the gravel. Add to that aftermarket shocks, wheels and tires, changes to the engine; let’s say part of the dynamic control is to reconfigure the timing to control the engine but the thing is chipped or artificially aspirated… All this is why we stick close to the stock balance on the brakes; we want to do all we can to lessen the impact of our parts on the rest of the vehicle while providing the most benefit in a very controlled manner.
 
Last edited:
Kit arrived today. WOW. Front kit is huge, but looks great. The front caliper is almost as big as the rear rotor. I'll post pics of the parts and the install this weekend.
 
I'm with you. Might have to give it a photoshop run to make sure painting the rears are the right thing. I have seen some painted stock calipers and I really thought they looked pretty good. The rear caliper obviously does a good job of hiding the tiny little brake pad.

Like you, I might end up going through a couple set-ups before settling on what works the best, especially after I go FI. Before FI, no doubt this upgrade will be a huge improvement.

this might help you, just painted mine:
DSC03565.jpg
DSC03557.jpg
 

Attachments

  • DSC03565.jpg
    DSC03565.jpg
    76.4 KB · Views: 18
  • DSC03557.jpg
    DSC03557.jpg
    65.7 KB · Views: 16
Cool. I plan to do exactly that to the rears this Friday. Did you use the G2 paint kit or something different? How was access to the back of the caliper? Did you mask off anything (bolt heads, brackets)? Any tricks to it or pretty straight forward?
 
I used a G2 kit this past weekend, if you can and have the know how I would take off all the parts needed to be painted. If not do what I did which was clean, mask everything, start painting. I believe you have about 2 hours to finish once you open the can and mix with the epoxy.
 
Cool. I plan to do exactly that to the rears this Friday. Did you use the G2 paint kit or something different? How was access to the back of the caliper? Did you mask off anything (bolt heads, brackets)? Any tricks to it or pretty straight forward?

I used duplicolor red paint from Autozone. I think G2 is the best, then duplicolor. Duplicolor is similar, you get a paint brush, caliper cleaner ,etc…

I masked off nothing, just removed the wheel and started painted. My tips are make sure you take the extra time to clean the caliper very well, it'll save time in the long run. I used a tooth brush to get everything I can off. I painted everything with a light coat first (no drips!), that includes bolt heads etc…, whatever I could paint that wouldn't "harm" the caliper.

You can be hardcore and remove the caliper and brake pad then start painting, and even sand down the caliper first, but I'm too lazy. I put on about 4-5 coats in about 2-3 hours. Then I used a wheel paint clear coat (I used a grocery bag and masking tape to cover the rotor, etc…) and sprayed 3 coats of clear. The wheel paint is a high temp paint and should give some extra life to the paint. Note that I had to repaint after 2 years of chicago salt.

Another thing you could do is buy high temp decals or lettering and put those on then clear coat. Like "Infiniti" or even "Stoptech" (since you have their rotors…)

I let it dry overnight to be safe so it could fully cure. 48 hrs would have been better, but once you start driving, the caliper heats up and should finish curing the paint.
 
Well, my install for the front BBK is getting delayed again.:mad:

I plan to paint the rear calipers this weekend, and maybe install the new rear rotors and lines. Front kit will have to wait till next weekend.
 
All the boxes arrived today so I had to unpack and check it out:

IMG_2026.jpg

Started the rear upgrade after I put my kid to bed last night. Went from 9pm to 2am and this was the result:

IMG_2027.jpg

Woke up this morning and they were cured enough to work with. Read a thread on here about knocking the old rotor off, "metal to metal", which I did with a sledge hammer. Did't take full swings or anything, but put some dents in the OEM rotors. It was time to replace them anyway. Greased the pad shims and dropped in the new pads. In this picture you can see the recently installed Eibachs too.

IMG_2029.jpg


Thanks to DodgeDanger for coming over to my house to help me bleed the brakes - definitely a two man job unless you have a fancy vacuum bleed kit. Topped off the reservoir before and after the brake bleeding. Torqued all the bolts I touched on the caliper, put the wheels back on and torqued them down. Access to the bottom torque member bolts is a little tough, especially with a torque wrench.

IMG_2034.jpg

Did the brake burnishing procedure per the instructions and everything seems to be ok.

Stainless steel lines & Front BBK next week!
 

Attachments

  • IMG_2029.jpg
    IMG_2029.jpg
    69.5 KB · Views: 16
  • IMG_2027.jpg
    IMG_2027.jpg
    74 KB · Views: 17
  • IMG_2026.jpg
    IMG_2026.jpg
    106.7 KB · Views: 16
  • IMG_2034.jpg
    IMG_2034.jpg
    109.6 KB · Views: 14
Last edited:
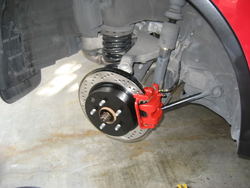
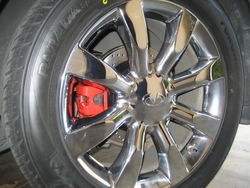
Finished up the front BBK this weekend. The biggest hurdle was needing a spacer (Dopie was right! Stoptech didn't know this :err:.). In order for the caliper to clear the rim, a minimum of 6mm is needed - and that will only give 1mm of clearance, which is where I am at this moment in time. A credit card won't fit in between my caliper and the wheel. It's crazy close. Ridiculous close. Scary, but also REALLY cool.

I was able to pick up universal non-hub centric spacers for about 20 bucks just to get my car back on the road. I'll be ordering the right hub-centric spacers immediately, with a bit more clearance. 8mm if I can find it. Anybody know where I could get something like that? The crap spacers I have in there now work because the hub still penetrates the rim for centering. In my case, I had to get longer wheel studs to accomodate the crap spacer, so with the new hub centric spacer the studs should be long enough for quick bolt up. Swapping out the studs was no problem at all, though I did go with a stud that has a different thread pitch than the studs on the rear wheels. Different lugs too - so they can't be interchanged with OEM.

I will absolutely do a write-up as a new thread. If I had the proper spacer when I started the job, it would have taken about 5 hours to complete the front upgrade. It took me a considerable amount of time longer, because I had to identify replacement studs & lugs, then FIND them in Houston. Hit seven stores on Saturday. Then there were fitment issues, so I had to take steps to make the studs work. Things you wouldn't have to do if you just got the right spacer.

IMG_2075.jpg

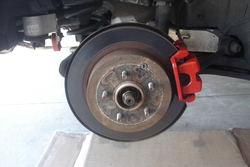
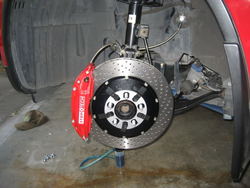
After installation of the rotor, caliper and stainless lines, before draining and refilling/bleeding brakes. Notice the crap spacer TAPED on to keep it centered? I can't stand having that on this BBK. It has GOT to go. Luckily, it's not doing anything other than acting like a big thick washer. It will be OK for a few days.IMG_2130.jpg

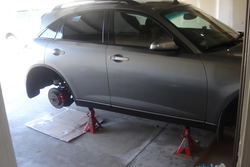
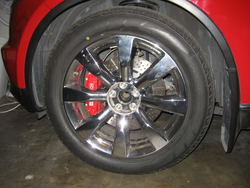
An after everything is torqued down - with less than a credit card's clearance between the caliper and rims.

IMG_2132.jpg

Cleaned off the rotors and took it out on the road for the bed-in & burnishing. Got them HOT and they were pouring off smoke by the fifth hard stop (normal, per the Stoptech procedure). By the end of the cycle, the brakes were MUCH stickier and the pedal was much less mushy than when I began. Did several leak checks and everything looks good. No more smoke or smell and the stopping feel is obviously more responsive than OEM.

I'm looking forward to getting to know my new brakes over the next few weeks. But I'm definitely needing that spacer so if anybody knows where I need to look for that - please drop me a line.
 

Attachments

  • IMG_2132.jpg
    IMG_2132.jpg
    92 KB · Views: 17
  • IMG_2130.jpg
    IMG_2130.jpg
    87.8 KB · Views: 13
  • IMG_2075.jpg
    IMG_2075.jpg
    65.6 KB · Views: 17
looks sweet. Good to know you need spacers. I thought Stoptech you didn't. I think it's down to just the 4 pot AP racing that don't need spacers? My axis titans have ridiculous amount of room between the caliper and wheel, but not so much the OEM 20's. Maybe I have to get aftermarket winter set too to avoid spacers =)

I was thinking of going 6 pot or even 8 pot, but 4 looks huge! Thanks for all the great pictures.
 
Back
Top