
*** Perform this DIY at your own risk. I'm not responsible for any injuries or mishaps for using this guide. ***
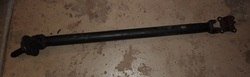
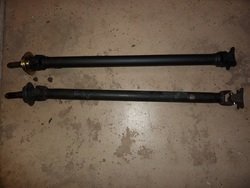
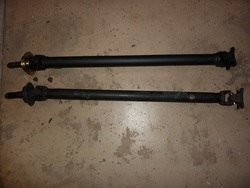
Strange vibrations from the car while driving started me to look and discover that I need a new front propeller drive shaft badly.


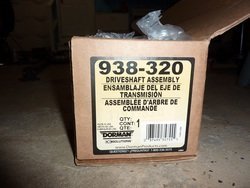
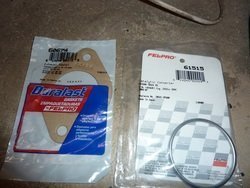
Parts you need:


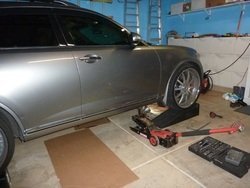
Secure car on ramps:

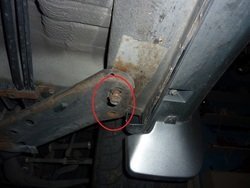
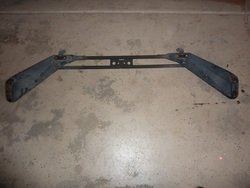
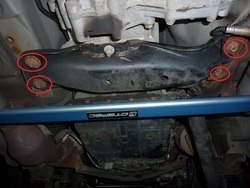
Remove the front cross member with power tool. There were 4 more bolts that need to be removed that I didn't have picture of. They're bolted to the bottom of the lower control arm:


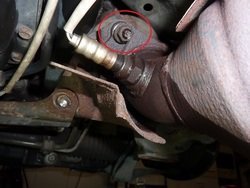
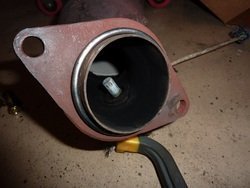
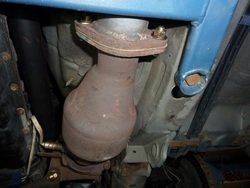
Remove the shield and catalytic converter with power tool:

***Note: The catalytic converter may be different on the FX35. The pictures here is from my FX45.
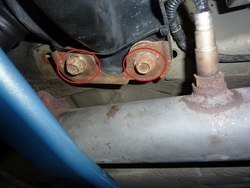
Make sure you're using the proper socket size to remove the converter mounting nuts. On mine, the two nuts that were used were different size. The left/top nut on the converter is a 14mm while the right/bottom nut is 11mm:


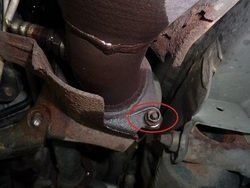
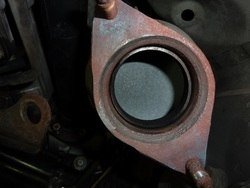
Remove the two bolts that mount the catalytic converter to the exhaust pipe:

One these studs broke while removing. It turns out to be beneficial since there is no room to remove the converter due to the entire exhaust system are mounted. Instead of loosen/un-mount the exhaust system, I decided to cut the other stud on the end of the converter. Once the studs are cut, I was able to work the converter off. I took the converter to a muffler shop to have them torch the remains of the studs off the converter and using new nuts and bolts to remount the converter back on.
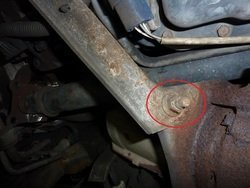
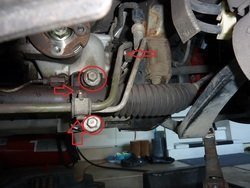
Remove the power steering linkage/gear with power tool and hose/pipping brackets :


Before removing the mounting bolts on the power steering linkage, using a jack stand to support it:

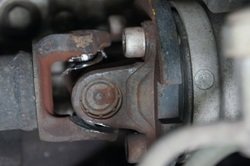
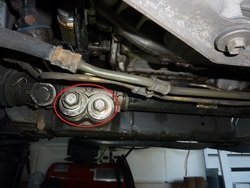
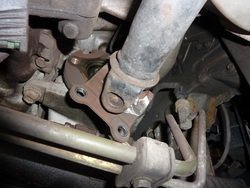
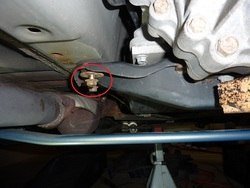
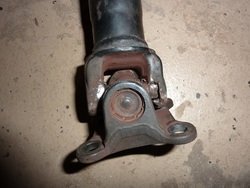
Remove the 4 allen bolts that mount the shaft to the front differential:

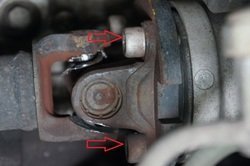
To keep the shaft from spinning while trying to loosen the 4 allen bolts, you can use a power tool or jam a screw driver into the shaft u-joint:


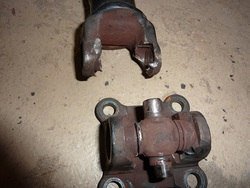
Work the drive shaft off by push the steering linkage, hose, and pipping out of the way. Be very careful not to puncture the power steering hose/pipping. Its a very tight fit. Take your time at this step. It can come out with some finessing.
Note, once the front end of the shaft comes off, the rear cannot comes off without lowering the transfer case/transmission a little bit. Believe me, it cannot comes out without lowering the transfer case!

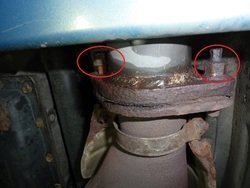
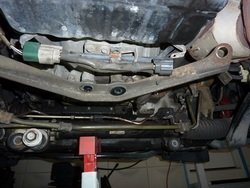
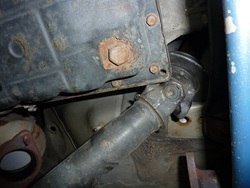
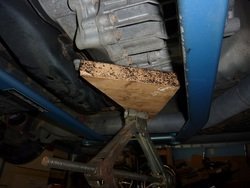
Support the transfer case with a wood block and jack. Raise the jack and wood block up to support the transfer case before loosen the 4 bolts on the rear engine mounting bracket:


Back the 4 bolts out about 1/2 inch, lower the jack support slowly, and work the drive shaft off.


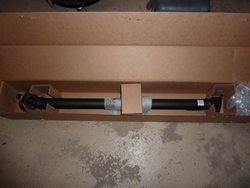
Installing the new drive shaft in the reverse order:
1. Work the new drive shaft back into the transfer case.
2. Raise the jack support transfer case, and tighten the 4 bolts. Torque the bolts 49 ft-lb.
4. Work the front end of the shaft back on and tighten the 4 allen bolts. Torque the bolts to 29 ft-lb.
5. Mount the steering linkage. Torque the two left bolts to 110 ft-lb. Torque the two right (top & bottom) bolts to 62 ft-lb.
6. Remount the power steering hose/pipping brackets.
7. Remount the front cross member. Torque the outer 4 bolts on the frame to 41 ft-lb . Torque the 4 bolts onto the lower control arm to 33 ft-lb.
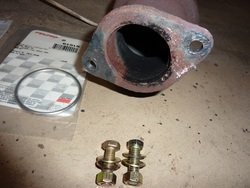
8. Remount the catalytic converter. Be sure to clean off any old gasket debris on the flange and neck of the converter.


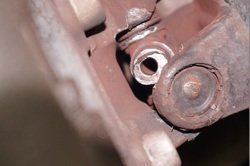
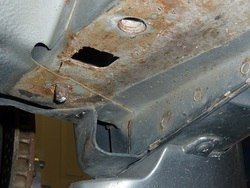
As you can see, with the rusted nuts and bolts, I have one rust broken bolt that I cannot fix. It is one of the outer bolts on the front cross member.

I lost track of time, but pretty safe to allow 5 to 6 hours to complete this replacement. The reason that I lost track of time due to the GT-SPEC braces on my car. Removing the GT-SPEC front four point ladder brace was a PITA due the two front mounting point of this brace bolted onto the lower control arm bolt that is in a very tight spot to get a socket into. The GT-SPEC mid brace also a hassle for removing the converter and the rear engine mounting bracket bolts. I was not able to remove the GT-SPEC mid brace due to the two front bolts simply spin as I turn the bolt. For those that installed the mid brace may remember how the two front bolts are mounted... a nut goes into a pass-though hole on the frame, the bolt then mounts the brace onto the frame from the outside. No tool can get through this pass-through hole to hold the nut in the frame as you turn the bolt on the outside.

Strange vibrations from the car while driving started me to look and discover that I need a new front propeller drive shaft badly.
Parts you need:
Secure car on ramps:
Remove the front cross member with power tool. There were 4 more bolts that need to be removed that I didn't have picture of. They're bolted to the bottom of the lower control arm:
Remove the shield and catalytic converter with power tool:
***Note: The catalytic converter may be different on the FX35. The pictures here is from my FX45.
Make sure you're using the proper socket size to remove the converter mounting nuts. On mine, the two nuts that were used were different size. The left/top nut on the converter is a 14mm while the right/bottom nut is 11mm:
Remove the two bolts that mount the catalytic converter to the exhaust pipe:
One these studs broke while removing. It turns out to be beneficial since there is no room to remove the converter due to the entire exhaust system are mounted. Instead of loosen/un-mount the exhaust system, I decided to cut the other stud on the end of the converter. Once the studs are cut, I was able to work the converter off. I took the converter to a muffler shop to have them torch the remains of the studs off the converter and using new nuts and bolts to remount the converter back on.
Remove the power steering linkage/gear with power tool and hose/pipping brackets :
Before removing the mounting bolts on the power steering linkage, using a jack stand to support it:
Remove the 4 allen bolts that mount the shaft to the front differential:
To keep the shaft from spinning while trying to loosen the 4 allen bolts, you can use a power tool or jam a screw driver into the shaft u-joint:
Work the drive shaft off by push the steering linkage, hose, and pipping out of the way. Be very careful not to puncture the power steering hose/pipping. Its a very tight fit. Take your time at this step. It can come out with some finessing.
Note, once the front end of the shaft comes off, the rear cannot comes off without lowering the transfer case/transmission a little bit. Believe me, it cannot comes out without lowering the transfer case!
Support the transfer case with a wood block and jack. Raise the jack and wood block up to support the transfer case before loosen the 4 bolts on the rear engine mounting bracket:
Back the 4 bolts out about 1/2 inch, lower the jack support slowly, and work the drive shaft off.
Installing the new drive shaft in the reverse order:
1. Work the new drive shaft back into the transfer case.
2. Raise the jack support transfer case, and tighten the 4 bolts. Torque the bolts 49 ft-lb.
4. Work the front end of the shaft back on and tighten the 4 allen bolts. Torque the bolts to 29 ft-lb.
5. Mount the steering linkage. Torque the two left bolts to 110 ft-lb. Torque the two right (top & bottom) bolts to 62 ft-lb.
6. Remount the power steering hose/pipping brackets.
7. Remount the front cross member. Torque the outer 4 bolts on the frame to 41 ft-lb . Torque the 4 bolts onto the lower control arm to 33 ft-lb.
8. Remount the catalytic converter. Be sure to clean off any old gasket debris on the flange and neck of the converter.
As you can see, with the rusted nuts and bolts, I have one rust broken bolt that I cannot fix. It is one of the outer bolts on the front cross member.
I lost track of time, but pretty safe to allow 5 to 6 hours to complete this replacement. The reason that I lost track of time due to the GT-SPEC braces on my car. Removing the GT-SPEC front four point ladder brace was a PITA due the two front mounting point of this brace bolted onto the lower control arm bolt that is in a very tight spot to get a socket into. The GT-SPEC mid brace also a hassle for removing the converter and the rear engine mounting bracket bolts. I was not able to remove the GT-SPEC mid brace due to the two front bolts simply spin as I turn the bolt. For those that installed the mid brace may remember how the two front bolts are mounted... a nut goes into a pass-though hole on the frame, the bolt then mounts the brace onto the frame from the outside. No tool can get through this pass-through hole to hold the nut in the frame as you turn the bolt on the outside.
Attachments
-
 02_zpsfwsa9mzb.jpg148.5 KB · Views: 577
 -
 02_zpsfwsa9mzb.jpg148.5 KB · Views: 600
 -
 01_zpsdjytovrm.jpg131.6 KB · Views: 604
 -
 02_zpsfwsa9mzb.jpg148.5 KB · Views: 521
 -
 01_zpsdjytovrm.jpg131.6 KB · Views: 592
 -
 04_zps908wb0pl.jpg139.6 KB · Views: 597
 -
 01_zpsdjytovrm.jpg131.6 KB · Views: 566
 -
 04_zps908wb0pl.jpg139.6 KB · Views: 585
 -
 03_zpsv4o3t7gu.jpg166.5 KB · Views: 599
 -
 04_zps908wb0pl.jpg139.6 KB · Views: 525
 -
 03_zpsv4o3t7gu.jpg166.5 KB · Views: 595
 -
 03_zpsv4o3t7gu.jpg166.5 KB · Views: 602
 -
 05_zpsukwufznl.jpg190.4 KB · Views: 560
 -
 05_zpsukwufznl.jpg190.4 KB · Views: 593
 -
 05_zpsukwufznl.jpg190.4 KB · Views: 593
 -
 06_zpsjtfw3qlu.jpg146.6 KB · Views: 548
 -
 06_zpsjtfw3qlu.jpg146.6 KB · Views: 602
 -
 06_zpsjtfw3qlu.jpg146.6 KB · Views: 536
 -
 07a_zpsw7kseabm.jpg148.2 KB · Views: 565
 -
 07a_zpsw7kseabm.jpg148.2 KB · Views: 552
 -
 07a_zpsw7kseabm.jpg148.2 KB · Views: 587
 -
 08_zpsvna6p5gq.jpg157.8 KB · Views: 603
 -
 08_zpsvna6p5gq.jpg157.8 KB · Views: 578
 -
 08_zpsvna6p5gq.jpg157.8 KB · Views: 566
 -
 09a_zpsse1fu8d4.jpg166.7 KB · Views: 584
 -
 09a_zpsse1fu8d4.jpg166.7 KB · Views: 585
 -
 09a_zpsse1fu8d4.jpg166.7 KB · Views: 565
 -
 10a_zpsm12stamg.jpg144.9 KB · Views: 539
 -
 10a_zpsm12stamg.jpg144.9 KB · Views: 577
 -
 10a_zpsm12stamg.jpg144.9 KB · Views: 525
 -
 11a_zpsi2bcyyme.jpg137.7 KB · Views: 590
 -
 11a_zpsi2bcyyme.jpg137.7 KB · Views: 574
 -
 11a_zpsi2bcyyme.jpg137.7 KB · Views: 622
 -
 12a_zpsc3da6ly2.jpg162.4 KB · Views: 555
 -
 12a_zpsc3da6ly2.jpg162.4 KB · Views: 580
 -
 12a_zpsc3da6ly2.jpg162.4 KB · Views: 547
 -
 13a_zps3t65neqg.jpg160.2 KB · Views: 570
 -
 13a_zps3t65neqg.jpg160.2 KB · Views: 551
 -
 13a_zps3t65neqg.jpg160.2 KB · Views: 580
 -
 14a_zps3oko1iyv.jpg150.4 KB · Views: 541
 -
 14a_zps3oko1iyv.jpg150.4 KB · Views: 579
 -
 14a_zps3oko1iyv.jpg150.4 KB · Views: 615
 -
 15_zpsburgij2a.jpg179.2 KB · Views: 538
 -
 15_zpsburgij2a.jpg179.2 KB · Views: 562
 -
 15_zpsburgij2a.jpg179.2 KB · Views: 570
 -
 16a_zpsinmyzpkk.jpg151.1 KB · Views: 518
 -
 16a_zpsinmyzpkk.jpg151.1 KB · Views: 567
 -
 16a_zpsinmyzpkk.jpg151.1 KB · Views: 527
 -
 16b_zps1rqvgezj.jpg134 KB · Views: 532
 -
 16b_zps1rqvgezj.jpg134 KB · Views: 511
 -
 16b_zps1rqvgezj.jpg134 KB · Views: 495
 -
 16c_zpssapiep2e.jpg167.4 KB · Views: 504
 -
 16c_zpssapiep2e.jpg167.4 KB · Views: 564
 -
 16c_zpssapiep2e.jpg167.4 KB · Views: 526
 -
 17_zpsboryhmuj.jpg156.2 KB · Views: 577
 -
 17_zpsboryhmuj.jpg105 KB · Views: 512
 -
 17_zpsboryhmuj.jpg169.9 KB · Views: 531
 -
 18_zps7wchrycl.jpg143.1 KB · Views: 549
 -
 18_zps7wchrycl.jpg156.2 KB · Views: 529
 -
 18_zps7wchrycl.jpg156.2 KB · Views: 548
 -
 19a_zps9pd5olxi.jpg153.2 KB · Views: 526
 -
 19a_zps9pd5olxi.jpg167.7 KB · Views: 592
 -
 19a_zps9pd5olxi.jpg167.7 KB · Views: 539
 -
 20a_zpsyu6nvmts.jpg136 KB · Views: 611
 -
 20a_zpsyu6nvmts.jpg148.8 KB · Views: 569
 -
 20a_zpsyu6nvmts.jpg148.8 KB · Views: 514
 -
 21a_zps9oygq8hk.jpg164.1 KB · Views: 564
 -
 21a_zps9oygq8hk.jpg164.1 KB · Views: 493
 -
 21a_zps9oygq8hk.jpg149.6 KB · Views: 585
 -
 24_zpsnbfdniku.jpg66.7 KB · Views: 505
 -
 24_zpsnbfdniku.jpg66.7 KB · Views: 560
 -
 24_zpsnbfdniku.jpg66.7 KB · Views: 506
 -
 25_zpswtni2cjq.jpg189.4 KB · Views: 544
 -
 25_zpswtni2cjq.jpg189.4 KB · Views: 562
 -
 25_zpswtni2cjq.jpg173.1 KB · Views: 522
 -
 26_zpsl4tt7i8u.jpg160.4 KB · Views: 534
 -
 26_zpsl4tt7i8u.jpg160.4 KB · Views: 558
 -
 26_zpsl4tt7i8u.jpg160.4 KB · Views: 569
 -
 27_zps6grigtli.jpg168.5 KB · Views: 525
 -
 27_zps6grigtli.jpg168.5 KB · Views: 550
 -
 27_zps6grigtli.jpg168.5 KB · Views: 526
 -
 28_zps7k307dih.jpg180.7 KB · Views: 505
 -
 28_zps7k307dih.jpg180.7 KB · Views: 534
 -
 28_zps7k307dih.jpg195.5 KB · Views: 499
 -
 29_zpshwqrkecc.jpg132 KB · Views: 499
 -
 29_zpshwqrkecc.jpg145.7 KB · Views: 492
 -
 29_zpshwqrkecc.jpg145.7 KB · Views: 568
 -
 30_zps6ts3jf0c.jpg136.5 KB · Views: 536
 -
 30_zps6ts3jf0c.jpg146.6 KB · Views: 512
 -
 30_zps6ts3jf0c.jpg136.5 KB · Views: 552
 -
 31_zpspjnlyhf0.jpg140.7 KB · Views: 560
 -
 31_zpspjnlyhf0.jpg140.7 KB · Views: 519
 -
 31_zpspjnlyhf0.jpg154.6 KB · Views: 537
 -
 32_zpsiwuu88qj.jpg231.4 KB · Views: 539
 -
 32_zpsiwuu88qj.jpg231.4 KB · Views: 465
 -
 32_zpsiwuu88qj.jpg231.4 KB · Views: 527
 -
 handyandy_thejackchanofmechanics-eyes_zps1wypbffr.png4.7 KB · Views: 521
 -
 handyandy_thejackchanofmechanics-eyes_zps1wypbffr.png5.3 KB · Views: 451
 -
 handyandy_thejackchanofmechanics-eyes_zps1wypbffr.png5.3 KB · Views: 443
")