Grinding down letters on third brake light

DatMan

Member
Car
2007 FX35 AWD
Name
Dat
Just got my overlays for the rear reflectors and third brake light in from Blue Batmobile... will put on the reflector overlays ASAP but I've always hated the look of the overlay on top of the third brake light with the letters popping up... wondered what the best way to shave them down and then keep the brake light looking OEM (no ugly scratches and stuff)... I know it's gonna be under some tint film but if I know it's all scratched up, it's gonna bug me...

This was what I was thinking... let me know what you think...

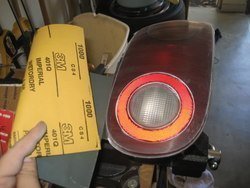
1. Remove third brake light.
2. Use a new exacto knife and shave down the lettering.
3. Use a dremel to file it almost flat.
4. Use sandpaper of varying degrees to flatten it... rest of the brake light will get light scuffing.
5. Lightly sand all of the brake light.
6. Tape off and then paint the brake light with several layers of clear coat.

I saw someone do something similar when they were tinting their tail lights... just wondering if something like this could be done for the third brake light and if it will look stock like this... and no one better to ask but turbo himself... :smile (2):
 
Wet or dry 400 with a block and water, then 600, then 800 or 12 then can simply plastic polish or wax it back. It goes fast, don't go all heavy duty grinder style or you will end up digging deep too fast. Can't put back lens material :wink:

I have done three sets now......takes about an hour to do all the tails including the third brake light, its the removal/re-install of the third brake light that's a bit of a pain. Make sure you don't drop one of the nuts inside the hatch.
 
This should work too, right? Logan did this to his tail lights. One of those DIYs for those that are completely OCD about their cars. I'm going to do this one day myself I think. :nerd (2):

///10096

I thought Blue Bat stopped making overlays for some reason. Good to know he still sells them. Maybe I will pick up a pair of tinted reflectors. But now Marus now has LED reflectors....
 
I actually just did this on another car of mine - it is called shaving the lights.

The key is using five or six steps of sandpaper from 400 - 2000, then using a swirl remover and a plastic polish.

Coating with clear will work just fine - you need to seal or cover the lens with something to keep it from oxidizing. The sanding removed a protective layer over the lens that needs to be replaced. Here is a recent post I made when shaving the tail lights of my Miata - should work for you exactly the same way.

-------

You can see the raised lettering on the headlight, surrounded by white wax from previous washings.

IMG_3121.jpg

Went to Home Depot and found a sample pack of finishing sandpaper and a sanding sponge. Never done this before but the directions seemed pretty straight forward.

Started with a file and smoothed out the places where the lettering was. Then I went to 320 grit wet/dry sandpaper and sanded in one direction, up and down. Then I sanded 90 degrees (side to side) with 400 grit till I couldn't see any of the sanding marks in the other direction. Here you can see the sanding marks going the long way down the light

IMG_3123.jpg

Then I went to 600 grit and once again sanded 90 degrees to the previous grit.

Then 1000 grit, 90 degrees. You can see the sanding marks going left to right (short way across light).

IMG_3124.jpg

Then 1500 grit, 90 degrees.

Then I used Meguire's ultimate compound, rubbed in by hand

followed by a Sonus swirl remover

and then finally plastic-X.

Took about three hours for both lights.

First one complete - sitting next to the next one.

IMG_3122.jpg

On the car:

IMG_3131.jpg
 

Attachments

  • IMG_3121.jpg
    IMG_3121.jpg
    59.2 KB · Views: 18
  • IMG_3124.jpg
    IMG_3124.jpg
    65.3 KB · Views: 17
  • IMG_3124.jpg
    IMG_3124.jpg
    65.3 KB · Views: 30
  • IMG_3123.jpg
    IMG_3123.jpg
    57.5 KB · Views: 22
  • IMG_3123.jpg
    IMG_3123.jpg
    57.5 KB · Views: 23
  • IMG_3121.jpg
    IMG_3121.jpg
    59.2 KB · Views: 19
  • IMG_3131.jpg
    IMG_3131.jpg
    49.5 KB · Views: 19
  • IMG_3131.jpg
    IMG_3131.jpg
    49.5 KB · Views: 27
  • IMG_3122.jpg
    IMG_3122.jpg
    77.9 KB · Views: 18
  • IMG_3122.jpg
    IMG_3122.jpg
    77.9 KB · Views: 22
:tup:Wow, nice job guys. I will do this to my tail lights soon. I always hated those crud trap by the raised letters.
 
Awesome! Thanks for the replies guys... will be doing this this weekend... my 70K drivetrain warranty is almost up so I'm gonna be checking my sparkplugs for oil as well... only Saturday off in FOREVER and I'll be all covered up in car gunk! :)

And I KNEW this woulda been covered somewhere before but trying to search for it was a PITA lol...
 
def a cleaner look! nice write up jumbo.

dat, we want before and after pics =)
 
yeah man, seems they got you covered:wink (2): I do this with a tinted clear to smoke the lights as well but even sanded & polished the overlay will now lay nice & flat
 
Hey Jumbo, the second to the last pic, under the heading, "First one complete - sitting next to the next one", you can see some lettering/residue. Is that just the reflection from the lamp you haven't done yet? Just want to make sure.
 
Wow, I actually did this myself over the break before tinting my tail lights.
I used 600 Grit for the lettering, then 1000 on the whole assembly, then 2000.
 
Good!! Yeah it's an easy DIY and makes all the tail lights so much cleaner.
 
Back
Top