Hello, I have done an e-fan conversion for 2005 Infiniti Fx45. I bought this fan which fits perfectly,
For 2003-2008 Infiniti FX35 Auxiliary Fan Assembly Dorman 91289VS 2005 2006 2007 | eBay
This fan assembly have 2 ventilator and 2 speeds each. I have it configured that both work at slow speed or at high speed, but both ventilator at the same time.
Vladimir has given very good advice,but the only problem I see is that the fan will turn on at 95 degrees, and that for me is too much. I think it should start at 90/91 degrees Celsius or whenever the A/C is turned on, even if we have not reached 95 degrees.
I also do not recommend using a fan controller, it is not necessary. What I do recommend is a
good 70A relay and a good 30A maxi fuse or similar (not Chinese). I have a midi fuse in the battery compartment and it is exposed to a lot of heat so it is better to buy Maxi Fuse/midi Fuse that is made of good quality like the links I put below. The positive cable that goes to the fuse holder can be 6mm2 or 10mm2 (cooper quality).
Portafusibles con tapa para fusibles atornillados tipo MIDI
Fusible MIDI serie 55 de 30A a 125A - Coelectrix
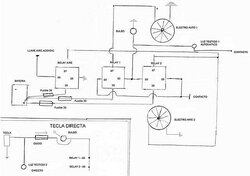
On the internet I have found this diagram in case someone wants to put it into practice.
View attachment 605632
On the other hand, it is very important to have a
clean radiator to avoid overheating problems. In our cars it is very complicated without disassembling it, since the both A/C radiator and the coolant radiator are together like a sandwich and the one that is visible on the outside is the A/C. Because the two radiators are so close together, the cooling radiator gets very dirty and that causes overheating. I leave you an image of a FX dirty coolant radiator after 160.000 milles, but that is not seen if it is not disassembled. If it is not cleaned well, it is evident that the cooling power will be greatly reduced.
View attachment 605633
I recommend before doing any conversion,
disassemble the radiator and clean it perfectly to start the conversion to e-fan. This process has to be done very carefully since in the lower part of the radiator there are 2 tubes that are from the transmission fluid circuit and it is very important that when disconnecting the tubes, they are lifted up and covered with a screw so that they are not lose transmission fluid. That is why it is very important to have a clean radiator because it cools the engine and transmission.
With the radiator clean, or it is in bad condition or broken, changing the radiator (from OEM 16mm to aftermarket 26mm thick, with more capacity, for example from Rockauto Radiator DENSO 2213424 or From Ebay Nissens 68118) in hot summer, and a big traffic in the city, with the 2 fans at low speed, the coolant temperature will not exceed 90 degrees (OBD Torque). It would be good to put a temperature gauge that warns if we pass for example 95 or 100 degrees. But if a fuse doesn't blow or something strange happens, it will never go above 90/91 degrees in the most adverse circumstances. E-fan conversion is much more powerful than OEM mechanical fan.
For me,
the easiest way to connect it without thermosensor, since the A/C is almost always connected, would be connecting a good 30A fuse and one relay for slow speed fans to a signal KEY ON or ignition key, so that when the car starts it will already turn on slow speed the two fans, and the second Fuse and relay with two fans in high speed mode (It will not be used if everything goes well or the low speed fuse does not blow) with manual switch or it could be connected to the signal cable that Vladimir says of the fan A/C condenser, so high speed fans would be connected only at 95 degrees centigrade.