Engine Bay

i think i saw something like that on one of those G, Z forums.. it look pretty need.

Also how much or simply how could one polished the plenum.. i being reading on other forum. they polished the upper and lower plenum and mentioned they got some gain out of that..
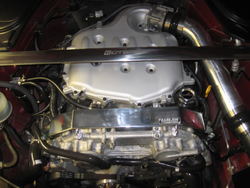
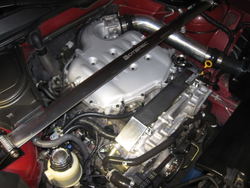
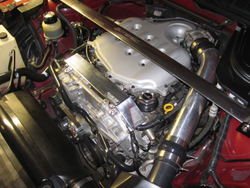
Gains would be from polishing the inside. The gains are minimal on the plenum since it is an expansion volume from the 6 intake runners to draw from. Polishing the lower plenum and intake runners would be much more beneficial, but still not a significant gain.

As for polishing the outside of the plenum, that's tricky stuff. I bought a fully polished plenum and all I need to do is touch it up to get an amazing shine back on it. As for starting with a bare (or painted) plenum, I don't know how easy that is. I may take you up on that offer Brad... I just polished my stock intercooler pipes on the Evo X and it turned out pretty well... I also don't mind polishing, it's like my version of knitting :tup:
 
Last edited:
Yep - exactly. And I've seen this polished plenum in a couple other VQ builds. How did you end up with it?
 
Noticed I was jacking a couple of my own threads to talk about the engine bay. This is an older thread, but I wanted to post a couple up to date photos.

Last night I broke down the entire intake and cleaned it out from the filter, MAF, tube, throttle body, upper and lower plenums. Prepped the upper with a wire brushing and then an acetone wipe. Painted the plenum with silver engine enamel and reassembled everything. MAF rotated 90 degrees down to hide the connector.

Check out this before/after:

View attachment 165407


And after the rattle can job:

View attachment 165409

View attachment 165411

Did you have any problems to hook-up Stillen air box to The OEM air duct on top of radiator ( I do.. ) . And how did you make it works?, so I can fix mine up...
Thanks,..
 
unless they were polishing the runners, port matching & stuff, those are internal & can produce gains ...

looking good man, the red itself is so striking that it really don't need a lot of red under the hood too, black silver & chrome is a nice look...


EDIT:ooops, missed this last page & few posts, so yeah, like frankiago said on the internal polishing:tongue:
 
Last edited:
Yep - exactly. And I've seen this polished plenum in a couple other VQ builds. How did you end up with it?
Got it from SxExCx who sells these to my350z and g35driver all the damn time. He also signed up here and there was not much interest so he packed up and left.
 
Did you have any problems to hook-up Stillen air box to The OEM air duct on top of radiator ( I do.. ) . And how did you make it works?, so I can fix mine up...
Thanks,..


Yes - I did have Stillen air box fitment issues. I actually ran the air box with NO ducting for a while - no positive or negative impact to performance or mpgs. There are plenty of open air filters out there and even without the ducting the air box is still a good heat shield.

So after I put the ducting back, I wanted a better fit. I disconnected the MAF tube and took out the filter. I placed the Stillen air box so that it fit perfectly over the front ducting. Then I drilled a hole through both the air box and the OEM duct where they overlap. Stuck a plastic grommet in the hole to act as a pin, so the two parts can not slide apart. Then I used a screw gear hose clamp over the joint and the head of the grommet. I think it was a 5 or 6 inch diameter clamp. It holds down the grommet and squeezes the joint. It's rock solid - the whole assembly doesn't shake or move.

View attachment 165413

On the other side of the air box, is the mounting hole to be used with the OEM bracket, which I removed since it really doesn't line up. I just made a custom bracket out of a peice of metal. Stillen actually gives you a straight aluminum bracket you can mod to fit. I just measured down to the airbox from the hole that mounted the OEM bracket and bolted the two ends - pretty simple. Painted it black.

View attachment 165415

The length of your tube and the angle it hits the airbox might not work if you do this - which is why I got a new tube and the hump couplers, which can bend off axis without hurting anything.
 
Clean intake gains

Totally surprised by this, but I've burned about a full tank of gas now (I drive about 60 miles a day) and the computer is telling me my mpgs are up by 0.2. I've been driving a little more agressively than normal, so that's a really good sign. After about three tanks of gas I will have paid for all the intake cleaning supplies and plenum paint in gas savings. I look forward to seeing what the computer says about my mpgs when I'm driving normally.

I've also noticed a change in engine tone at WOT. A little more growly. When it was dirty, it had a smoother, almost purring sound. Now it SOUNDS more, "clean" to me.

This was the first time I have ever cleaned the throttle body in 100,000 miles. There was visible black charcoaly looking powdery stuff on the edges of the throttle plate and all the way around the inside surfaces. I touched it and I could tell it was pretty much oil from the filter with tiny dirt particles that make it through the filter. The cleaner removed most of it and I used a microfiber cloth to gently wipe down anything I could reach. That change in tone is because of these clean surfaces - air moves more smoothly through the whole intake system now.

When I first started up the car after cleaning the whole intake, it burped out some white smoke. The idle tone never changed - stayed solid and constant from start up until I was satisfied. Like I said before, never threw any codes or check lights. Any high mile cars should definitely do this!!!
 
Oil Catch & Samco hoses

I found this thread with a search and reading it sold me on the idea. Sticking with my color theme, I wanted black:

Samco Hose - InfinitiScene.com
http://www.samcosport.com/usa/why_samco.asp

I did a couple general internet searches for draining the radiator and replacing hoses. Before today, I had never done anything with a cooling system on a car.

http://www.wonderhowto.com/how-to/v...in-preparation-for-removing-the-motor-115176/
http://www.howtodothings.com/automotive/how-to-replace-your-cars-radiator-hose
http://www.wonderhowto.com/how-to/video/how-to-check-and-replace-hoses-in-your-automobile-203673/

One of the OEM hoses didn't want to come off the left side and I had to cut it off. The OEM spring clamps on the middle hose couldn't be used on the replacement - it was slightly larger and I couldn't get the clamp back over the barb. Had to use screw clamps instead. Also, the air relief valve didn't want to open. I ended up partially stripping out the Phillips slot, but got it out with a flat head. Besides those three things, swapping out the old radiator hoses went pretty quickly. I left the OEM coolant overflow hose, but I did remove the reservoir, empty it and clean it inside and out. There was sediment at the bottom - it felt good to get rid of it.
View attachment 165416
View attachment 165419

The oil catch was a bit tricky to mount. I ended up placing it where the wire harness attaches to a bracket, just behind the power steering reservoir. I removed the bracket and used the holes to mount a new bracket I made. I used washers to get it level, but I might have to tweak it a bit more. It looks a little tilted to me. The good thing about this location is that it's super close to the hose I was replacing. I used 10mm silicone hoses to connect to the catch. I bought ten feet and only used about 18 inches.


View attachment 165420

View attachment 165423

View attachment 165425


View attachment 165427

Just like with any other mod I have ever done, I feel totally more comfortable with the cooling system now that I have actually been in there and understand the parts. I'd like to understand the air breather valve and when to use it. It didn't seem to burp any air when I opened it, but some coolant did spill out. Plus I need to replace that plug now that I damaged it a little. I think it's exactly the same as the one on the radiator, so I'll probably pick up a couple extras just to have handy.

After driving the car for about ten minutes (getting it up to operation temp), I checked levels and they hadn't really changed. I let the car cool completely and put in just a couple more ounces of coolant before it topped off. The second time I started up, I heard the, "fluid rushing in the dash" sound I read about here. It worried me a little, but I again checked levels and everything is full. Since then I have started a few more times and no sound in the dash. I think whatever air was in the system has now percolated out. I'll still be watching my temp gage and the levels for a few more days.
 
Last edited:
Evening addition

Got the Rare JDM harness cover in from Z1 Autosports late in the afternoon. Had to install it immediately, of course!

Removed the grounding wire kit to get everything out of the way, and had to remove the clips holding main the harness down (a previous mod of mine). The instructions say to remove the OEM brackets prior to install, so it seems that no tie downs are needed. The cover holds the harness down well enough since it bolts in the front and back of the cover.

IMG_0882.jpg
IMG_0884.jpg
IMG_0883.jpg

I don't really like how the wire harness comes out of either end of the cover. On the right side, the MAF wire pokes under the front of the cover and on the left side the harness is making contact with the cover. I plan to take the cover off and move the harness around a bit more - to try to tuck the wires coming out of the cover and along the top and sides of the valve cover.

I was impressed with the cover kit quality and fit - the hardware has been polished also, including the washers.

Next up - finishing up the grounding kit. I moved the battery to TB wire to it's appropriate place, but the other three grounding wires came off and I'll be determining the right lengths.
 

Attachments

  • IMG_0882.jpg
    IMG_0882.jpg
    89 KB · Views: 25
  • IMG_0884.jpg
    IMG_0884.jpg
    86.2 KB · Views: 35
  • IMG_0883.jpg
    IMG_0883.jpg
    108.4 KB · Views: 49
I definitely like the theme... the polish on the Rare JDM looks shoddy though, and your intake pipe needs a little love from Mother's Mag or Nevr Dull and possibly a high speed buffer.

Did you honestly feel a difference after taking some of the grounding kit back off??? I really think grounding kits are a placebo, and in the Evo world they're pretty much unheard of. Coming from the FX/G/Z crowds to the Evo crowds, the grounding kits completely disappeared. They also add clutter to the engine bay :tongue:
 
Actually, ALL my chrome needs some love but at least it is consistent from part to part! I don't have a polisher and don't have motivation to polish all the chrome parts to a mirror shine. Maybe I'll be motivated once I get a polished plenum? ;-)

Yeah, I know your opinion about grounding kits and understand why you think the way you do. I'm not quite so convinced the kits are a placebo, but I wouldn't say I'm a firm believer they improve things either. Let's just say from an engineering standpoint, it can only help - can't hurt (unless installed incorrectly). Fair enough?

I never installed the grounding it according to the "recommended" locations because this was a G35 grounding kit and some of the wires don't reach to where they are supposed to. Up until last night it really was all for looks. I retained one ground kit wire on the Throttle Body, and no - I didn't notice a difference in feel going from the four wires (none on the TB) to just the one on the TB.

I do plan on finishing the grounding kit. Routed with a little thought, I don't think it adds clutter at all. It's almost artistic the way member GTO fans out the connectors and runs the wires. With some p-clamps and staying consistent with the way the wires are mounted, I think it would actually dress up the bay. And if it doesn't and I hate it - not a big deal to remove.
 
Last edited:
to me the only way the grounding kit can make a difference is if there was some inadiquacy in nissans design to begin with. some of it is just nonsense to me, I mean the engine block is bolted to the transmisson, how can an extra wire from the engine to the transmission possibally make the slightest difference?

wow man, engine compartment looking good man, at your rate it'll be really beautiful soon enough, polished plenum would look sweet... then you'll get to the timing cover being the biggest eye sore compared to everything else... wow, that'll not be an easy thing to do though... looking good:smile:
 
Since we're all up in your compartment and all....I went to a specialty nut/bolt shop to see if I could find stainless nuts to replace the OEM STB nuts. Thought it might be a nice touch to see the silver on the black (I also painted my blue GT-Spec support rings black) Couldn't find the exact same stainless nut with the built in additional "lip".

One more point while you are in there. I have used a rattle can paint, SEM original satin trim for years now, kicks ass, looks great and with decent prep sticks to plastic, not high oil content plastic like Polypropylene (without primer).

This stuff-Very nice satin finish for a rattle can. I did some dash work with it once-perfect. It comes in a couple other colors as well.

http://www.goodspeedmotoring.com/sem-original-black-trim-paint-39143-39144.html
 
Testing grounding is an easy thing to do. Using a digital multi-meter pick the negative battery terminal and the grounding point on the transmission. You get a resistance measurement (in Ohms). Then connect a grounding wire and take the same point to point measurement again. If the resistance is less, you improved grounding. If there's no change or it's worse, check your DMM, it's not working.

Thanks - yeah I like how the engine bay is coming together. So much better than OEM - it feels so much less, "cheap" to me. Which really, it is!
 
And did you test using a fluke or something? I can't imagine there being more than a 1-2 ohm reading from any point on the motor to the battery's ground. If you're getting more than 1-2 ohms, sand or wire brush the area you're trying to get a reading from because you're probably reading an oxide layer and not actual conductor (such as the block itself).

Keep in mind, OEM grounding points are put together when both contact areas are clean and free of an oxide layer. Anything that builds up around those after it's put together is not harming the connection.
 
Totally understood about testing through corrosion and also corrosion protection coatings. Most DMMs come with sharp pointed probes (needle probles), good enough to stick through any oxidation. On the Space shuttle program, most metals are coated for oxidation protection in space which is a much more corrosive environment than here where there is an atmosphere. We test for electrical bonding and continuity on everything, including coated & painted metals. The needle probes penetrate just fine checking for electrical continuity and resistance.

Mine is a Radio Shack DMM, but it has similar ranges to common fluke models. Fluke is the standard in my workplace, but was generally too expensive for me to buy just because I wanted a meter.

The difference in resistance readings we're talking about are usually less than 1 ohm. Can be as small as .02 ohms or as large as .8 for the ones I measured in my own engine bay. But crank out the formula: V=I*R^2 for each case.

Voltage = Current*Resistance^2 (squared).

Our battery is 12V, so voltage is known and we are measuring resistance, so you can easily calculate how much current is NOT getting to an OEM grounding point once you have both OEM and aftermarket resistance (grounding) measurements. Does that mean anything for performance? I would think no, in most cases. MAYBE a slightly higher current lends to a slightly faster signal transmission and/or recognition - totally depends on the electrical component we are talking about. The reality is hard to measure because there are so many other complicating electrical factors that actually change with the electrical load on the car.

Most of the tuner world is figured out by the guys that get thier hands dirty, not from engineers. It's funny to me how often they disagree - but there's no arguing with physics. The truth (most efficient solution) lies somewhere in-between theory and practice so the debate about how to best take advantage continues. From a theoretical standpoint, using actual DMM measurements, a grounding kit works. But what does it actually DO? I would sign up to saying it makes the electrical system more efficient, but that doesn't really translate to anything we can see or feel in the car. It MIGHT for some people that have some unique electrical quirk.
 
Last edited:
[/QUOTE] One more point while you are in there. I have used a rattle can paint, SEM original satin trim for years now, kicks ass, looks great and with decent prep sticks to plastic, not high oil content plastic like Polypropylene (without primer). This stuff-Very nice satin finish for a rattle can. I did some dash work with it once-perfect. It comes in a couple other colors as well.

http://www.goodspeedmotoring.com/sem-original-black-trim-paint-39143-39144.html[/QUOTE]

Thanks for the tip, Logan. I was planning on a rattle can paint specifically for plastic (the power steering and coolant reservoirs). Do you think this trim paint would bond better?

They make engine bay specific dress-up kits. It's a whole set of bolts and nuts in polished or color options. Might be pricey, but if you are doing something strictly for looks anyway then price is probably not quite as important.

I have often wanted to change all visible hardware to at the very least be the same colors and heads. I have combinations of allen head, phillips, bolt head... being consistent is more elegant to me.

I actually did something along the same lines with my STB - I painted the nuts black to match the STB bracket paint, but then used stainless washers to give it a little bling. With that special nut washers are not required, but I used them anyway just for the look.
 
Why not go full bore on the theme you've got going & just polish it out to that chromee look, lol.
Kidding aside, I really like what you're doing with the bay
 
Back
Top