When I roll down my driver side front window while driving the FX, it rolls up but automatically rolls down 6". To get it to stay up, I have to hold the switch up, turn the vehicle off, then open the door. This started two days ago and I have never had any problems with the truck. It is a 2004 FX45 with about 94,000 miles. Has any one experienced this before? Any ideas on how to fix it?

You are using an out of date browser. It may not display this or other websites correctly.
You should upgrade or use an alternative browser.
You should upgrade or use an alternative browser.
Driver Window automatically rolls down 6"
- Thread starter Byrd
- Start date
- Location
- Dallas, TX
- Car
- 2007 FX35 RWD
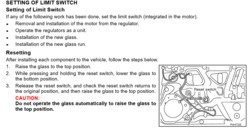
Is it when you do the auto up only? If so, the pinch detector thingy needs to be reset. Mine does the same after glass replacement and I forgot to reset it. I thought the button is on the window motor itself, and I'm not taking it back apart again, but I'm not sure. I did try the hold the up switch, and it makes a different noise after a few seconds, but didn't fix the issue. Now I have an auto window crack feature though. Gotta stay positive.
edit: I'll try specifically what fxlr8's link says and see if that doesn't fix it.
edit: I'll try specifically what fxlr8's link says and see if that doesn't fix it.
Last edited:
Nice to know, my passenger side window goes up then comes down a bit every time. Gonna have to try this. [emoji106]
Sent from my SM-N920V
Sent from my SM-N920V
@fxlr8 I tried this a few times this morning, but it didn't work for me.I read that entire manual when I first got the truck, but I don't remember seeing this at all. Next time I'll consult the manual first, LOL. Thanks for the suggestion. I will try it again on my lunch break and hold it for longer than 10 seconds to make sure I did it right the first few times.
---------- Post added at 08:47 AM ---------- Previous post was at 08:38 AM ----------
Stulax18, Yes, it is when I do the auto roll up only. My button is so sensitive that it rarely does the manual up down. I did get the manual to work this morning for a little bit to get the window up. The next time I tried it, Auto roll up kicked in. If I have to reset the pinch detector, I don't know when I will feel like taking the door apart. I'll have to search the forum for a DIY thread on that one so I know what I'm doing when I go inside the door.
Last edited:
- Location
- Dallas, TX
- Car
- 2007 FX35 RWD
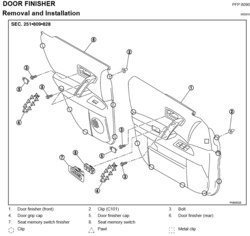
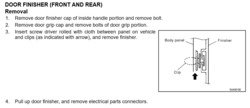
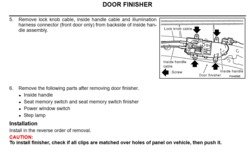
Yeah, that reset procedure didn't work for me either. Taking the door off isn't too bad. The service manual shows where to pry the door panel off since it's held on by clips, then you have to unhook wires to be able to take it off completely. You may not need to take off the metal part of the door either, if you can access the motor through the speaker hole, assuming it has a reset on there.

Attachments


- Location
- Dallas, TX
- Car
- 2007 FX35 RWD
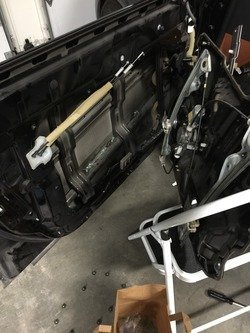
On that last pic, I don't think you need to remove those screws like it shows. You can unclip the cables coming in from the left. That's what is sticking out in the middle in the picture I posted.
Thanks! The visual always helps.
---------- Post added at 01:38 PM ---------- Previous post was at 01:37 PM ----------
I appreciate the instructions!
---------- Post added at 01:42 PM ---------- Previous post was at 01:38 PM ----------
All of these instructions will help a great deal. I like to see this beforehand, so I can get in there without breaking anything. I'm not sure how soon I will get to it. I also need to fix my control arm stabilizers. They are making all sorts of clunking sounds. When I get to it, I'll let you all know if it was a success for me, LOL.
Share: