
mctwist77
Member
- Location
- Mississippi
- Car
- 2004 FX45
Hello, everyone this is my first DIY so bear with me. I had the amazing opportunity of changing the starter on my 2004 Infiniti FX45 with 150,000 miles! I was having an intermittent start issue where I would turn the key to start the car and I would get one click and nothing would happen. I knew the battery was good and I made sure that the car was recognizing the key so I knew it had to be the starter. The weird thing is that after I pulled the bad started I had it tested at O'reilly's and it tested good. However, the machine they use to test it just tests the mechanical function of it, it doesnt actually put it under a load. So if you get yours tested and it tests good throw a new one in there anyway. Ok so on to the write up.
Here is the link to the Infiniti repair manual that I used as a guide
http://www.nicoclub.com/FSM/FX/2004.0_FX45-35/sc.pdf
Parts:
Starter (I used a $90 dollar starter with a lifetime warranty from O'reilly's. I wanted a Denso starter but they were $250 and back ordered for another 2 months)
Tools:
Basic ratchet set (Most of the sizes are from 8mm to 14mm)
Various ratchet extensions
Wrenches
(Not going to go into the obvious stuff, but basically if you have the basic stuff you can do this job. No special tools requred.
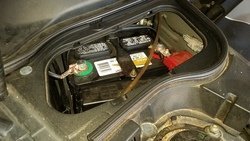
Step 1: Disconnect the negative battery terminal

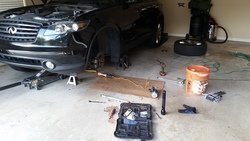
Step 2: Chock the back wheels and jack the front end in the air. I jacked it from the center of the front cross member and then put two 3 ton jacks under the two forward jack points. I also like to throw extra "backup" jacks under the car so that I dont get crushed and die.:good:

Step 3: Remove all the underside splash shields. Both the front one and the back one (the one behind the front cross member)
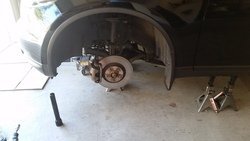
Step 4: Remove the front drivers side tire

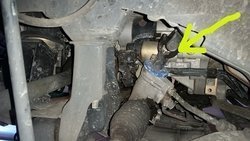
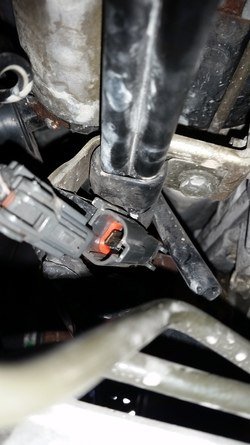
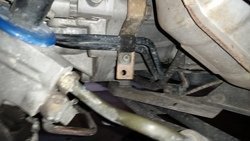
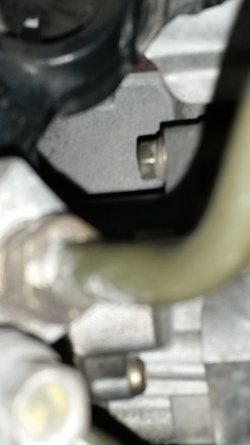
Step 5: Disconnect S connector. This is a clip, it is located behind the transmission line bracket next to the starter. So you wont be able to see it looking in from the wheel well. I just used needle nose pliers and pulled it out.


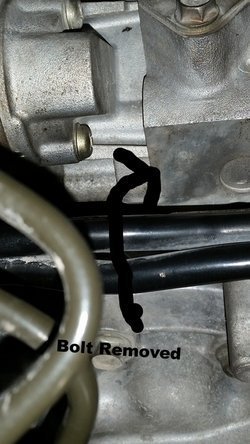
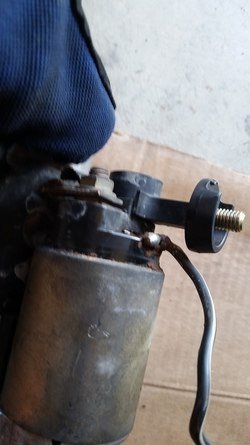
Step 6: Remove B-terminal nut (I think it was a 10mm) and pull the wire off the threads


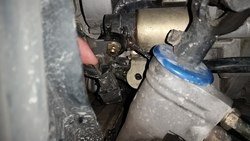
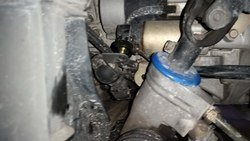
Step 7: Remove the transmission line bolts. (The manual says to remove one but it doesn't give you enough wiggle room) I ended up removing 4 of them. Basically, started from the front of the transmission line where the hard line meets the rubber line, then worked my way back. I only removed 4 bolts. I didnt remove any bolts that were near the transmission pan. To remove these bolts you will need some extensions (Again, I think they were 10mm bolts). You will notice the transmission line still doesn't move that easily. You have to use some muscle and push it around.

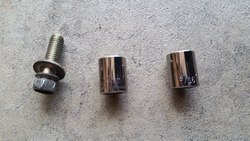
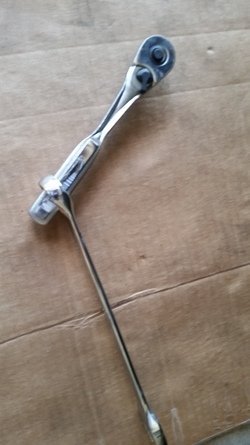
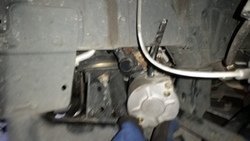
Step 8: Here's the fun part. Remove the starter bolts (14mm). Note: These bolts are tight its going to take a good bit of force to get them off. The one located closest to the front of the car is fairly easy and self explanatory. But the one on the bottom is a bitch. So, my issue with the bottom bolt is that my 14mm socket wouldn't fit snug over the bolt so whenever I put torque on it, it felt like it was going to strip. To solve this problem I used a 9/16 socket instead and it worked like a charm. If you need some leverage check out the technique I used in the photo below.


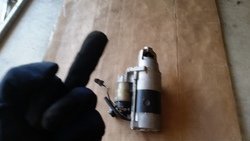
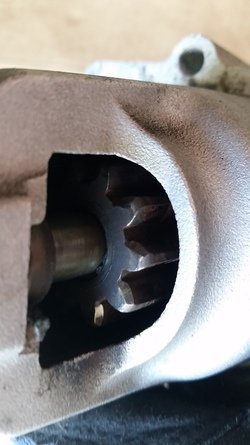
Step 9: Remove the starter. This part is also a bitch because the front axle is in the way but it is possible to get it out without removing the axle. I literally just twisted and pushed and pulled and got it out. Cant really explain what I did, I just made it happen. Don't be bashful when removing the starter. There isn't a whole lot of stuff in that area that could get damaged if you are rough with it. Dont be afraid to use some muscle. Anyway, I got it out, when you take it out note the orientation when you pull it out. This will make putting it back in easier.


Step 10-69: Put new starter in, reverse the steps. It helps to have an extra hand when putting in it, I didn't and it was difficult. Basically, get the starter seated all the way then connect the bolts. I put the top bolt in first and put it in loosely so that I could play around with the other bolt. Its a bitch, but keep working at it and you will get it. Also, there was one bolt on the transmission line I couldn't get back in so I left it out, it wasn't a big deal.
Good luck! Let me know if you have any questions.
---------- Post added at 07:41 PM ---------- Previous post was at 07:40 PM ----------
Here is the link to the Infiniti repair manual that I used as a guide
http://www.nicoclub.com/FSM/FX/2004.0_FX45-35/sc.pdf
Parts:
Starter (I used a $90 dollar starter with a lifetime warranty from O'reilly's. I wanted a Denso starter but they were $250 and back ordered for another 2 months)
Tools:
Basic ratchet set (Most of the sizes are from 8mm to 14mm)
Various ratchet extensions
Wrenches
(Not going to go into the obvious stuff, but basically if you have the basic stuff you can do this job. No special tools requred.
Step 1: Disconnect the negative battery terminal
Step 2: Chock the back wheels and jack the front end in the air. I jacked it from the center of the front cross member and then put two 3 ton jacks under the two forward jack points. I also like to throw extra "backup" jacks under the car so that I dont get crushed and die.:good:
Step 3: Remove all the underside splash shields. Both the front one and the back one (the one behind the front cross member)
Step 4: Remove the front drivers side tire
Step 5: Disconnect S connector. This is a clip, it is located behind the transmission line bracket next to the starter. So you wont be able to see it looking in from the wheel well. I just used needle nose pliers and pulled it out.
Step 6: Remove B-terminal nut (I think it was a 10mm) and pull the wire off the threads
Step 7: Remove the transmission line bolts. (The manual says to remove one but it doesn't give you enough wiggle room) I ended up removing 4 of them. Basically, started from the front of the transmission line where the hard line meets the rubber line, then worked my way back. I only removed 4 bolts. I didnt remove any bolts that were near the transmission pan. To remove these bolts you will need some extensions (Again, I think they were 10mm bolts). You will notice the transmission line still doesn't move that easily. You have to use some muscle and push it around.
Step 8: Here's the fun part. Remove the starter bolts (14mm). Note: These bolts are tight its going to take a good bit of force to get them off. The one located closest to the front of the car is fairly easy and self explanatory. But the one on the bottom is a bitch. So, my issue with the bottom bolt is that my 14mm socket wouldn't fit snug over the bolt so whenever I put torque on it, it felt like it was going to strip. To solve this problem I used a 9/16 socket instead and it worked like a charm. If you need some leverage check out the technique I used in the photo below.
Step 9: Remove the starter. This part is also a bitch because the front axle is in the way but it is possible to get it out without removing the axle. I literally just twisted and pushed and pulled and got it out. Cant really explain what I did, I just made it happen. Don't be bashful when removing the starter. There isn't a whole lot of stuff in that area that could get damaged if you are rough with it. Dont be afraid to use some muscle. Anyway, I got it out, when you take it out note the orientation when you pull it out. This will make putting it back in easier.
Step 10-69: Put new starter in, reverse the steps. It helps to have an extra hand when putting in it, I didn't and it was difficult. Basically, get the starter seated all the way then connect the bolts. I put the top bolt in first and put it in loosely so that I could play around with the other bolt. Its a bitch, but keep working at it and you will get it. Also, there was one bolt on the transmission line I couldn't get back in so I left it out, it wasn't a big deal.
Good luck! Let me know if you have any questions.
---------- Post added at 07:41 PM ---------- Previous post was at 07:40 PM ----------
Attachments
-
 20151023_124259_zpsg1s3nj4r.jpg83.8 KB · Views: 3,843
 -
 20151023_124259_zpsg1s3nj4r.jpg83.8 KB · Views: 1,042
 -
 20151023_124259_zpsg1s3nj4r.jpg83.8 KB · Views: 1,093
 -
 20151023_143849_zpscu438nae.jpg66.8 KB · Views: 926
 -
 20151023_143849_zpscu438nae.jpg66.8 KB · Views: 912
 -
 20151023_143849_zpscu438nae.jpg66.8 KB · Views: 943
 -
 20151023_125824_zpsirli7vba.jpg43.4 KB · Views: 2,047
 -
 20151023_125824_zpsirli7vba.jpg43.4 KB · Views: 1,105
 -
 20151023_125824_zpsirli7vba.jpg43.4 KB · Views: 1,209
 -
 e800c23a-1fe4-4d46-b941-6fdc1011b3cc_zpsufhamtpw.jpg56.2 KB · Views: 1,060
 -
 e800c23a-1fe4-4d46-b941-6fdc1011b3cc_zpsufhamtpw.jpg56.2 KB · Views: 1,037
 -
 e800c23a-1fe4-4d46-b941-6fdc1011b3cc_zpsufhamtpw.jpg56.2 KB · Views: 1,087
 -
 20151023_130640_zpsy2iljphj.jpg123.1 KB · Views: 1,241
 -
 20151023_130640_zpsy2iljphj.jpg127 KB · Views: 1,182
 -
 20151023_130640_zpsy2iljphj.jpg127 KB · Views: 1,144
 -
 20151023_130920_zpsatyf9hfd.jpg61.6 KB · Views: 1,540
 -
 20151023_130920_zpsatyf9hfd.jpg61.6 KB · Views: 1,032
 -
 20151023_130920_zpsatyf9hfd.jpg61.6 KB · Views: 1,158
 -
 20151023_131114_zpshwl8fzd8.jpg57.8 KB · Views: 4,777
 -
 20151023_131114_zpshwl8fzd8.jpg57.8 KB · Views: 1,187
 -
 20151023_131114_zpshwl8fzd8.jpg57.8 KB · Views: 1,275
 -
 20151023_131335_zpsfztsfuog.jpg58.8 KB · Views: 2,462
 -
 20151023_131335_zpsfztsfuog.jpg58.7 KB · Views: 1,177
 -
 20151023_131335_zpsfztsfuog.jpg57.4 KB · Views: 2,912
 -
 20151023_142633_zpsg1bom3qy.jpg98.6 KB · Views: 1,143
 -
 20151023_142633_zpsg1bom3qy.jpg98.6 KB · Views: 1,110
 -
 20151023_142633_zpsg1bom3qy.jpg98.6 KB · Views: 1,109
 -
 20151023_142651_zpsorwljnvl.jpg90.2 KB · Views: 1,141
 -
 20151023_142651_zpsorwljnvl.jpg90.2 KB · Views: 956
 -
 20151023_142651_zpsorwljnvl.jpg90.2 KB · Views: 992
 -
 fd361703-4523-4099-92e6-5ca7872b6251_zpsqguy1efr.jpg56.2 KB · Views: 918
 -
 fd361703-4523-4099-92e6-5ca7872b6251_zpsqguy1efr.jpg56.2 KB · Views: 902
 -
 20151023_142724_zps8dd2de4h.jpg77.8 KB · Views: 978
 -
 fd361703-4523-4099-92e6-5ca7872b6251_zpsqguy1efr.jpg56.2 KB · Views: 875
 -
 20151023_142724_zps8dd2de4h.jpg77.8 KB · Views: 939
 -
 20151023_142724_zps8dd2de4h.jpg77.8 KB · Views: 952
 -
 20151023_143400_zpsmbgdfpwi.jpg45.7 KB · Views: 981
 -
 20151023_143400_zpsmbgdfpwi.jpg45.7 KB · Views: 973
 -
 20151023_143530_zpsgsfaflve.jpg38.2 KB · Views: 952
 -
 20151023_143400_zpsmbgdfpwi.jpg45.7 KB · Views: 1,000
 -
 20151023_143530_zpsgsfaflve.jpg38.2 KB · Views: 924
 -
 20151023_143530_zpsgsfaflve.jpg38.2 KB · Views: 913
 -
 20151023_143557_zpsbmikdbzy.jpg104.2 KB · Views: 904
 -
 20151023_143557_zpsbmikdbzy.jpg104.2 KB · Views: 912
 -
 20151023_143557_zpsbmikdbzy.jpg104.2 KB · Views: 874
 -
 20151023_143618_zps4fpntsmt.jpg92.1 KB · Views: 901
 -
 20151023_143618_zps4fpntsmt.jpg92.1 KB · Views: 870
 -
 20151023_143618_zps4fpntsmt.jpg92.1 KB · Views: 773
Last edited:
")