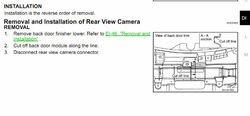
As many before I experienced the annoying 'black screen of death' - Basically one day the camera stops working for whatever reason. I didn't want to pay the dealer to replace this, and in a way I'm pissed that such component would fail.
This process isn't necessarily difficult, but you do have to work at weird angles and you WILL be cutting into your car. So if you don't feel comfortable doing so, then dealer it is.
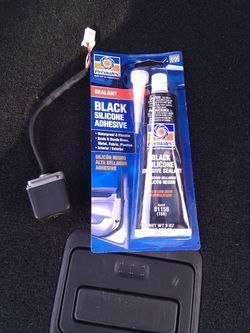
Tools needed:

You do not need to remove the 'Back door finished cap' as they aren't holding the trim. Use your trim remover kit here, in order to get the clips out without damaging anything. (I should have taken pictures, but it seemed easy enough) - The C103 clips were pretty solid, this is where I used the pliers on top of the trim remover kit in order to get them out.
Once you remove the backdoor trim, you will see all the wiring, wiper motor and what looks like another door trim. From the manual, once again, you got the following instructions:

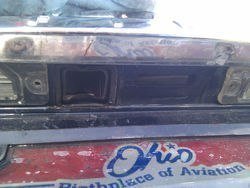
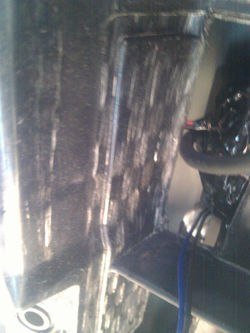
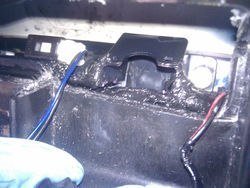
This piece was very confusing to me at first, but made sense once I removed the backdoor trim - Here is where the camera is:

As you can see it's fixed behind what seems to be a secondary back door trim. The problem is that if you look through the holes where the backdoor handles were, you can see that this trim is fixed to the rear door.

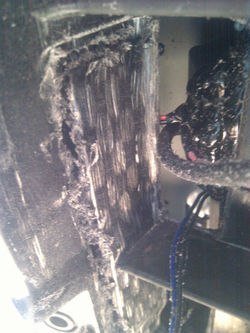
There is no way to remove it and this is why you need to 'cut' into it, in order to provide yourself with enough room to remove the camera. Looking at the plastic trim, near the camera module, you will see that there is somewhat of an outline of where to cut:

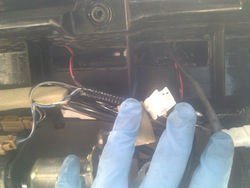
This is the line you want to follow in order to cut at the right spot - Even if you removed more, it wouldn't matter as this piece isn't crucial. Do note that the wiper motor screws into this trim, so don't go crazy with the cutting either. Disconnect the 2 wire plugs that go towards the camera and the rear door opener. Move them out of the way so that you don't damage them while you do the cutting.
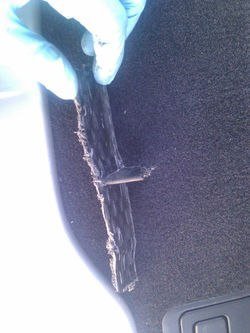
Bring out your dremel/rotozip/plastic saw and start cutting (remember the safety glasses, wear them now) - Follow the lines as much as you can and you should end up with this:

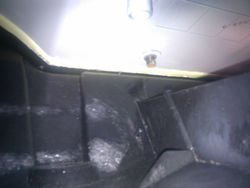
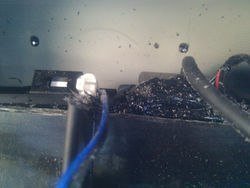
You will get a bunch of plastic dust everywhere, but nothing that can't be vacuumed out. Make a final cut flat with the opening, so that the trim piece you are removing is like a small T shape - You can now remove that entire piece out:

Look at all the room you have now created to get your hands/tools through and the essential camera module out!

Disconnect the wires if you didn't do it before cutting, you can see the rear door actuator plug here (blue wire) - Now comes the fun part, bring out your 8mm socket, WD-40, ratchet and extension.
Why the WD-40 you ask? There is a bunch of epoxy around the camera module as you can see above. It is VERY sticky and will stick to just about anything. Thankfully a quick spray of WD-40 on the socket and extension will prevent this from happening.
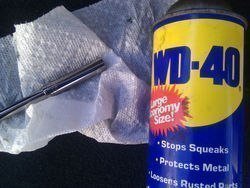
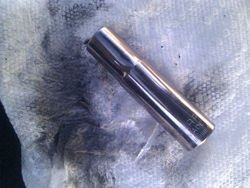
If you end up with some epoxy on your socket, get the paper towels and clean it with the WD-40 like so:


See all clean again!!
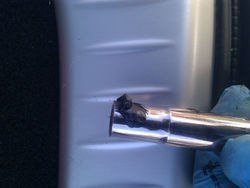
You will have to remove 2x 8mm nuts that are at the top of the module - Looking through the opening you can see them pretty clearly. Once that is done, you will have to use one hand on the outside of the back door and one near the module.
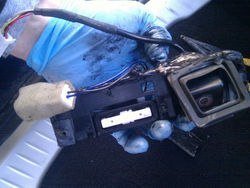
Push on the camera and rear actuator from the outside while pulling the module from the inside. The epoxy doesn't help as it makes everything VERY sticky. Just take your time and eventually you'll get it all out:

Since I didn't have a camera module ready, I went ahead and removed the camera from the door actuator/opener and mount it back in the door, so that you can open the back door - Add some tape to cover the opening the camera left on the inside, thus preventing water from going in:

Of course if you planned ahead and got the camera module, then just put it in and re-assemble it. You obviously can't put the plastic bit back in (unless you want to use some epoxy or plastic welder).
The epoxy around the camera is to prevent water from coming in. Feel free to add a bunch of it around the camera module to keep everything dry.
That's it, congratulations on exchanging the camera module and saving yourself a bunch of cash.
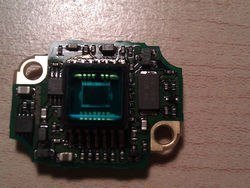
ps: I didn't buy the module as I have hopes of getting a replacement component for the camera cctv/cmos/photocel chip, as I believe it is the source of the failure. All other components inside look to be simple resistors/diode/etc that shouldn't go bad.
Here's a quick snap of inside the camera:

This process isn't necessarily difficult, but you do have to work at weird angles and you WILL be cutting into your car. So if you don't feel comfortable doing so, then dealer it is.
Tools needed:
- 8mm socket
- ratchet and 1/4in extension
- pliers
- plastic tools for trim removal (not a requirement but helps keep the trim free of scratch)
- rotozip with multi-purpose xbit (a hand plastic saw works too)
- safety glasses
- paper towels
- WD-40
- mechanics/nitril gloves (i don't like dirty hands)
You do not need to remove the 'Back door finished cap' as they aren't holding the trim. Use your trim remover kit here, in order to get the clips out without damaging anything. (I should have taken pictures, but it seemed easy enough) - The C103 clips were pretty solid, this is where I used the pliers on top of the trim remover kit in order to get them out.
Once you remove the backdoor trim, you will see all the wiring, wiper motor and what looks like another door trim. From the manual, once again, you got the following instructions:
This piece was very confusing to me at first, but made sense once I removed the backdoor trim - Here is where the camera is:
As you can see it's fixed behind what seems to be a secondary back door trim. The problem is that if you look through the holes where the backdoor handles were, you can see that this trim is fixed to the rear door.
There is no way to remove it and this is why you need to 'cut' into it, in order to provide yourself with enough room to remove the camera. Looking at the plastic trim, near the camera module, you will see that there is somewhat of an outline of where to cut:
This is the line you want to follow in order to cut at the right spot - Even if you removed more, it wouldn't matter as this piece isn't crucial. Do note that the wiper motor screws into this trim, so don't go crazy with the cutting either. Disconnect the 2 wire plugs that go towards the camera and the rear door opener. Move them out of the way so that you don't damage them while you do the cutting.
Bring out your dremel/rotozip/plastic saw and start cutting (remember the safety glasses, wear them now) - Follow the lines as much as you can and you should end up with this:
You will get a bunch of plastic dust everywhere, but nothing that can't be vacuumed out. Make a final cut flat with the opening, so that the trim piece you are removing is like a small T shape - You can now remove that entire piece out:
Look at all the room you have now created to get your hands/tools through and the essential camera module out!
Disconnect the wires if you didn't do it before cutting, you can see the rear door actuator plug here (blue wire) - Now comes the fun part, bring out your 8mm socket, WD-40, ratchet and extension.
Why the WD-40 you ask? There is a bunch of epoxy around the camera module as you can see above. It is VERY sticky and will stick to just about anything. Thankfully a quick spray of WD-40 on the socket and extension will prevent this from happening.
If you end up with some epoxy on your socket, get the paper towels and clean it with the WD-40 like so:
See all clean again!!
You will have to remove 2x 8mm nuts that are at the top of the module - Looking through the opening you can see them pretty clearly. Once that is done, you will have to use one hand on the outside of the back door and one near the module.
Push on the camera and rear actuator from the outside while pulling the module from the inside. The epoxy doesn't help as it makes everything VERY sticky. Just take your time and eventually you'll get it all out:
Since I didn't have a camera module ready, I went ahead and removed the camera from the door actuator/opener and mount it back in the door, so that you can open the back door - Add some tape to cover the opening the camera left on the inside, thus preventing water from going in:
Of course if you planned ahead and got the camera module, then just put it in and re-assemble it. You obviously can't put the plastic bit back in (unless you want to use some epoxy or plastic welder).
The epoxy around the camera is to prevent water from coming in. Feel free to add a bunch of it around the camera module to keep everything dry.
That's it, congratulations on exchanging the camera module and saving yourself a bunch of cash.
ps: I didn't buy the module as I have hopes of getting a replacement component for the camera cctv/cmos/photocel chip, as I believe it is the source of the failure. All other components inside look to be simple resistors/diode/etc that shouldn't go bad.
Here's a quick snap of inside the camera:
Attachments
-
 Backdoor%20trim.PNG17.9 KB · Views: 71
 -
 3.jpg29.3 KB · Views: 83
 -
 1.jpg43.7 KB · Views: 85
 -
 camera%20trim.jpg35 KB · Views: 78
 -
 4.jpg53 KB · Views: 90
 -
 5.jpg66.9 KB · Views: 104
 -
 6.jpg74.5 KB · Views: 81
 -
 7.jpg49.7 KB · Views: 73
 -
 8.jpg40.9 KB · Views: 83
 -
 9.jpg78.7 KB · Views: 109
 -
 11.jpg70 KB · Views: 110
 -
 10.jpg74.3 KB · Views: 74
 -
 12.jpg69.9 KB · Views: 89
 -
 13.jpg72.6 KB · Views: 84


") A regular hairdryer works, but a heat gun is best:
A regular hairdryer works, but a heat gun is best: