
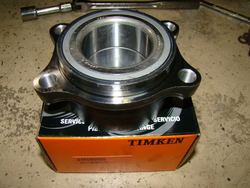
I found my driver side rear wheel bearing has a lot of play and decided to replace it. I bought a Timken BM50005 bearing from RockAuto.com for $96 + $8 shipping and documented the following procedure on how I installed it.
Just so you know, this job will be much easier if you can find a place that sell the bearing & hub already pressed together, but the hub range from $120 to $150 alone.
Once you taken the old hub & bearing assembly off the knuckle, you can also take them and the new bearing to a local shop to have them press it into the bearing for you for about $30 - $40 in my area.

Tools
Just so you know, this job will be much easier if you can find a place that sell the bearing & hub already pressed together, but the hub range from $120 to $150 alone.
Once you taken the old hub & bearing assembly off the knuckle, you can also take them and the new bearing to a local shop to have them press it into the bearing for you for about $30 - $40 in my area.
Tools
- Hammer
- Rubber mallet
- Break bar
- Ratchet
- Torque wrench
- Wrench
- Cheater bar
- Wire brush
- Pb Blaster penetrate
- 14 mm socket
- 19 mm socket
- 32 mm deep wall socket
- Three-jaw puller
- Slide hammer
- Die grinder or Dremel tool and cut off wheel
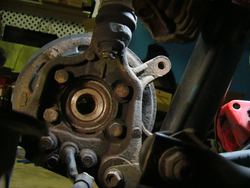
- Start by spaying liberal amount of the PB Blaster penetrate on all nuts and bolts that you will be working on – 32 mm Axle nut, six 14 mm half shaft mounting bolts near the rear differential, two 19 mm caliper bracket bolts and the four 19 mm hub bearing bolts on the back side of the knuckle.
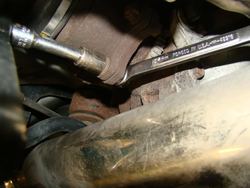
- Loosen the axle nut on the wheel that you will be working on with the car on the ground. Using a 32 mm socket with a break bar, insert a cheater bar (I use the handle bar from my jack) over the break bar to give you the leverage to break loose the 177 ft lb axle nut. The cotter pin at the end of the axle may need to be removed first if it interferes with the 32 mm socket going onto the axle nut. Use a pneumatic impact gun if you have one.
- Chock the front tires, loosen the lug nuts just a bit while the car still on ground, jack up the rear of the car and support it with jack stands.
- Remove the lug nuts and take off the tire.
- Take off caliper & caliper bracket assembly from the knuckle using a 19 mm socket. Use a coat hanger or bungee cord to hang/support the caliper and bracket assembly out of the way.
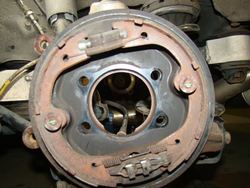
- Take the rotor off the hub. If it stuck/seized onto the hub, give it a couple whacks with a rubber mallet to break it free. Some rotor may have a thread hole that you can insert a bolt of proper size to break it loose from the hub.
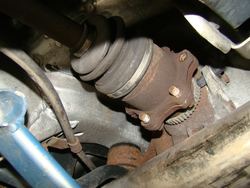
- Properly supported the rear of the car (both tire off the ground) with jack stands, crawl under the rear differential and remove the six 14 mm bolts that mount the half shaft to the differential. You can turn the shaft/wheel such that allows easy access to each of the six 14 mm nut and bolt. Drop the half shaft and support it with a block of wood or jack stand.


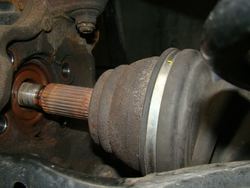
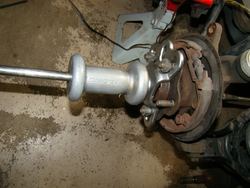
- Take the axle nut off half shaft. Using a rubber mallet to whack the end of the half shaft a couple of times to break it loose from the hub. If it is seized onto the hub, using a three-jaw puller to push the half shaft loose.

- Once the half shaft comes out of the hub, carefully maneuver it off the car and out of the way.


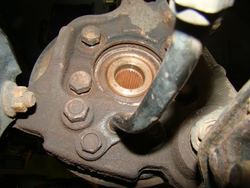
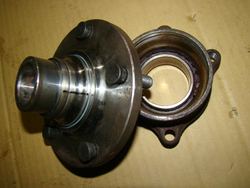
Note: If you decided to take the old hub & bearing assembly and new bearing to a local shop to have them pressed together, do step 10 and skip step 11, 12, 13, 14 & 15. If you decided to press your own bearing, then do step 11, 12, 13, 14, 15 and then step 10. - Remove the wheel bearing housing off the knuckle. Loosen the four 19 mm bolts enough but not complete off the hub; using a hammer and whack each bolt a couple of times to un-seat it off the knuckle. Using a wire brush, clean off any rust and corrosion around the seat.


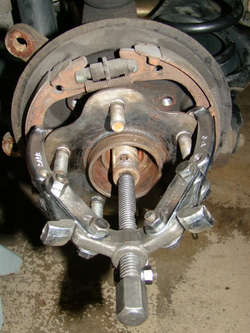
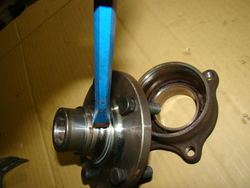
- Attach a slide hammer onto the hub and try to break the hub off the bearing from it housing. I have to give it quite a few hits to break the hub off since my bearing wasn’t as bad as I thought. If your bearing was really bad, a couple of whacks of the slide hammer should break the bearing apart.

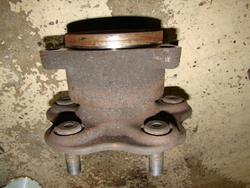
- Once the hub is off the knuckle, remove any part of the bearing that is still attached to the hub. Now, attach a cut off wheel to a die grinder or a Dremel, cut a groove (black line) across the outer race of the bearing, place a chisel on the groove (black line) and whack it with a hammer to crack the race. Once the race is cracked, you can easily chisel it off the hub.


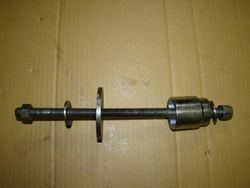
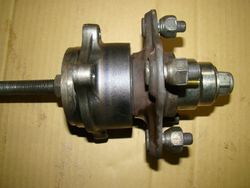
- I put together a simple "press" to press the hub into the new bearing on my own. I have done this many times on different car with great success. My “press” consist of a stick of coarse thread bolt, two thick washers, a large socket and a plate/washer that is big enough to cover the entire bearing. Here is a picture of my press setup.

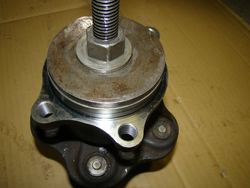
- This is how I setup the new bearing and old hub into my press. I run a thin coat of grease onto the shaft of the hub and set the hub onto the bearing to make sure they’re square, then I start to slowly crank the nut to press the bearing onto the hub. The pictures below shown the bearing was already pressed onto the hub.


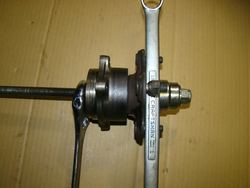
- I thread the lug nuts onto the stud to protect the thread of the stud and stick a wrench to hold the hub while I crank the nut with a wrench to press the bearing into the hub.

- Once the bearing is completely pressed onto hub, mount the hub & wheel bearing assembly onto the knuckle and torque the four hub bearing bolts to 64 ft.
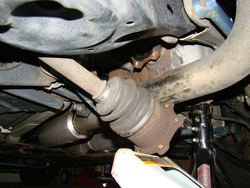
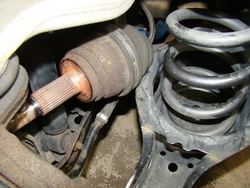
- Maneuver the half shaft back into the hub. Making sure the splines are line up onto the splines on the hub. DO NOT use any force to seat the half shaft into the hub. Just wiggle it in until it is completely through the hub.
- Reinstall the axle nut and tighten as much as possible so that the other end of the half shaft can be easily raised up to the differential mounting point.
- Reinstall the other end of the half shaft back onto the differential and torque the six 14 mm bolts & nuts to 52 ft lb for the FX35 or 87 ft lb for the FX45.
- Reinstall the rotor. Thread a lug onto the stud to hold the rotor in place while reinstall the caliper & caliper bracket. Torque the two 19 mm caliper bracket bolts to 62 ft lb.
- Reinstall the tire. Torque the lug to 85 ft lb. Lower the car to ground and torque the axle nut to 177 ft lb and then install new cotter pin. Note: You may have to take the tire off again to install a cotter pin since the hole for the cotter pin is somewhat deep into the hub that makes it impossible to insert the cotter pin with the tire on.
- You’re done! Go for a test drive.
Attachments
-
 DSC07169.jpg91.4 KB · Views: 446
 -
 DSC07362.jpg68.9 KB · Views: 180
 -
 DSC07146.jpg94.3 KB · Views: 235
 -
 DSC07151.jpg95.7 KB · Views: 240
 -
 DSC07149.jpg114.5 KB · Views: 325
 -
 DSC07155.jpg70.1 KB · Views: 234
 -
 DSC07157.jpg102.2 KB · Views: 204
 -
 DSC07359.jpg104.1 KB · Views: 221
 -
 DSC07159.jpg68.5 KB · Views: 216
 -
 DSC07158.jpg83.5 KB · Views: 217
 -
 DSC07163.jpg86.4 KB · Views: 204
 -
 DSC07162a.jpg99.8 KB · Views: 219
 -
 DSC07347.jpg88.1 KB · Views: 346
 -
 DSC07355.jpg72.2 KB · Views: 292
 -
 DSC07357.jpg52.1 KB · Views: 270
 -
 DSC07348.jpg46.7 KB · Views: 385
 -
 DSC07349.jpg76.8 KB · Views: 271
 -
 DSC07351.jpg67.6 KB · Views: 274
 -
 DSC07350.jpg55.5 KB · Views: 203
")