
You are using an out of date browser. It may not display this or other websites correctly.
You should upgrade or use an alternative browser.
You should upgrade or use an alternative browser.
Copper 2007 FX35 AWD build thread!
- Thread starter 95maxrider
- Start date
- Location
- Los Angeles, CA
- Car
- 05 FX35 RWD
Ask and ye shall receive.
Can you smell the understeer?
Sorry I never responded. I had checked out for a little while. You were killing it out there! & yes, I smell it, but it is what it is. You're able to work it, just need to turn in very early. Fun ride
95maxrider
Member
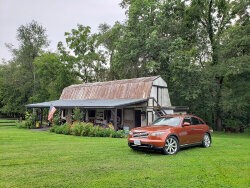
I took a nice pic of the FX in the sun a while back, so here it is:

That is all.
That is all.
- Location
- Los Angeles, CA
- Car
- 05 FX35 RWD
Way better than the rust you usually show us ") . Car looks great & I love that color
. Car looks great & I love that color
. Car looks great & I love that color95maxrider
Member
Way better than the rust you usually show us
Lol, yeah I figured I would mix things up and bit and post something nice for once. Thanks, I'm still in love with the color too.
95maxrider
Member
Looks like I forgot to post an update from right after I did the rust repair and installed the BCs. I had loaded up the FX with the new to me (but used) factory 20" wheels and new Bridgestone tires to get them mounted and balanced. We were going to drop everything off at a local shop, so my wife got in the FX and I hopped in my car so I could bring her home while we waited. I was in my car about to start it up when she started the FX, except it didn't start, it went "GRIND BANG!". Holy crap, I hadn't heard a noise like that before. Did the engine just blow? I rushed out of my car and told her to pop the hood. I opened it up to see smoke wafting up from the firewall area on the driver's side. Crap. I told her to try and start it again, and I could hear the starter doing its normal thing, but nothing was happening and it didn't start. I was pretty worried at this point, but the only thing I could think was that the starter somehow died. A few days later a reman Bosch starter arrived and I got busy.

Since the FX wouldn't start, I couldn't get it in the garage on the lift, so I rolled it down the driveway and had to do it down there.

The job wasn't too bad, but I ran into a problem when I went to hook up the signal wire. The wire was like 2" shorter than the original one and wouldn't reach to connect! So I pulled out the little plastic clip that was securing the wire to the car and that gave me just enough slack to connect it. I didn't have 1 mm to spare! So it was time for the moment of truth, would the car start? I was very nervous. It started! But for the first 10 seconds or so the engine didn't sound right and I wasn't sure what was going on, but it eventually smoothed out and seemed fine. Thankfully we haven't had a problem since, so it seems like we had an explosive case of starter failure.
The FX hasn't seem a whole lot of driving since the pandemic started and we've been working from home, but it does get some occasional exercise. We had a warm day a few weeks ago so I figured I would give it a bath while I could. It still shines up nice, but I do owe it some light paint correction and a proper sealing. But for now, some more clean pics in the sunlight. I love this paint!


So that's it for now. I hope I can get around to doing the ARP wheel studs and 20mm wheel spacers this year, but that should really be it in terms of mods. This is the wife's vehicle after all
Since the FX wouldn't start, I couldn't get it in the garage on the lift, so I rolled it down the driveway and had to do it down there.
The job wasn't too bad, but I ran into a problem when I went to hook up the signal wire. The wire was like 2" shorter than the original one and wouldn't reach to connect! So I pulled out the little plastic clip that was securing the wire to the car and that gave me just enough slack to connect it. I didn't have 1 mm to spare! So it was time for the moment of truth, would the car start? I was very nervous. It started! But for the first 10 seconds or so the engine didn't sound right and I wasn't sure what was going on, but it eventually smoothed out and seemed fine. Thankfully we haven't had a problem since, so it seems like we had an explosive case of starter failure.
The FX hasn't seem a whole lot of driving since the pandemic started and we've been working from home, but it does get some occasional exercise. We had a warm day a few weeks ago so I figured I would give it a bath while I could. It still shines up nice, but I do owe it some light paint correction and a proper sealing. But for now, some more clean pics in the sunlight. I love this paint!
So that's it for now. I hope I can get around to doing the ARP wheel studs and 20mm wheel spacers this year, but that should really be it in terms of mods. This is the wife's vehicle after all
95maxrider
Member
Time to finish up a mod and make a small repair!
I installed that aux input converter box for the stereo a while back, but the finished product left a little to be desired. The (long) cable for it was run out through the glove box then across the dash to the phone perched on the dashboard near the driver. It was not a clean look and I wanted it to look nice, so I wanted to install a real aux input somewhere on the dash. I found one that had good reviews and looked like it was solidly constructed:

After trying different locations, I settled on a hidden one down by the driver's right knee, on the bottom of the dash. It was right under the location where the phone would be, and it was also nearly invisible. However, I had to find a way to actually get it to fit in that area, as the face plate/cover of the dash took up a fair amount of space in the cavity left when it's removed. I double checked that there were no wires in the area, and drilled a hole up from the bottom of the dash, trying to angle it back a little away from where the face plate/cover mounts. This put the adapter inside a part of the dash that was inaccessible, so I got to work with the dremel and made it accessible.
(Sorry for the blurry picture)

You can see the top of the adapter with the cable from the aux converter box on top of it.
With it all buttoned up, the aux port only sticks down about 1/4" and is pretty much invisible when sitting in the seat, and I'm very happy with how it turned out. The port is threaded and comes with a nut, so I was able to tighten that and make it real secure, so it doesn't wobble or move at all when pushing in or removing the cable. The new aux cable that runs to the phone tucks out of the way in the area between the gauge pod and the dashboard, so it doesn't interfere with the wiper stalk or any of the buttons on the center stack.


When we bought the car, there was a tear forming on the driver's seat, and over the last two years it has gotten a little bigger, so I wanted to try and fix it before it got out of hand. Since this is fake leather, it has a fabric backing to it, and I wanted to glue it back to the backing. I decided some contact cement should do the job, so I smeared both sides with the stuff, waited for it to set, and then did my best to press it back together in proper alignment. Once the two sides touch you can't realign them, so I had to get it right on my first attempt. You can tell a repair was made, but it looks better, and more importantly, it should stop the tear from getting worse.


That's all for now. I checked the oil and after about 3,000 miles, it was only 1/3 qt low, which is great! I know these engines like to burn oil, so this was a welcome surprise. When it warms up outside I'll do some more preventative rust repair on the front subframe since I don't like the way it looks.
I installed that aux input converter box for the stereo a while back, but the finished product left a little to be desired. The (long) cable for it was run out through the glove box then across the dash to the phone perched on the dashboard near the driver. It was not a clean look and I wanted it to look nice, so I wanted to install a real aux input somewhere on the dash. I found one that had good reviews and looked like it was solidly constructed:
After trying different locations, I settled on a hidden one down by the driver's right knee, on the bottom of the dash. It was right under the location where the phone would be, and it was also nearly invisible. However, I had to find a way to actually get it to fit in that area, as the face plate/cover of the dash took up a fair amount of space in the cavity left when it's removed. I double checked that there were no wires in the area, and drilled a hole up from the bottom of the dash, trying to angle it back a little away from where the face plate/cover mounts. This put the adapter inside a part of the dash that was inaccessible, so I got to work with the dremel and made it accessible.
(Sorry for the blurry picture)
You can see the top of the adapter with the cable from the aux converter box on top of it.
With it all buttoned up, the aux port only sticks down about 1/4" and is pretty much invisible when sitting in the seat, and I'm very happy with how it turned out. The port is threaded and comes with a nut, so I was able to tighten that and make it real secure, so it doesn't wobble or move at all when pushing in or removing the cable. The new aux cable that runs to the phone tucks out of the way in the area between the gauge pod and the dashboard, so it doesn't interfere with the wiper stalk or any of the buttons on the center stack.
When we bought the car, there was a tear forming on the driver's seat, and over the last two years it has gotten a little bigger, so I wanted to try and fix it before it got out of hand. Since this is fake leather, it has a fabric backing to it, and I wanted to glue it back to the backing. I decided some contact cement should do the job, so I smeared both sides with the stuff, waited for it to set, and then did my best to press it back together in proper alignment. Once the two sides touch you can't realign them, so I had to get it right on my first attempt. You can tell a repair was made, but it looks better, and more importantly, it should stop the tear from getting worse.
That's all for now. I checked the oil and after about 3,000 miles, it was only 1/3 qt low, which is great! I know these engines like to burn oil, so this was a welcome surprise. When it warms up outside I'll do some more preventative rust repair on the front subframe since I don't like the way it looks.
95maxrider
Member
Not much to report on the FX, but we did have a partially seized brake caliper on the rear on the driver's side that was intermittently causing some very strange noises and vibrations on the highway after it rained. The first thing I noticed was excessive brake dust on the wheel, but the strange symptoms showed up not long after that. At first I thought it was a bent wheel or a very out of balance tire, but after getting everything road force balanced (no wheels were bent), the problem remained. I tried just servicing the caliper pins and brake pad shims at first, but that didn't fix it, so I bought a new/reman caliper and installed it.
Visual evidence of the sticking caliper:

The red anti-rattle goo I applied to the back of the pads a few weeks ago had turned black from the excessive heat (the other side was still red):

So it was definitely time for a new caliper. Thankfully the caliper is coated so it should slow down rust.

With that done, I moved onto something I had wanted to do for a long time, which was to install the Sport tail lights. I had picked up a number of them from junkyards, but the early ones were in rough shape and needed to be sanded down and clear coated. But at a recent trip to the junkyard I found a set that were in good shape so I picked them up. After a little mild polishing and waxing they were ready to be installed.


I also picked up some other cool stuff at the yard for the FX but it's not ready yet to be installed, so I'll post that up soon.
Visual evidence of the sticking caliper:
The red anti-rattle goo I applied to the back of the pads a few weeks ago had turned black from the excessive heat (the other side was still red):
So it was definitely time for a new caliper. Thankfully the caliper is coated so it should slow down rust.
With that done, I moved onto something I had wanted to do for a long time, which was to install the Sport tail lights. I had picked up a number of them from junkyards, but the early ones were in rough shape and needed to be sanded down and clear coated. But at a recent trip to the junkyard I found a set that were in good shape so I picked them up. After a little mild polishing and waxing they were ready to be installed.
I also picked up some other cool stuff at the yard for the FX but it's not ready yet to be installed, so I'll post that up soon.
kahlilj
Member
- Location
- Pittsburgh
- Car
- 2006 FX35 AWD
Haven't read this thread in a while. How are your seats? Mine have a tear in the driver's side bottom cushion. For "leather", this has got to be some of lowest quality material I have seen.
95maxrider
Member
Haven't read this thread in a while. How are your seats? Mine have a tear in the driver's side bottom cushion. For "leather", this has got to be some of lowest quality material I have seen.
From what I've seen in FS ads, forum posts, and FXs in junkyards, my seats are well above average, and are generally in great condition. Aside from the tear shown in pics above, there is now a small tear forming on the side of the bottom cushion on the driver's seat, in what appears to be a common location. I'm going to seal it up before it gets any bigger or begins to rip. These tears are not occurring in the leather seating surface, but rather the vinyl material on the sides of the seats.
kahlilj
Member
- Location
- Pittsburgh
- Car
- 2006 FX35 AWD
From what I've seen in FS ads, forum posts, and FXs in junkyards, my seats are well above average, and are generally in great condition. Aside from the tear shown in pics above, there is now a small tear forming on the side of the bottom cushion on the driver's seat, in what appears to be a common location. I'm going to seal it up before it gets any bigger or begins to rip. These tears are not occurring in the leather seating surface, but rather the vinyl material on the sides of the seats.
Mine is in similar condition as you described yours, but it still bothers me. How are you going to seal it? Might be another add to your DIY thread
95maxrider
Member

95maxrider
Member
I've got a question for everyone!
The front subframe/engine cradle in our FX is (you guessed it) kinda rusty. I've been on the lookout for one that's in decent shape at the junkyard that I can clean up and POR15 so I can replace it in one fell swoop. Well today I found one, but it's in a 2004. It's still an AWD FX35, but I thought it looked different than what's in our FX so I didn't pull it. I just got home and plugged in the VIN to check, and apparently earlier FX35s (AWD at least) had a different part number for their front subframes. Old is 54401-CG101, newer is 54401-CM80A. But here's the thing: in the parts catalog, the old one has been superseded/replaced by the new one. Which leads me to believe they're interchangeable. What I'm now curious about is WHY did Infiniti design a new subframe for the later FXs? Did the early ones rust real bad? Where they found to be weak in some areas? Better for crash testing?
Does anyone have any insight as to what's going on with these things?
95maxrider
Member
Hey everyone, I'm back, and I've finally got some stuff worth posting!
The FX has been chugging along as my wife's daily driver, with nothing much more than oil changes and tire rotations. I had been putting off doing the brakes for as long as I could, but she recently went to visit family out of the country for 3 weeks, so I knew I had to take advantage of her car not being needed to take care of things.
First, let's start with a few small things. I never really saw it mentioned anywhere in reviews, or even here on the forum, but Sport models (and V8s?) came with a shadow-finish chrome grille. I'm not sure if it was for all years, or just the 06-08 refresh, but I really liked it when I came across one at the junkyard, so I picked it up.

I was replacing the belts and pullies last spring and decided it would be a good time to clean up and paint the rusty brackets. Unfortunately, all I had was silver spray paint. Still, it's better than rust.


I also scored the wood dash from the 06-08 FX45s at the junkyard and installed it. It's not in perfect condition, but it'll do.
Original:

New

And I installed a new main grounding strap for the engine. Ours was looking pretty corroded. I ordered from Amayama since they were selling it for like $20 versus $120 at InfinitiPartsDeal.com. Amayama rules! I also got all four new OEM end links from them for less than $100 shipped!

The FX has been chugging along as my wife's daily driver, with nothing much more than oil changes and tire rotations. I had been putting off doing the brakes for as long as I could, but she recently went to visit family out of the country for 3 weeks, so I knew I had to take advantage of her car not being needed to take care of things.
First, let's start with a few small things. I never really saw it mentioned anywhere in reviews, or even here on the forum, but Sport models (and V8s?) came with a shadow-finish chrome grille. I'm not sure if it was for all years, or just the 06-08 refresh, but I really liked it when I came across one at the junkyard, so I picked it up.
I was replacing the belts and pullies last spring and decided it would be a good time to clean up and paint the rusty brackets. Unfortunately, all I had was silver spray paint. Still, it's better than rust.
I also scored the wood dash from the 06-08 FX45s at the junkyard and installed it. It's not in perfect condition, but it'll do.
Original:
New
And I installed a new main grounding strap for the engine. Ours was looking pretty corroded. I ordered from Amayama since they were selling it for like $20 versus $120 at InfinitiPartsDeal.com. Amayama rules! I also got all four new OEM end links from them for less than $100 shipped!
95maxrider
Member
I never got any replies to my question about the differences in subframes between 03-05 and 06-08 cars. Well, here's why I was asking.
A recurring topic of this thread has been rust. I've known for a long time that the front subframe on our FX wasn't in great shape. I don't necessarily think it was in danger of splitting in half, but I really hated being under the car and looking at it.


I think part of the reason why it got so rusty is that this car has never leaked a drop of oil!
So I saw an FX at the junkyard with a nice oily subframe, and yanked it. It was from an 03-05, but when I put them side by side I couldn't tell a difference.


It's certainly in better condition than ours was, but that wasn't good enough. I wanted it to be better than new. This allowed me to put my new media blasting system to work, and I had it down to bare metal in no time. Oh, and I also picked up another W brace at the junkyard since it too was in better condition than the one I had "refurbished" 3 or 4 years ago.
Now I know what you're thinking....."This is better than what you've currently got?" Unfortunately, yes, it is.


So anyways, I loaded up my blaster with fine coal slag and got to blasting. It was quite a lot of fun


I'd guess it took me about 3 hours to get them both down to bare metal. Isn't it beautiful?!
Since I last did rust repair on the FX, I learned a hard lesson: POR15 sucks. It sucks real bad. Thankfully, I found something much better to replace it with: Mastercoat Silver and AG111.
Now that I've got a giant air compressor I can spray paint too, which is exactly how I applied the Mastercoat Silver.

I then top coated them with the AG111 for maximum protection.
Here's my old one on the left, with the new one on the right.


To take things a step further, I also sprayed two coats of 3M Cavity Wax Plus on the insides to prevent any rust from forming in places I couldn't paint.

So then it was finally time to swap subframes. Everything was going well until I went to remove the front two nuts holding the subframe to the body. One eventually came off with enough percussive persuasion from Mr. Milwaukee, but the other wasn't budging. So I had to bring out the acetylene.

After heating it up for about a minute the nut came off nice and easy.
The front two posts were in very different condition:


A recurring topic of this thread has been rust. I've known for a long time that the front subframe on our FX wasn't in great shape. I don't necessarily think it was in danger of splitting in half, but I really hated being under the car and looking at it.
I think part of the reason why it got so rusty is that this car has never leaked a drop of oil!
So I saw an FX at the junkyard with a nice oily subframe, and yanked it. It was from an 03-05, but when I put them side by side I couldn't tell a difference.
It's certainly in better condition than ours was, but that wasn't good enough. I wanted it to be better than new. This allowed me to put my new media blasting system to work, and I had it down to bare metal in no time. Oh, and I also picked up another W brace at the junkyard since it too was in better condition than the one I had "refurbished" 3 or 4 years ago.
Now I know what you're thinking....."This is better than what you've currently got?" Unfortunately, yes, it is.
So anyways, I loaded up my blaster with fine coal slag and got to blasting. It was quite a lot of fun
I'd guess it took me about 3 hours to get them both down to bare metal. Isn't it beautiful?!
Since I last did rust repair on the FX, I learned a hard lesson: POR15 sucks. It sucks real bad. Thankfully, I found something much better to replace it with: Mastercoat Silver and AG111.
Now that I've got a giant air compressor I can spray paint too, which is exactly how I applied the Mastercoat Silver.
I then top coated them with the AG111 for maximum protection.
Here's my old one on the left, with the new one on the right.
To take things a step further, I also sprayed two coats of 3M Cavity Wax Plus on the insides to prevent any rust from forming in places I couldn't paint.
So then it was finally time to swap subframes. Everything was going well until I went to remove the front two nuts holding the subframe to the body. One eventually came off with enough percussive persuasion from Mr. Milwaukee, but the other wasn't budging. So I had to bring out the acetylene.
After heating it up for about a minute the nut came off nice and easy.
The front two posts were in very different condition:
Last edited:
95maxrider
Member
So I ground down the rust and applied 3 or 4 coats of the MC silver:


Skipping ahead a bit, here's what it looks like installed:

Except when I went to tighten the new FSB bushings down, one of the bolts for the bracket popped out as I was torquing it down. The threads were ruined and couldn't be rethreaded. So I ordered a M10x1.25 helicoil kit, and installed it. Problem solved! Then I went to torque everything back down again for the FSB bushings, and wouldn't you know it? The freaking stud snapped!

Yup, the stud that's a part of the subframe snapped. How? I haven't the faintest idea. These things are only supposed to be torqued to like 35 ft-lbs.
I came up with a plan to cut the stud out and weld in a new bolt. But as I was drilling out the old stud, I realized I might be able to helicoil it instead. And guess what? It held perfectly when I went to torque everything! Success!
Skipping ahead a bit, here's what it looks like installed:
Except when I went to tighten the new FSB bushings down, one of the bolts for the bracket popped out as I was torquing it down. The threads were ruined and couldn't be rethreaded. So I ordered a M10x1.25 helicoil kit, and installed it. Problem solved! Then I went to torque everything back down again for the FSB bushings, and wouldn't you know it? The freaking stud snapped!
Yup, the stud that's a part of the subframe snapped. How? I haven't the faintest idea. These things are only supposed to be torqued to like 35 ft-lbs.
I came up with a plan to cut the stud out and weld in a new bolt. But as I was drilling out the old stud, I realized I might be able to helicoil it instead. And guess what? It held perfectly when I went to torque everything! Success!
95maxrider
Member
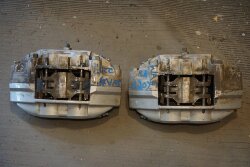
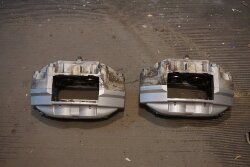
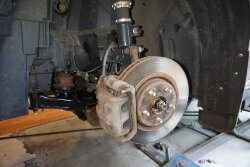
Next up were the brakes. It needed pads and rotors all around, so I figured it would be the perfect time to upgrade to the Akebono 4 piston calipers. I got a set for a decent price, but had to spend a lot of time cleaning them up.


I also picked up a set of SS brake lines, and installed a set of ARP wheel studs. So I went from this:

To this

The calipers came with their original mounting bolts, but they are too long for the 1st gen FX, so I reused the original bolts.

I also replaced the parking brake shoes and hardware.


The mounting brackets for the rear SS lines must have been made for a G35/350Z or something, because they weren't even close to fitting. So I cut them open a bit so I could at least get a bolt through them. Unfortunately, this still left them mounted too low on the body relative to the hard line, so I wasn't able to use the normal retaining clip. In the end, a zip tie took up what little slack there was.


To get the ARP wheel studs to fit in the rear, I had to cut off a few mm from them. Otherwise I would have had to remove the hub from the car, and I was in no mood to mess around with that.
I also picked up a set of SS brake lines, and installed a set of ARP wheel studs. So I went from this:
To this
The calipers came with their original mounting bolts, but they are too long for the 1st gen FX, so I reused the original bolts.
I also replaced the parking brake shoes and hardware.
The mounting brackets for the rear SS lines must have been made for a G35/350Z or something, because they weren't even close to fitting. So I cut them open a bit so I could at least get a bolt through them. Unfortunately, this still left them mounted too low on the body relative to the hard line, so I wasn't able to use the normal retaining clip. In the end, a zip tie took up what little slack there was.
To get the ARP wheel studs to fit in the rear, I had to cut off a few mm from them. Otherwise I would have had to remove the hub from the car, and I was in no mood to mess around with that.
Attachments

95maxrider
Member
I got a little carried away with the media blaster and some small parts from the rear of the vehicle. I really didn't like the look of the RSB end link brackets:

Or the exhaust hanger

Or this little guy

So they all came off and got blasted


And then got painted with the MC Silver

So much better...


Or the exhaust hanger
Or this little guy
So they all came off and got blasted
And then got painted with the MC Silver
So much better...
95maxrider
Member
I also wanted to replace the RSB since ours was looking so rusty, and the bushings were shot. But once again, rust had to make things way more challenging. Even though I had been soaking everything in a variety of penetrating oils, the nuts holding on the RSB bushing brackets were being very difficult. Two came off eventually, but when I went to loosen the other two nuts, I ended up breaking the captive stud loose from the rear subframe, rendering them useless. Thankfully, there's just enough room to snake in a new bolt from the top:

There was no way I was going to be able to remove the end links from their brackets, so I had to cut off their nuts to separate things.

So I was eventually able to remove the RSB from the car, and it was worse than I had thought.


It had actually lost 2mm of thickness in the areas of the bushings!
The old bushings were toast too:

But it all went back together smoothly, this time with plenty of anti-seize!

There was no way I was going to be able to remove the end links from their brackets, so I had to cut off their nuts to separate things.
So I was eventually able to remove the RSB from the car, and it was worse than I had thought.
It had actually lost 2mm of thickness in the areas of the bushings!
The old bushings were toast too:
But it all went back together smoothly, this time with plenty of anti-seize!
Share: