2007 Infiniti FX

Installed GT Spec Mid Chassis Brace.

20140514_220741.jpg

Plenty of clearance for Invidia.
20140514_220810.jpg

But it hangs very low. I've got maybe 4" of ground clearance now in the middle of the car. Already hit it once leaving my building. Just a pic from rear - car has no ground clearance as it is.
20140514_221418.jpg
 

Attachments

  • 20140514_220741.jpg
    20140514_220741.jpg
    58.8 KB · Views: 50
  • 20140514_221418.jpg
    20140514_221418.jpg
    47 KB · Views: 52
  • 20140514_220810.jpg
    20140514_220810.jpg
    68.9 KB · Views: 48
Finally got my car back after accident. This is the cleanest it's been in a while, so I thought I'd take a pic.

image.jpg

And random pic showing the "poke" on the rear wheel. That's how far out 10.5" and +5 offset sticks out.
20140815_160555.jpg
 

Attachments

  • image.jpg
    image.jpg
    163.6 KB · Views: 145
  • 20140815_160555.jpg
    20140815_160555.jpg
    53.2 KB · Views: 63
Thanks. Only downside is that huge amounts of swirls/scratches that I have to take care of. Been lazy up to now, but there are finally enough that I have to deal with it. At least they don't show up in pics.

Love the OB FX. What a beauty. :good:


---------- Post added at 07:13 AM ---------- Previous post was at 07:10 AM ----------

I don't think a 2nd gen is that different. It just has "more" going on so it would take a bit more work I think. But if you were to color match all of the stuff like grill, vents, trim, etc. Then slam it and get wheels, it would look about the same. All of the chrome on the FX is what makes it look busy. And thanks!

Its cars like yours that make me regret getting a 2nd gen. Very clean ride!
 
hey man. i really dig the red cutoffs ypu have in the headlights. any how to's you made or any info on doing this myself would be helpful. does the headlight have to be opened up?
 
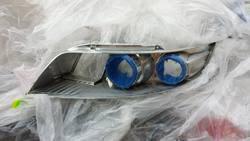
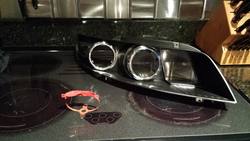
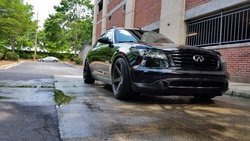
The headlight does have to come apart. I did mine when I decided to black out the chrome. So you just put the headlight in an oven at 225F for 8-10 minutes and pry them open. There are plenty of DIY's on that portion, it's easier than it seems. Just make sure to remove all screws before hand so you can get them open.

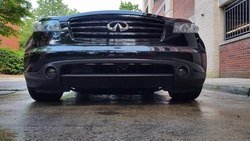
So I started out just wanting to paint them
20130917_182903.jpg

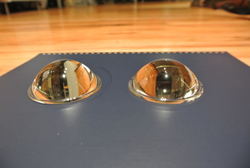
And since they were apart, I replaced the OEM projector lens with the TSX-R lens
DSC_27231.jpg

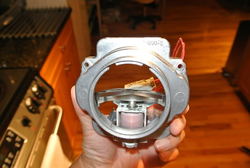
To do that, you have to remove the projector itself from the light. This part is really easy since it's just 4 screws. Then once you remove the lens, you're left with this.
DSC_27261.jpg

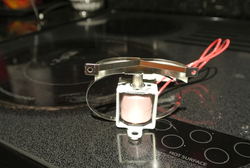
Then you remove the cutoff shield itself. There's just one screw on the bottom holding it in, remove that and it slides out.
DSC_27271.jpg

Final step is to remove just the shield as you don't want to paint the plunger since that is a moving part which turns your high beams on. Then paint that w/ engine paint or other high temp paint. This is probably the hottest part of your headlight since it sits 1.5" in front of the bulb.
20130916_200511.jpg

Then reassemble everything. The magnification of the projector lens is what makes such a small red piece result in the entire lens reflecting red. Light output is not impacted. It's sort of cool pulling up behind other cars and seeing the red reflection in their paint. Makes the car look more aggressive.

The process seems intimidating, but it's really not. I probably had an hour of work in each headlight all in and that includes painting the housings, swapping the lenses and painting the cutoff shield. Getting the headlights out probably takes more time since you have to pull the bumper. Any headlight shop can do this as well.
 

Attachments

  • 20130917_182903.jpg
    20130917_182903.jpg
    67.1 KB · Views: 55
  • DSC_27271.jpg
    DSC_27271.jpg
    73.7 KB · Views: 60
  • DSC_27261.jpg
    DSC_27261.jpg
    66.7 KB · Views: 47
  • DSC_27231.jpg
    DSC_27231.jpg
    42.1 KB · Views: 42
  • 20130916_200511.jpg
    20130916_200511.jpg
    84 KB · Views: 50
No big updates lately. Just maintenance - rotated tires and went slightly more aggressive on spacers. 35mm in rear for +0 offset and 15mm in front for +5 offset. Also installed EBC green rear pads, haven't used them in forever, but I like them. Quieter than what was on there before and nice initial bite. Still on the fence about installing HFC's I've had sitting for 1.5 years now. Don't know if I want the extra noise for the minimal power bump. I think I've finally hit the point where I'm content with how the FX sits and drives. Probably keep it this way with minor updates until I get a new family hauler. Friend keeps offering to let me borrow his X5M and I'm honestly nervous about it. Afraid I'll love it so much and then obsess over it until I get one and it's not a great financial decision. He took me for a ride in his new not even broken in yet (654 miles) GT3 and I can't stop thinking about it. Luckily that one is way out of my income bracket so it won't be reality. But the X5M is feasible.

20150205_171625.jpg

Amazingly, this doesn't rub.
20150205_173323_RichtoneHDR.jpg
 

Attachments

  • 20150205_171625.jpg
    20150205_171625.jpg
    141.2 KB · Views: 53
  • 20150205_173323_RichtoneHDR.jpg
    20150205_173323_RichtoneHDR.jpg
    71.8 KB · Views: 46
Most recent update was the TBW engine splash shield/belly pan. Old one was destroyed due to ride height and tow truck so I've been running without for almost a year now and it's fine except the engine bets dirtier.

It's a nice piece.
20150421_082621.jpg

And in powdercoated black, it's basically invisible.
20150503_161652.jpg

I've scraped it a few times already and it's held up well. Based on the sounds, I thought I did some damage to it, but upon inspection, no damage. Even the powdercoat held up to the impacts. I can see some scratches, but it didn't really go through and it's not chipping or anything.

Just washed it yesterday so might as well post some pics of when it's clean since it never is.


Always like the 3/4 shot to show how concave the wheels are.
20150503_161750.jpg

20150503_161826.jpg
 

Attachments

  • 20150503_161826.jpg
    20150503_161826.jpg
    234.9 KB · Views: 72
  • 20150503_161750.jpg
    20150503_161750.jpg
    220.7 KB · Views: 56
  • 20150503_161652.jpg
    20150503_161652.jpg
    192.7 KB · Views: 59
  • 20150421_082621.jpg
    20150421_082621.jpg
    129.9 KB · Views: 46
Agree with zebra, I love your car. The modifications are less subtle than some of the other cars on here, but they work together so well, and the car just looks so simple because of that.

Still waiting to hear from John on my Belly Pan order. I really need it, my pan is sagging like a pair of old tits.
 
Love the stance, sick

---------- Post added at 04:43 PM ---------- Previous post was at 04:20 PM ----------

BTW, you should get a avatar pic up bro.
 
Thanks guys. I was sort of going for the urban assault look and keeping it aggressive. So everything is pretty much shades of black or grey, inside and out. A neighbor saw it driving down the street and said it looked like the Batmobile and it was so low it looked like the car was floating. The look isn't for everyone.

I just measured the height and for those who car, it's 27.5" fender to ground both front and back. It's 14.25" from fender to wheel center on both front and rear. The rear is maxed out and the front may have more threads left, but I haven't tried.
 
Back
Top