Quad Projectors Possible?

Will do. Tonight is when I pass the point of no return and cut up the factory bezel.

Viperi, looks great. I was going to do the AE but decided to go for a different look. The shrouds I got are slotted for light to pass through so I'm going to put the rings inside the shroud. Nothing will be seen on the outside until they light up. Are you running 2 sets of OEM projectors? Or did you build a dummy projector?

i used 2 sets of oem projectors. yes the back is exposed to the elements but hopefully the dielectric grease will prevent moisture. I love the AE's. i was thinking about going with the shrouds with built in ae slots but wanted to stay oem. i like the look of the yellow ae when its off
 
Cut the bezel today; didn't have to notch it as much as I thought. Just a little bit on the bottom to clear the projector solenoid. Took forever though because I broke all my cutting wheels and had to use my drill and a knife to make all the cuts. Last pic shows the lens cover test fitted for clearance (ignore the haze, I'm in the middle of wet sanding them).

DSC_25851.jpg

DSC_25841.jpg

DSC_25891.jpg
 

Attachments

  • DSC_25851.jpg
    DSC_25851.jpg
    84.1 KB · Views: 28
  • DSC_25841.jpg
    DSC_25841.jpg
    76 KB · Views: 12
  • DSC_25891.jpg
    DSC_25891.jpg
    65.2 KB · Views: 17
It's not that hard to do yourself. It's more intimidating than anything; I took a deep breath before my first cut. But I would say that anyone with a spare set of headlights and any sort of attention to detail could do it. The thought of it is worse than the actual work.

As an update, I totally finished notching the bezel today. I was very close, but it was still bottoming out on one of the projector screws. 1/4" removed w/ dremel and good to go. I'm now measuring the shroud to put there. It's so close to the corner of the bezel that I'll have to do significant trimming to get it to fit. Since I was going to have to mold it anyways, no big deal. I'm happy that I can keep the face of the shroud intact. Turbo and Viperi didn't have this problem because they used OEM projectors and mounted them on the same plane as the original. I'm mounting mine slightly lower because it is actually mounted using the bulb socket for the DRL. I can do this because I'm using a smaller aftermarket H1 projector and I like it because I don't have to cut out the back of the housing, it remains sealed without a lot of custom work. Plus I like the look because there is a slight rake in the projector angle. To me, it gives the front a slightly meaner look.

I'm travelling a lot in the next couple of weeks, but I should have the first projector done late October. The second will be much quicker since I can just mirror the cuts on the first, no trial and error. Hoping to have it all installed before Thanksgiving.

I need to pay somebody to make me a set of these. LOVE them.
 
Mines having moisture issues :S Not sure where its coming from but i suspect 2 entries.
1. from the exposed projector socket in the back ( i put dielectric grease on the bulb and the socket)
2. the oem air vent. i had to cut half of it off to fit projector in.

Weird thing is the moisture is forming where the lense is cool. i silicones around the joints so it cant be from there. Im still hoping its from the high temp silicone not fully cured. will wait a week and see if it still happens
 
Have you tried sealing the back? I've seen where people JB weld the projector in or use aftermarket rubber boots. When you describe the joints, are you referring to the lens? Have you thought about using butyl sealant there since that's what is OEM? I'm planning to add more butyl to reseal.

Maybe bake the headlight to cure the silicone? When I bought my headlights, the inside was slightly hazy because they had been blacked out and I don't think the person who painted them fully cured the paint so it was fuming the inside of the headlight. When I opened them, the smell of paint was bad.
 
yea i added more seal and also siliconed it. i doubt its from the lens joint. Might be from the back where i hacked the housing to put the projector in. not sure. will it off the car in a week if it still happens( elimintaes the wet silicone theory)
 
Cut down one of the aftermarket Gatling Gun shrouds. Now the hard part of molding it to the bezel will start. The big issue is that the shroud isn't that big and the hole for the original DRL is square so I'm trying to figure out my options. I need to cover about 3" of space from the back of the shroud to the bezel. I'll probably use part of the factory reflector there and then make up the gap. With it all painted black, it shouldn't be noticable. The OEM shroud is going to get cut probably right at the step and a matching aftermarket Gatling Gun shroud grafted on. The goal is to have 3 matching shrouds; the front will be left chrome and the rest black.

DSC_27001.jpg

DSC_27031.jpg
 

Attachments

  • DSC_27031.jpg
    DSC_27031.jpg
    94.9 KB · Views: 18
  • DSC_27001.jpg
    DSC_27001.jpg
    82.5 KB · Views: 15
Last edited:
Thanks, I figured I'd document all this since it's my first go around with headlight mods. Before this, I hadn't even opened up a set of lights to paint them, much less cut them up.
 
No updates, I've been out of town for the last 4 days for work. I've also got a marathon coming up in a couple of weeks so I've been spending a lot of time running. But tonight I should have some more progress; planning on cutting the OEM shroud back and beginning to graft the new one on. I hope to have all three of the shrouds done by the end of next week. Then the following week mold in the turn signal (eliminating it in favor of LED's); then finish work and paint. All this for just one headlight... The second one should go much quicker since I'll know where all the cuts need to be. Right now, a lot of time is spent just staring at it and then trying to fit stuff together. Then cut a little bit of material away and try again; rinse, repeat. Without the trial and error, the second headlight will probably take a day or two. My goal is sometime around Thanksgiving; or at least having that time off will allow me significant progress. I'm travelling a lot for work right now which is causing delays.

---------- Post Merged at 07:20 PM ---------- Previous Post was at 09:30 AM ----------

Didn't get as much done today as I wanted; I live in a loft so I do all my work in my closet/laundry room (too much work to go downstairs to my storage unit). Because of the dremel noise, I only get to work until my 4 year old goes to bed. But here's where we're at today.

Had to trim a little more on the shroud to get it to sit perfect. Previously, it didn't sit all the way back on the projector. Also started cutting out the OEM shroud (that's when I had to stop, will finish tomorrow).

DSC_27181.jpg


Here's how much had to be cut out of the shroud for it to sit flush. It's not even because of the way it fits in the headlight. Ignore the roughness, none of this is finished yet.

DSC_27111.jpg

Here's a close up of how the projector sits w/ the OEM bezel. The clearances are tight, I removed as little material as possible.

DSC_27071.jpg

Here's where the cuts are.

DSC_27041.jpg

New shrouds came in the mail today. These are the full size Gatling Gun shrouds I'm using to replace the OEM shroud. I wanted to use the mini's I'm using for the aftermarket projector, but they were a bit small and would look too modified. This pic shows the size difference. And this is one of the reasons this project is going to take a while. I'm ordering things in pieces as I test fit. If I went off of listed dimensions, I'd be ordering the wrong stuff. So basically I order stuff in phases. After fitting one thing, I can fit another. Now I'm just waiting on another set of mini Gatling's for the turn signals. I'm going to swap the OEM fresnel lenses there as fake projectors.

DSC_27201.jpg
 

Attachments

  • DSC_27181.jpg
    DSC_27181.jpg
    77.4 KB · Views: 20
  • DSC_27041.jpg
    DSC_27041.jpg
    56.5 KB · Views: 12
  • DSC_27071.jpg
    DSC_27071.jpg
    53 KB · Views: 11
  • DSC_27111.jpg
    DSC_27111.jpg
    53.8 KB · Views: 14
  • DSC_27201.jpg
    DSC_27201.jpg
    71.1 KB · Views: 20
Still cutting on the OEM shroud. It's hard to remove the front without cutting away a ton of the bezel which would show up after the new one is installed. Taking me forever. As an update, the final set of mini Gatling Gun shrouds is enroute and I'm going to go by The Retrofit Source on monday (right down the street) to get some FX-R lenses and maybe some LED rings.
 
Nice progression. I'm keeping my eyes on this post. Keep the progress and pics coming! :good:
 
I'll keep posting pics as they come. Today was a frustrating one, trying to cut out the OEM shroud is tricky. It's so integrated into the OEM bezel that I can't just cut the face off in an even circle. After breaking about 4 cutting wheels, I've taken to using the dremel and drilling out the top and bottom portions where the shroud and bezel meet. It's the only way to follow the line of the shroud so I can remove it cleanly without messing up the top of the bezel which is visible when the headlight lens is installed. The upside is that I can fill and blend the cut areas after I'm done since I'm painting it again. But I don't think it would be possible to change the OEM shroud and keep the chrome. Then again, most people wouldn't bother changing the OEM shroud, but I can't stand the idea of having shrouds that don't match.
 
Still frustrated by the cutting of the OEM shroud. Getting around the corners is annoying especially since I'm trying to follow the natural lines of the shroud and remove as little material as possible. After breaking a few more cutting wheels, I decided to do something else.

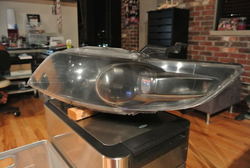
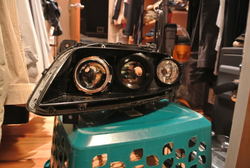
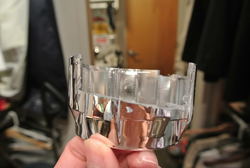
So I went to the Retrofit Source (right down the street from me) and picked up some TSX-R clear lenses. I had wanted FX-R (which apparently they do still have), but since I had post recall projectors, I ended up with the TSX-R. Matt down there was super cool and gave me a tour of their shop which is very impressive. Here's a pic of the TSX-R lens vs. OEM. OEM is on the left, it's very hard to tell the difference, but it is there.

DSC_27231.jpg

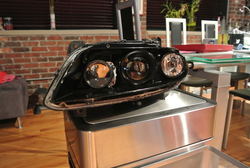
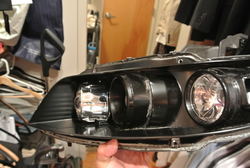
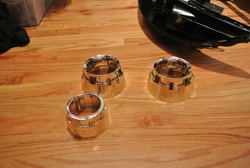
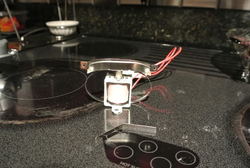
According to Matt, it's a pretty simple mod to install the TSX lens. They're the same size as OEM. So pretty much just pop the projector cover off first. In this pic, you can see the little V shaped portion in front of the projector shield. That has to be removed.

DSC_27261.jpg

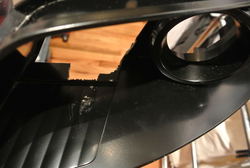
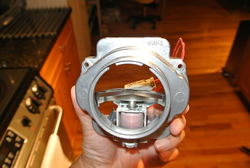
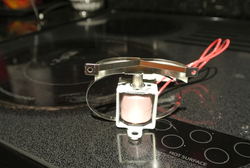
To cut the V shaped piece off, you have to pull the shield from the projector (only held in by 2 screws).

DSC_27271.jpg

And here's what it looks like once you've cut it out.

DSC_27281.jpg

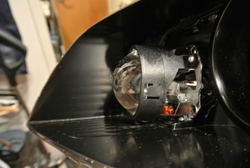
Reassemble and that's it. It honestly took 10 minutes to swap the lens. Since it's apart, I'm going to paint the projector shields for the "demon eye" look.

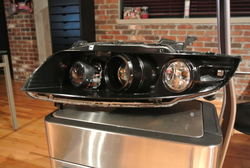
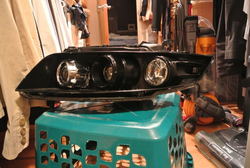
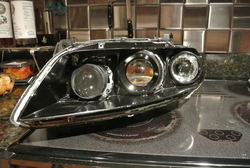
Since I now have a spare set of projector lenses, I'm going to use them in the turn signal location. So it will look like "hexa" projectors. The quads will be functional, the fake ones will be turn signals or DRL's. Here's a quick mock up. It's hard to see and none of the shrouds are on.

DSC_27291.jpg

And for those of you who are thinking about the xB LED rings, I'd highly recommend them. Matt demo'd me a set and they are ridiculously bright. I'm intending to put them behind the shrouds and he was nice enough to use an FX projector w/ Gatling Gun shroud to show me exactly what it will look like. It's much nicer in person than I've seen in pics.
 

Attachments

  • DSC_27261.jpg
    DSC_27261.jpg
    66.7 KB · Views: 18
  • DSC_27231.jpg
    DSC_27231.jpg
    42.1 KB · Views: 13
  • DSC_27271.jpg
    DSC_27271.jpg
    73.7 KB · Views: 17
  • DSC_27281.jpg
    DSC_27281.jpg
    70.5 KB · Views: 15
  • DSC_27291.jpg
    DSC_27291.jpg
    111.4 KB · Views: 14
Last edited:
Nice progression. So did Matt at Restrofit mention of playing (bending the shield after the cut to get a really sharp cutoff line and color? Like your idea of "hexa" projector. Yeah, those xB LED are super bright. I have a set in hand. Just need time to put it in my headlights.
 
Back
Top