Jbaker1121's FX50 updates and photo thread

Updates:

-got K&N drop-in filters for the factory intakes; My stock ones were a little dirty.
-Installed the window roll-up and sunroof close/open modules; returned navigation and fog light modules
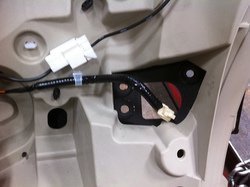
-Wired a switch to ignition to control fog lights independently; the module wiring instructions were incorrect for the newer carsx and my installed did not feel like checking every single wire to see which one it was, so we installed a simple ignition switch.
-installed my box+subs from the old FX into the new one; the Box fits perfectly and I re-tuned the subs by ear and it sounds excellent with the factory system now.
-Still need to install the Radar.
-Will be selling my GTR wheels
-I removed the painted pinstripe at the dealer; took them 2+ hours to do it, with the help of the actual artist..and they Polished the entire car for me while they were at it.
-I'm going to delete the resonators, and patiently wait for coilovers to be avail in the US for the 09+ (by the time my warranty is up)
-My dad and I are going to get a toy to play with so a lot of my modding efforts will be going towards that, and not the FX.

Pictures will be posted in a little bit.
 
Always late with these things but nice ride man......love the color...!!

Looked over all 11 pages.......also saw that your buddy with the G got rid of his Winter tyres :laugh:
Strechted winter dunlops on those varstoens......nice :tup:

Enjoy...!!
 
sweet updates jbaker! Why did you return the nav module?

you need to solder wiring to the actual button, I thought it was all simple plus and play, put wires together....the install would be too much, same with the stupid fogs.

Always late with these things but nice ride man......love the color...!!

Looked over all 11 pages.......also saw that your buddy with the G got rid of his Winter tyres :laugh:
Strechted winter dunlops on those varstoens......nice :tup:

Enjoy...!!

Thanks man!
yeah he finally got rid of them; he actually got a g37 convert. and put the Varstooens on that....

Like I said, pictures will be up soon,. we took a bunch yesterday.


late today I'm going with my father to check out the "project" car aka the new garage queen aka my and my dad's new toy...:tup:
 
ha I was thinking of the same thing with the no-nav mod, rather not deal with possibly messing up the unit=)
 
Don't be turned off by soldering, imo all electrical connections are better off soldered. All of the electrical mods in my car were soldered and I have no worries of them failing.
 
ha I was thinking of the same thing with the no-nav mod, rather not deal with possibly messing up the unit=)

Don't be turned off by soldering, imo all electrical connections are better off soldered. All of the electrical mods in my car were soldered and I have no worries of them failing.
Im worried about taking eveythting apart to get to the actual location to solder; not the soldering itself. It's fne, for the $99 I'll press the damn button each time.:tonguey:
 
so,
I am trying to figure out how to take apart the hatch to get to the reverse lights....its a little harder than on the 1st gen and I already brok eon of the "clips" .....hmm


also, I think I may do a muffler delete and put straights pipes....
 
you won't do it...:wink (2):

Im afraid it will sound like a muscle car which is not what I want...I just want it to have an exotic note and actual have an exhaust note...it too quiet stock.

to get to the reverse lights, just pop the trim off, its only held by 3 bolts, you can't break anything for these, it was extremely easy

wich trim? the black trim on the inside of the hatch where are the 3 bolts for it?
also lookat your pm ;)
 
Im afraid it will sound like a muscle car which is not what I want...I just want it to have an exotic note and actual have an exhaust note...it too quiet stock.


wich trim? the black trim on the inside of the hatch where are the 3 bolts for it?
also lookat your pm ;)

The black "cover" trim that covers the hatch from the inside is only held on by the handle area, three or four push pins near the latch, and two at top corners where the cover is held on, the rest is just snapped in place.

5982031171_9b833d3fdc.jpg
Look at the BLACK portion, theres three holes, from that theres another red snap pin at the end (closest to your license plate area) that holds it, pull the tail light from the left side (farthest away from the license plate area) and it should pop right off if you need to take the reverse lights off.
 

Attachments

  • 5982031171_9b833d3fdc.jpg
    5982031171_9b833d3fdc.jpg
    30.6 KB · Views: 26
The black "cover" trim that covers the hatch from the inside is only held on by the handle area, three or four push pins near the latch, and two at top corners where the cover is held on, the rest is just snapped in place.

5982031171_9b833d3fdc.jpg
Look at the BLACK portion, theres three holes, from that theres another red snap pin at the end (closest to your license plate area) that holds it, pull the tail light from the left side (farthest away from the license plate area) and it should pop right off if you need to take the reverse lights off.

thanks bro Im tackling it tomorrow.

When are we doing Stage 1? lol

When you are all settled in your new shop and have an opening.
 

Attachments

  • 5982031171_9b833d3fdc.jpg
    5982031171_9b833d3fdc.jpg
    30.6 KB · Views: 34
Back
Top