DIY How to Change Climate Controlled Seat Filters

  • Thread starter Thread starter Fire0nic3
  • Start date Start date
Hello,

Do you know if the FX50 S would have the same type of seat filters.

Thanks

Yes, unlike the cabin air filter is different. FX50 comes with the grape one but you can use this better one in the FX35 as well.

The seat filters are a waist of money imo. I bought a pair....they are so expensive and I still haven't needed to replace them because the originals are fine after you clean them with some vacuum.
 
^ Aaron (aka Fire) is the one that originally suggested vacuuming them. Credit goes all to him.
 
Thanks Jonas


I notice these filters are the same filter in my mothers Dyson Slim.Not exactly the same but the same material. So I think they are called HEPA filters or something. With those filters all you do is just brush then off or you can wash and let them dry.
 
Last edited:
Guys, what am I doing wrong? I have the seat in the highest and most forward position, yet I am not even close to being able to reach underneath from the back.

Edit: Never mind. Putting the backrest all the way down gave me the necessary clearance.
 
Last edited:
So here are the filters, showing the cleaned (lighter color) and the dirty (darker color) ones. I vacuumed both after removing them, then GENTLY washed it with water and soft soap; repeated 3 times to get it completely cleaned as you'll see dirty water running when you rinse them. Let them air dry for a couple of days to make sure its completely dry (never install a wet or even a damp filter back in as it attracts more dust and turns into mud).
 
So I gave this an attempt ('15 3.7) and for the life of me could not find or see anything that resembled a filter or filter housing. I feel like I got a pretty good look underneath and saw one round thing that might have been a housing, but it had no give when trying to rotate it. Can someone who has done this maybe post a few photos or extra details? And what intervals do you guys recommend for cleaning/changing these filters? My car has 30K and under the seat was really clean so they are probably in fine shape, but I've noticed the cooling/heating functions are not as strong as they once were (and they were never that strong) so I figured I'd start here and it couldn't hurt.
 
So I gave this an attempt ('15 3.7) and for the life of me could not find or see anything that resembled a filter or filter housing. I feel like I got a pretty good look underneath and saw one round thing that might have been a housing, but it had no give when trying to rotate it. Can someone who has done this maybe post a few photos or extra details? And what intervals do you guys recommend for cleaning/changing these filters? My car has 30K and under the seat was really clean so they are probably in fine shape, but I've noticed the cooling/heating functions are not as strong as they once were (and they were never that strong) so I figured I'd start here and it couldn't hurt.
It's super easy. Hard to take pictures of it though. I tried a few pictures just now on my driver's side. Lift the seat all the way up. See the location of my arm and it's right there. It's a soft white material that you can easily feel.

So in the second picture I'm squatting outside the car with the door open and my right arm is under the seat

I hope this helps.
 

Attachments

  • 20190629_184131.jpg
    20190629_184131.jpg
    107.2 KB · Views: 188
  • 20190629_184713.jpg
    20190629_184713.jpg
    187.7 KB · Views: 183
  • 20190629_184444.jpg
    20190629_184444.jpg
    79.4 KB · Views: 185
  • Screenshot_20190629-185705_Photos.jpg
    Screenshot_20190629-185705_Photos.jpg
    103.7 KB · Views: 176
Last edited:
I AM NOT RESPONSIBLE FOR ANY DAMAGE DONE TO YOUR VEHICLE BY FOLLOWING THIS GUIDE! DO IT AT YOUR OWN RISK! PLEASE DO NOT POST THIS GUIDE NO WHERE ELSE OR MODIFY IT. Email or PM me with any questions you may have ;)


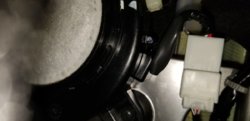
Since all of us 2nd gen owners have climate controlled seats (Cooling & Heating), with more features comes more maintenance. Each climate controlled seat has a circular shaped filter inside of it. The purpose of these filters is to make sure nothing clogs up the blower motor or the perforated holes. Since the blower motor is close to the floor at the bottom of the seat, anything near that area gets sucked up by the seat blow motor. That includes anything on the floor or in the surrounding air. To insure it doesn't screw the system up, there is a filter to make sure nothing get's sucked up.


I recommend and so does the manual and service manual to change these every 24 months or 30,000 miles, which ever comes first. You don't have to change them really, you can just vacuum them off too. I recommend vacuuming them as changing them is just pure OVERKILL. Their made almost like Hepa filters which makes them cleanable. Just don't wash them!! The dealer want's $95+ tax for these too, which in my opinion is a rip off. And don't forget you need one for each seat, which makes them $190+tax. Insane right?:eek.:


Step 1:

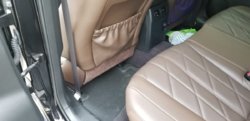
Open lift the front seat position to the most highest elevation posssible. You must do this to be able to get under the seat. Also slide the seat forward.

cimg3034k.jpg


Step 2:

From the back of the front seat, get down on your hands and start sliding your hand under the back of the seat.


cimg3037.jpg


Step 3:

Now this is the most important part. With your hand under the front seat, start feeling around for a circular shaped disc. The circular shaped disc is the filter. You'll feel it once you slide your hand under the seat. It's right next to this big wire which is the side airbag wire. Be careful not to mess with the airbag wire. Anyways now that you know where the filter is, you need to get a hold of it and turn it counterclockwise. It will make a pop sound letting you know it's out.


cimg3039l.jpg


Step 4:

Now carefully slide your hand holding the filter from out under the back of the seat.


cimg3040.jpg


Step 5:

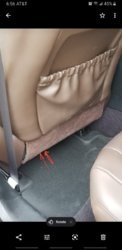
Now do the driver's side now repeating steps 1-4 that I just mentioned.


Step 6:

Now with the filter out, bring it inside of the house and vacuum the filter with a soft brush vacuuming attachment. Using an attachment with a brush will help get the dirt and dust out of the white fibers carefully. Be careful not to tear or rip the fibers of the filter.


cimg3046.jpg


Step 6:

The left side is clean now and the right side is dirty still. It may not look that dirty, but they were. Even the littlest amount of dirt will cause the blower motor to not operate at it's best. The look dirtier in person, but my camera won't pick it up.


cimg3049.jpg


Step 7:

Now go back to the FX and install both the driver's side and passenger's side in the reverse order or removal.


Step 8:

Finally go start up the car and turn both the cooling then heating to test and confirm the air is blowing up through the seat properly.


Now give yourself a good pat on the back!:tup: You've just completed another maintenance thing yourself without blowing $250 at the dealer to have this done. What a difference in the amount of air I feel up my back now. Not only does the cooling part feel colder now, but the airflow is even better than before. The heating is even better now too. I can feel the heat alot more. I have noticed over a period of time they stopped working as good as they use too. This is why you must clean or change these filters. It makes the climate controlled seats work good as new again:biggrin:


On a scale of 1-10 with 10 being the hardest and 1 being the easiest, I'd give this DIY a 2. The only hard part I can think of is getting the filter back on after cleaning or changing it. You have to feel around for the blower motor hole and attach the filter back on. But that's just about it.;)

can OP or anyone else provide pictures, the links /pictures don't work anymore. i have had the filters for a year now that I bought but I think my car (i'm the 3rd owner) didnt have filters on them, so I keep reaching down there and I don't feel the current/old filters that I can take off? and I can't seem to twist the new ones on? some pictures or tutorial would really help, thanks!
 
Not sure if anyone mentioned this, but I found the MOTORCRAFT FS100 part fits and looks pretty much the same. They are around $18 each...they can be bought on amazon or I got mine from rockauto.

20240301_130622.jpg 20240301_130630.jpg 20240301_130632.jpg 20240301_130634.jpg
 
Back
Top