Rear Crossmember

I just tappered (at a machine shop) my euro spec diff cover to match the FX size bolt. That was to change to the nismo diff cover, did not change out the bushing in my diff.
Reason why i'm bringing this thread up from the dead is because i am kinda looking into the whole bushing story of our car. A colleque of mine is distributor here in the netherlands for Superpro Bushings. He has a complete kit in stock for a Z/G and i am eager to find out wich will fit and wich once wouldn't. Was kinda hoping that there already was some more experiance with other areas under the car but i gues nobody realy done this before........
 
I believe the bushings fit, but the mounting bolt is larger, so if there's enough room you'd just need to bore it out. Really not that hard if you have access to a mill.

Looking at this, it's hard to say if there's enough metal that you could remove, however.

attachment.php?attachmentid=18705&d=1326299577.jpg
 

Attachments

  • attachment.php?attachmentid=18705&d=1326299577.jpg
    attachment.php?attachmentid=18705&d=1326299577.jpg
    75 KB · Views: 314
Yes i read about that and can imagine it wouldn't be any issue to adjust the solidt mount. The urethane version your Showing would be another thing. Think the "wall" would become quit thin. But i was talking about all other bushings on our car and where that would be the same as the Z/G's or where it would differ.....

Sent from my GT-I9505
 
Just out of curiosity, how hard is it to drop the rear subframe?
I am wondering if we'd cut of one side of the liquid filled bushing, wouldn't filling it up with 2 part urethane work?
so instead of waiting for a company to setup with something other than a solid aluminum we could just make our own
urethane filled solid mounts. I've fix busted motor mounts with a 60a/80a shore urethane before. Just thinking...
 
I was under the car looking at that just this morning and if you would want to get it out almost everything has to come loose or out i believe. Everything is connected to eachother

Sent from my GT-I9505
 
I will have to take a look later. Otherwise it be impossible to fill horizontally..
edit: I just thought about it. Yeah it'll be really labor intensive: exhaust, I'm sure the springs and shock, etc...
 
Last edited:
I know you need to drop the exhaust, if you have OEM style. I remember them doing that when these guys were replacing one on the Z. I think I have enough room my exhaust to get to it, and your idea isn't a bad one, considering there's not much to lose aside from the cost of the filler. Any more info?
 
DSC00238.jpg
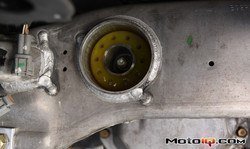
**lets use this picture as a reference**

Forsch Polymer 2 part urethane. Cost around $30 for a 2 part system.
Comes in 40a (soft), 60a, 80a, and 94a (hard) hardness
Working time 25mins
Full cure about 2 days
http://www.forschpolymer.com/images/instruction.pdf

80a would be similar to a full solid polymer bushing, for my previous motor mount I used 60a to minimize vibrations.

Here's an idea..
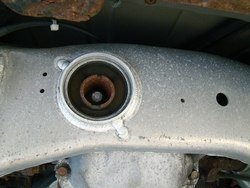
Lets say you take a drill, drill two 1/4 equivalent holes. (1 above the socket eye and 1 below)

Buy 2 cheap ketchup bottles and some 1/4" clear vinyl tubing.
1st bottle fill with some AP cleaner and run thru it from the top hole with your finger plugging the bottom hole so you can fill it all up. Release it and technically it should drain out some of the residue from the old oils. Repeat once or twice more, then run clean water through a couple times to rid of APC residue. Let dry for couple hours.

2nd bottle will contain the 2 part mixed urethane. I would use some masking tape under the bottom hole and cover the subframe from spills of any urethane. With a clean vinyl tube and the 2nd bottle squeeze the urethane with your finger covering the second hole until full. Remove your finger while continuing to feed fresh urethane in to force all air bubbles out of the bottoms one.. Hence the drip tape. It'll have to be watched carefully and if it starts to flow smoothly with no detection of air bubbles, seal the bottom then the top holes. Allow to dry for 2 days.

I am not an expert in this field but with both sides of the original bushing still intact it should mold a near perfect bushing inside.. I think


here is a thread on my350z of two guys doing there tranny mount with the same product.
http://my350z.com/forum/engine-driv...diy-homemade-urethane-transmission-mount.html
 

Attachments

  • DSC00238.jpg
    DSC00238.jpg
    118.4 KB · Views: 97
Last edited:
Cool, thanks! That seems like a good plan. Anything with a quicker cure time? Wouldn't mind sacrificing working time for cure time. 25 mins seems like plenty.
 
Any update on this? I found replacement bushings from SPL for the 350z/g35. I'm curious if this will fit my 06' FX35, as my rear diff hydraulic bushing has now started to leak.

Thank you!
 
I believe the size of the bushing OD is the same, but the size of the bolt mounting the diff is different, and the hole inside the bushing might be too small on the Z/G one.
 
I believe the size of the bushing OD is the same, but the size of the bolt mounting the diff is different, and the hole inside the bushing might be too small on the Z/G one.
I'm curious if you ever came up with a fix for the rear differential mount I just joined the forum and I'm looking for a solution for this I have a 2010 FX 35 with the same problem
 
I'm curious if you ever came up with a fix for the rear differential mount I just joined the forum and I'm looking for a solution for this I have a 2010 FX 35 with the same problem

No, I never did anything. I feel like with the FX having over 130k miles, and 80k of those on the coilovers that it's gonna be a rough ride no matter what and I shouldn't worry too much about something as small as a blown bushing.

That thing with the epoxy still seemed like the best option though.
 
I was hoping for a quick fix but then i looked under my car and realized i need a whole new cross member, ugh, NYC winters have not been kind.

Look at that small crack. Better get it fixed before it gets worse. What kind of pricing am i looking at with infiniti?

Photo Mar 13, 12 17 27 PM.jpg Photo Mar 13, 12 34 30 PM.jpg Photo Mar 13, 12 34 34 PM.jpg
 
Last edited:
Back
Top