
Some of you may have already seen my Dynamat thread, but I wanted to write it up as a DIY with some more step by step for those that want to try this.
I'll start by saying I had never attempted anything like this before, but if you can swing a couple tools, you'll be fine. It seems more scary than it really is. You need a good block of time to knock this out - it took me about ten hours to do all four doors and under the back seat. For the purposes of this DIY, I am covering only the doors.
Tools needed:
Acoustic/insulation mat (I used Dynamat, but many others work as well)
Small flat head screwdriver
Large Phillips head screwdriver
strong scissors or shears
razor blade
rolling tool
cloth/rag
cleaner (I used MAF cleaner because it is safe for plastics).
Sharpie/marker
gloves
The only reference I used was from the FX manual on how to remove and replace the door panels:
View attachment 195648
I started with the passenger side front door.
Remove the armrest handle trim (#5) and the finishing cap behind the door opener (#4). I used the small screwdriver covered with a cloth to pry off one side, then got my fingers behind it and gently pulled the trim off.
Using the large phillips head screwdriver, take out the three screws (#3) just exposed.
At this point I also took out the window/door lock button panel, also with the screwdriver. This makes it easier to remove the wiring harness connector.

Starting at the bottom of the door, pry the finishing door panel out and gently pull out around the perimeter of the door to pop out all the retaining clips. To remove the panel, grab the handle and pull straight up until it comes free.
Now detach each connector from the door panel. There is one above the door pull and one below the speaker grill. I used the small screwdriver to depress the electrical connector catches before sliding them apart.
The door opening cables are still attached and care should be taken not to put pressure on the plastic retainers that hold them in the finishing panel. I propped the panel up next to the door.

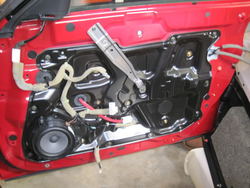
Next, I removed the diagonal brace (2 screws) and clipped off all the plastic harness retainers. I also removed the speaker (3 screws). This allowed me to move the exposed wiring harness out of the way for working on the door.

Next, I cleaned the surface of the door to prepare for the Dynamat bonding. I used MAF cleaner and made sure there wasn't anything visible on the surface. Just a little dust for the most part.
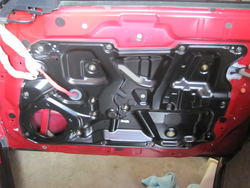
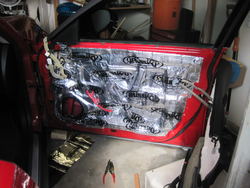
Cutting the Dynamat into pieces easier to work with is recommended. I removed the adhesive backing from the mat and started at the top of the door, working the mat into every nook and cranny as I moved down. I had to use several different items to work the mat into all the corners - I found the butt end of a screwdriver to be pretty helpful. I used the roller for flat areas but it seemed sort of useless if there were any countours - of which there are tons on our doors. Mostly I used my fingers. As I covered a bolt or a hole, I would circle the area with a sharpie to let me know what I was covering. Using a razor, I would cut out small circles around these areas before replacing the panels. When laying down another piece, I tried to overlap the mat by about a 1/4" and made sure to press down the seams.

Next, I replaced all the harness retainers and put back the speaker, cross brace, and routed the wiring harness. Don't overtighten these screws - you can strip out the hole in the door frame with too much torque.
Next I moved the finishing panel back into position so I could re-attach the wiring connectors. You might want to test all the electrical functions to make sure you re-attached everything properly. Otherwise you'll have to take the door panel off again.
After putting the finisher panel back on by hanging the top on the door and pushing down, the retaining clips lined up and popped back in with a light bump of my fist. I was surprised how easy it was to put them back on.
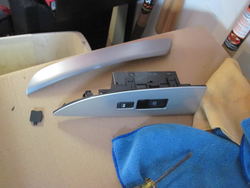
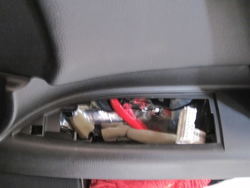
Here's a shot before I re-attached the button panel:

Attached the button panel connector and pressed the assembly back into place.
Then the three screws were installed beind the handle trim and finishing cap.
Finally the trim & cap were snapped back into place.
It was a good bit of work, but just takes patience - not very much skill. The front driver side door went more quickly just because of my experience on the passenger side door.
I repeated this exact same process for the rear doors with a couple of differences:
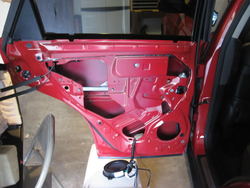
Removing the rear panels are exactly the same as removing the fronts. The rear doors have openings in the frame that required Nissan to put in a vapor barrier and foam to block noise:

Knowing that the Dynamat will perform the same function (only better) I completely removed the plastic liner and foam, along with the diagonal brace, wire harness retainers and the speaker.

This presented me with an opportunity to place some dynamat INSIDE the door - against the outer skin. Working through the holes in the frame and using smaller peices, I covered about 75% of the interiror of the door. I didn't try to cover internal structural members or smaller brackets.
Then I covered the door as I did with the fronts, completely covering the open holes. For the speaker I covered the entire area and then trimmed out the opening with a razor, leaving a perfect cut-out.
Once again the retainers, wires, brace, speaker, door panel & trim pieces were replaced.
After completing the four doors, there was enough mat remaining to install under the back seat. I would guess I used approximately 25 square feet on all four doors (including a partial double layer on the back doors due to the internal application).
I'll start by saying I had never attempted anything like this before, but if you can swing a couple tools, you'll be fine. It seems more scary than it really is. You need a good block of time to knock this out - it took me about ten hours to do all four doors and under the back seat. For the purposes of this DIY, I am covering only the doors.
Tools needed:
Acoustic/insulation mat (I used Dynamat, but many others work as well)
Small flat head screwdriver
Large Phillips head screwdriver
strong scissors or shears
razor blade
rolling tool
cloth/rag
cleaner (I used MAF cleaner because it is safe for plastics).
Sharpie/marker
gloves
The only reference I used was from the FX manual on how to remove and replace the door panels:
View attachment 195648
I started with the passenger side front door.
Remove the armrest handle trim (#5) and the finishing cap behind the door opener (#4). I used the small screwdriver covered with a cloth to pry off one side, then got my fingers behind it and gently pulled the trim off.
Using the large phillips head screwdriver, take out the three screws (#3) just exposed.
At this point I also took out the window/door lock button panel, also with the screwdriver. This makes it easier to remove the wiring harness connector.
Starting at the bottom of the door, pry the finishing door panel out and gently pull out around the perimeter of the door to pop out all the retaining clips. To remove the panel, grab the handle and pull straight up until it comes free.
Now detach each connector from the door panel. There is one above the door pull and one below the speaker grill. I used the small screwdriver to depress the electrical connector catches before sliding them apart.
The door opening cables are still attached and care should be taken not to put pressure on the plastic retainers that hold them in the finishing panel. I propped the panel up next to the door.
Next, I removed the diagonal brace (2 screws) and clipped off all the plastic harness retainers. I also removed the speaker (3 screws). This allowed me to move the exposed wiring harness out of the way for working on the door.
Next, I cleaned the surface of the door to prepare for the Dynamat bonding. I used MAF cleaner and made sure there wasn't anything visible on the surface. Just a little dust for the most part.
Cutting the Dynamat into pieces easier to work with is recommended. I removed the adhesive backing from the mat and started at the top of the door, working the mat into every nook and cranny as I moved down. I had to use several different items to work the mat into all the corners - I found the butt end of a screwdriver to be pretty helpful. I used the roller for flat areas but it seemed sort of useless if there were any countours - of which there are tons on our doors. Mostly I used my fingers. As I covered a bolt or a hole, I would circle the area with a sharpie to let me know what I was covering. Using a razor, I would cut out small circles around these areas before replacing the panels. When laying down another piece, I tried to overlap the mat by about a 1/4" and made sure to press down the seams.
Next, I replaced all the harness retainers and put back the speaker, cross brace, and routed the wiring harness. Don't overtighten these screws - you can strip out the hole in the door frame with too much torque.
Next I moved the finishing panel back into position so I could re-attach the wiring connectors. You might want to test all the electrical functions to make sure you re-attached everything properly. Otherwise you'll have to take the door panel off again.
After putting the finisher panel back on by hanging the top on the door and pushing down, the retaining clips lined up and popped back in with a light bump of my fist. I was surprised how easy it was to put them back on.
Here's a shot before I re-attached the button panel:
Attached the button panel connector and pressed the assembly back into place.
Then the three screws were installed beind the handle trim and finishing cap.
Finally the trim & cap were snapped back into place.
It was a good bit of work, but just takes patience - not very much skill. The front driver side door went more quickly just because of my experience on the passenger side door.
I repeated this exact same process for the rear doors with a couple of differences:
Removing the rear panels are exactly the same as removing the fronts. The rear doors have openings in the frame that required Nissan to put in a vapor barrier and foam to block noise:
Knowing that the Dynamat will perform the same function (only better) I completely removed the plastic liner and foam, along with the diagonal brace, wire harness retainers and the speaker.
This presented me with an opportunity to place some dynamat INSIDE the door - against the outer skin. Working through the holes in the frame and using smaller peices, I covered about 75% of the interiror of the door. I didn't try to cover internal structural members or smaller brackets.
Then I covered the door as I did with the fronts, completely covering the open holes. For the speaker I covered the entire area and then trimmed out the opening with a razor, leaving a perfect cut-out.
Once again the retainers, wires, brace, speaker, door panel & trim pieces were replaced.
After completing the four doors, there was enough mat remaining to install under the back seat. I would guess I used approximately 25 square feet on all four doors (including a partial double layer on the back doors due to the internal application).
Attachments
-
 IMG_5665.jpg73.4 KB · Views: 102
 -
 IMG_5666.jpg90.3 KB · Views: 126
 -
 IMG_5667.jpg79.2 KB · Views: 300
 -
 IMG_5668.jpg107.9 KB · Views: 110
 -
 IMG_5669.jpg60.6 KB · Views: 72
 -
 IMG_5671.jpg80.4 KB · Views: 150
 -
 IMG_5672.jpg82.2 KB · Views: 161
 -
 IMG_5665.jpg73.4 KB · Views: 110
 -
 IMG_5666.jpg90.3 KB · Views: 94
 -
 IMG_5667.jpg79.2 KB · Views: 102
 -
 IMG_5668.jpg107.9 KB · Views: 81
 -
 IMG_5669.jpg60.6 KB · Views: 74
 -
 IMG_5671.jpg80.4 KB · Views: 85
 -
 IMG_5672.jpg82.2 KB · Views: 80
 -
 IMG_5665.jpg73.4 KB · Views: 75
 -
 IMG_5666.jpg90.3 KB · Views: 76
 -
 IMG_5667.jpg79.2 KB · Views: 89
 -
 IMG_5668.jpg107.9 KB · Views: 83
 -
 IMG_5669.jpg60.6 KB · Views: 79
 -
 IMG_5671.jpg80.4 KB · Views: 79
 -
 IMG_5672.jpg82.2 KB · Views: 85
 -
 IMG_5665.jpg73.4 KB · Views: 102
 -
 IMG_5666.jpg90.3 KB · Views: 71
 -
 IMG_5667.jpg79.2 KB · Views: 83
 -
 IMG_5668.jpg107.9 KB · Views: 97
 -
 IMG_5669.jpg60.6 KB · Views: 72
 -
 IMG_5671.jpg80.4 KB · Views: 70
 -
 IMG_5672.jpg82.2 KB · Views: 89
 -
 IMG_5665.jpg73.4 KB · Views: 79
 -
 IMG_5666.jpg90.3 KB · Views: 67
 -
 IMG_5667.jpg79.2 KB · Views: 86
 -
 IMG_5668.jpg107.9 KB · Views: 85
 -
 IMG_5669.jpg60.6 KB · Views: 83
 -
 IMG_5671.jpg80.4 KB · Views: 63
 -
 IMG_5672.jpg82.2 KB · Views: 72
