Jumbo's exterior care

jumbosrule

Fully FX Invested
Premium
Car
2003 FX35T
Name
Brad
When I first got the FX back in 2004, I thought the paint was amazing. The Laser Red from Infiniti just seems to pop like no other red I have seen.

The FX is the first car I have ever cared enough about to want to spend time on the exterior. For the first few years I used drive through car washes. It wasn't until I joined this forum that my understanding of "detailing" took on a new meaning. Before, detailing was just paying some dude to wash my car really, really well. Inside and out for about $100.

Now I understand much better about "proper" paint care and what it takes to do it right. Thanks in no small part to Andrew, "Big A" for his detailed write ups and posting in this section. Clay bar, swirl marks, paint correction, polish, glaze, sealant... all new terms added to my detailing vocabulary over the past couple years.

Since learning a bit more I have stopped going to drive through washes. Now, only I wash my car and only microfiber touches the paint. I use the mainstream products applied by hand with good success - Meguire's, Mothers, Turtle, etc. Only one time last year did I pay for a real paint correction detail. I was amazed with the results and decided for not much more than two or three detail sessions, I could buy all the gear and learn how to do it myself.

To this point I have never wanted a machine polisher - mostly because I was scared to do more damage than good. Recently something changed. I got a 1995 project car that has BIG paint issues and I have no problem teaching myself on paint like that. Seriously I can't make it much worse. Once I am comfortable, then I will try my hand on the FX. I've been motivated to get good enough at it to recognize mistakes and how to correct them.

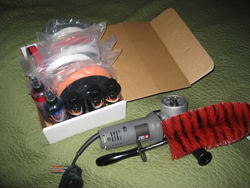
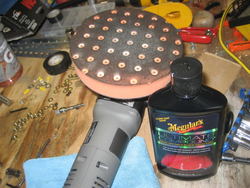
So for the purposes of discussion and sharing experience from the novice detailer, this is my new detailing setup.

I ordered this yesterday from Autogeek.

http://www.autogeek.net/hk7424.html
Porter Cable 7424XP
CCS Lake Country pads - Orange, White, Red

http://www.autogeek.net/sonus-car-care.html
Sonax SF-1 restore polish, SF-2 swirl remover, and SF-4 paint sealant

Some of the other products that I have found over the years will stay on my shelf till I find something better. All of these do the job for me. I like that they are available at most autoparts stores because I can browse.

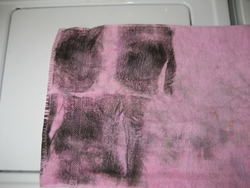
Pile-o-microfiber towels, machine washed separately
California duster
Daytona wheel brush
Turtle wax car shampoo
Sheep's wool wash mitt
Turtle wax liquid wax cleaner
Meguire's NXT paste wax
Meguiars Gold Class Endurance High Gloss Tire Gel
Meguire's Plastic-X (headlights & taillights)
Mother's Back to Black (trim & plastics)

Still looking for a product that I like better than my current Clay bar and also a decent wheel cleaner.

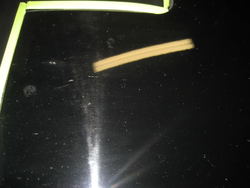
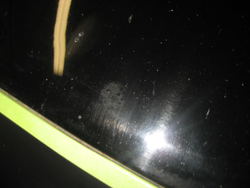
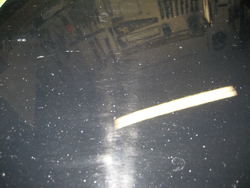
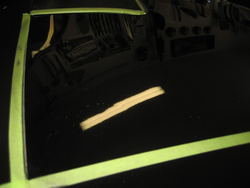
Since I had the paint professionally detailed, maintenance and upkeep has kept her looking great. The only thing I wish I could handle is water spots on a recently washed car. They don't seem to want to come off the paint without clay barring, which is a real pain to do more than a couple times a year.
 
Autogeek is a great site to purchase auto detailing and cleaning products. I have purchased a few items from there in the past. Here's another great site I like to browse when I'm bored and want to read up more on auto detailing:

http://www.autopia.org/
 
Sounds like you found a new appreciation to paint and detailing. I didn't care so much about my paint before, until I got my Liquid Copper FX. There is a certain metallic luster to the paint that is beautiful when polished right. Let us know if there are any tips and tricks you pick up while learning this new skill. I've always wanted to try polisher/buffer, but never had the balls to try it on my FX. btw, i read in one of big A's detailing posts that the California duster is a big no no.
 
Sounds like you found a new appreciation to paint and detailing. I didn't care so much about my paint before, until I got my Liquid Copper FX. There is a certain metallic luster to the paint that is beautiful when polished right. Let us know if there are any tips and tricks you pick up while learning this new skill. I've always wanted to try polisher/buffer, but never had the balls to try it on my FX. btw, i read in one of big A's detailing posts that the California duster is a big no no.

Yeah I read that as well. It's just SO easy and useful here in the great Texas state of perpetual pollen. Yes, I'm dragging the duster across the paint but not with any pressure and I don't see any swirl marks being made after use. If the weather has been perfectly dry since my last wash, I dust her each morning. If it has rained at all, then I don't dust because the results are streaky and almost worse than before.

And I love your Liquid Copper color up close - it really is nice. Probably my second favorite FX color. :wink:

Will definitely try to photodocument my learning process along the way. It will probably help me get better with the camera too. Capturing swirl marks on the camera is not an easy thing to do!
 
I too use a California Duster on all my other cars. Just drag it in one direction and don't put any pressure on it. It works well for me.
 
I want to learn how to properly wash my car because the past 2 cars I've owned i wash each a maximum of 2 times a year and each was just a drive threw car wash:tonguey:. When i first got my fx i washed it that following weekend and wow that sapphire really POPPED! Now I've been washing her every weekend even though its pollen season and the next she will be yellow again :tdown:. So maybe i could come take a look at your setup and get some pointers from you? Also i want to get my fx done by a professional so that i can just upkeep his work and my car will look so pretty, where did you go to get it professionally detailed at and how much if you don't mind me asking?
 
I want to learn how to properly wash my car because the past 2 cars I've owned i wash each a maximum of 2 times a year and each was just a drive threw car wash:tonguey:. When i first got my fx i washed it that following weekend and wow that sapphire really POPPED! Now I've been washing her every weekend even though its pollen season and the next she will be yellow again :tdown:. So maybe i could come take a look at your setup and get some pointers from you? Also i want to get my fx done by a professional so that i can just upkeep his work and my car will look so pretty, where did you go to get it professionally detailed at and how much if you don't mind me asking?

Yeah man, I'm always happy to get together when it comes to the FX! Let's set something up. Seems like we have a couple things lined up to get done.

If there has been no weather to make the paint dirty, I'll just go over the car with a quick detailer. Otherwise I wash about three times a month or more if convenient.

The detailer I used is a local guy named Dave. His biz is called Road Rage Detail - I can PM you his number if you want it.
 
Jumbo - good topic from the "novice" perspective. I too have had a long term hesitation to not touch a power buffer myself. I like your 1st post about trying the process on a lesser test vehicle. I'm tempted to buy a buffer and get that learning curve out of the way on my truck.
California Car Duster - I only use it on garage dust and car cover dust, and never outside dirt. It works very well when used correctly. I use their water blade (with my chamois) to dry the car quicker to minimize water spots.
Have you tried or had any success with Laser Red touch up paint? I'm really really concerned about finding the correct 03-04 match. Another one of those "more harm than good" things.

Ok so I'm glad you posted - you reminded me of two other things I do I forgot to mention.

First thing. In the past I used a synthetic chamois for drying, and a water blade on the glass only. Both of those things have been traded in for my leaf blower and a couple of small microfiber towels. It's faster, easier and safer for the paint. Like I said, nothing touches the paint besides microfiber. The only exception I can think of is my sheep's wool wash mitt. Though I have been thinking about switching to a synthetic/microfiber mitt.

Yes, I use the OEM touch up paint on all rock chips. If you call up Infinitipartsusa and talk to a rep, they should be able to actually use your VIN number to find the right paint code.

No matter how carefully you apply touch up paint, it dries looking like crap. Literally. Like a tiny bird crapped on your car in the appropriate color. But I do it anyway to prevent oxidation from taking hold in that chipped spot.

The KEY to making the touch up paint look flawless is the ability to wetsand and then polish out the area. To this point I dabbed it on there and let it dry. When I saw my detailer for the first (and only) time, I showed him the rock chip repairs and he demonstrated wetsanding and polishing it out on a chip I had painted. Couldn't see it at all when he was done. The downside? It took him about 20 minutes. For one single rock chip. The challenge was blending in the wetsanded area with the rest of the paint so you can't see there is a repaired area.

Wetsanding is absolutely something I'll try on the project car. There are something like 200 rock chips on it just begging to be repaired. I might actually have to do all of them before I am comfortable doing it on the FX. Guess we will see how it goes.
 
Yeah man, I'm always happy to get together when it comes to the FX! Let's set something up. Seems like we have a couple things lined up to get done.

If there has been no weather to make the paint dirty, I'll just go over the car with a quick detailer. Otherwise I wash about three times a month or more if convenient.

The detailer I used is a local guy named Dave. His biz is called Road Rage Detail - I can PM you his number if you want it.

Yes please send me Dave's # if you don't mind, thanks brad. Also let's try and set something up as far as a fx meet or just you and i having a lil video session.
 
if you dont mind me throwing this in.. after I'm done washing my car, i take the spray nozzle off and have a steady stream of water onto the car. Most of the water slides right off leaving just a little to be dried off manually.

btw, Autogeek is a great place! They used to throw in trial size samples with my orders. Let me know when yall meet up, detailing get togethers are fun! lol
 
All my new gear arrived yesterday. I'm ready to attack the Miata!

IMG_3098.jpg

For the first time since I owned the car, I decided to give her a deeper cleansing than I had before. Till now, she was just getting regular washes, waxes and quick details. This past weekend I decided to try cleaning just the hood.

I started with just a normal wash, then went on to a liquid wax cleaner. Obviously nothing like this had ever been done because the terrycloth towel I was using turned BLACK. Not from paint color, but from surface contaminants embedded in the paint. I used the wax cleaner three times - until I stopped seeing color on the clean towel.

These three passes took all the time I had for the day so I stopped after laying down a quick protective layer. Honestly I was amazed at the difference in shine and gloss just from the cleaner wax and I have not even tried the clay bar yet!

I tried to take some photos but need to spend some time figuring out light conditions and how to actually capture the surface of the paint with my particular camera. If you guys can't see before/after shots, it sort of defeats the purpose of this thread.

This shot is on the passenger side fender and hood. The white blurry spots you see are rock chips AND paint overspray. I didn't even realize there was overspray on the car till I got the hood this clean. I can easily see both silver and black overspray sitting on the surface of the paint in various areas.

The finish on the hood is so much more reflective after just the cleaning. The fender is reflecting the sky and part of my house, which is why it looks blue/white in the photo. Again sorry for the photo quality. I'll try to get better. Might have to take yet another cue from Big A and get some Halogens set up inside the garage to control the light and angles.

IMG_3096.jpg

I think my current focus needs to be getting good "before" photos. Once I capture the challenges on film, then I can start trying to fix them.
 

Attachments

  • IMG_3098.jpg
    IMG_3098.jpg
    95.8 KB · Views: 19
  • IMG_3098.jpg
    IMG_3098.jpg
    95.8 KB · Views: 44
  • IMG_3096.jpg
    IMG_3096.jpg
    21.5 KB · Views: 17
  • IMG_3096.jpg
    IMG_3096.jpg
    21.5 KB · Views: 18
Last edited:
hey man, just a tip on touching up chips & then wet sanding them flat... it's very important that the whole orifice of the chip is 100% clean & wax free inside as you fill the void with touch up paint, otherwise wet sanding & polishing can remove the touch up easily & give less than great results... 2 things that work well is 1, scratching the inside of the chip clean with the pointy corner of a razor blade to promote adhesion & second is wiping the chip out with a solvent type cleaner right before touching up... if the chip is touched up well & sanded well, especially on a solid non metallic like your red it can really be just about invisible but yeah, like you said, a lot of work to polish it out to that point.
 
Thanks John, great tip. Makes sense of course - the key to any good paint job is the prep.

I have a bunch of chances to practice - some areas have 10-12 rock chips in a 6"x6" area so I can take advantage of repairing the whole area. Other areas have loner chips that will force me to practice blending the smaller wetsanded area.
 
So I washed the FX this afternoon and used my Daytona wheel brush for the first time. Easy to use but it tends to throw water around with the bristles. You still have to dry the wheels by hand so I'm not sure how much time it really saves.

I really wanted to take the next step with the Miata. Since I washed it last weekend it collected a good bit of pollen and dust, so after I was done with the FX, I re-washed and dried just the Miata hood.

After the wash and dry, I decided to try the liquid wax cleaner one more time for kicks. This was the rag after using it on four clean sides - only on the hood. Keep in mind this is AFTER a wash and cleaner wax last week and another wash and cleaner wax five days later!

IMG_3101.jpg

After this was done I rinsed off and dried and then I went for a clay bar session.

I must have gone over the hood three times, kneading the clay about 10 times per pass. From the first time to the third time the clay pulled out less contaminants each pass but when I finished I felt like I could do another two or three passes before I might stop seeing color on the clay. I'm afraid if I don't keep cleaning, I'll be fouling up my new foam polishing pads when I begin using them.

I taped off one section of the hood and brought the car inside to see if I could get better photos of the paint. Getting better but still not satisfied with the photo quality.

You can see the remains of petrified bird-crap that was left on the hood which allowed the nitric acid to eat into the top coat. You can also see where the previous owner used steel wool to try to remove the oxidation.

IMG_3107.jpg

Bird oxidation, overspray, rock chips, swirls and scratches - oh my!

IMG_3104.jpg

IMG_3105.jpg

Taking a break for now but I might bust out the rotary polisher for the first time later tonight or tomorrow.
 

Attachments

  • IMG_3101.jpg
    IMG_3101.jpg
    80.3 KB · Views: 33
  • IMG_3104.jpg
    IMG_3104.jpg
    49.4 KB · Views: 24
  • IMG_3104.jpg
    IMG_3104.jpg
    49.4 KB · Views: 31
  • IMG_3107.jpg
    IMG_3107.jpg
    38.1 KB · Views: 16
  • IMG_3107.jpg
    IMG_3107.jpg
    38.1 KB · Views: 15
  • IMG_3101.jpg
    IMG_3101.jpg
    80.3 KB · Views: 15
  • IMG_3105.jpg
    IMG_3105.jpg
    72.4 KB · Views: 22
  • IMG_3105.jpg
    IMG_3105.jpg
    72.4 KB · Views: 17
Last edited:
Well, I put the machine to the paint. After finishing up with the first cut, I could tell I was not being aggressive enough. After wiping off the Sonus product, I could see an improved gloss, but the paint contamination went deeper than the pad and polish was able to cut, even after three passes.

I went out for some polishing compound and came back with Meguire's ultimate compound. After two passes with the polisher, I can see improvement, but still isn't cutting deep enough I think.

After using the Sonus products, the pad stopped picking up color. That makes sense since they are not cutting very much. Below is my first pass with the Meguire's compound. Color on the pad means cutting, which is good.

IMG_3125.jpg

Shot of the paint now - once again my camera isn't showing the detail like I wish it would. Much improved over the cleaned surface. But I'm not happy yet.

IMG_3126.jpg

Think I need a more aggressive pad and maybe a more aggressive compound as well.
 

Attachments

  • IMG_3126.jpg
    IMG_3126.jpg
    29.4 KB · Views: 19
  • IMG_3126.jpg
    IMG_3126.jpg
    29.4 KB · Views: 15
  • IMG_3125.jpg
    IMG_3125.jpg
    100.6 KB · Views: 30
  • IMG_3125.jpg
    IMG_3125.jpg
    100.6 KB · Views: 27
Last edited:
A brief thread diversion? Each time I see this title come up "Jumbos exterior care" I think its going to be a picture of Brad is the shower soaping up. NOT that it makes me want to open it all up or anything :eek.: but it makes me laugh just a little bit. Sorry B, carry on brother.......
 
Back
Top